Showing posts with label Active Directory. Show all posts

11 May 2021

Export Group Policy (GPO) to a File

 I recently needed to export a list of all GPOs within a client's environment to HTML file.  Rather than going through each one individually and exporting out, I used this simple PowerShell command to get the job done.

I create a new folder called GPOExport within C: root (C:\GPOExport), then ran the following command:

Get-GPO -all | % { Get-GPOReport -GUID $_.id -ReportType HTML -Path "C:\GPOExport\$($_.displayName).html" }

08 January 2019

Hybrid O365 User Creation

Here's a simple script created by a colleague of mine, for creating a new user account and assigning an O365 mailbox. 

$Users = Import-Csv -Path "C:\Users.csv"
$OU = read.host "What OU would you like the users created in?"       
$domain = read.host "What is your domain?"
$Password = read.host "What password would you like to set all accounts to?"     
foreach ($User in $Users)            
{            
    $Displayname = $User.Firstname + " " + $User.Lastname            
    $UserFirstname = $User.Firstname            
    $UserLastname = $User.Lastname            
    $SAM = $User.Username          
    $UPN = $User.Firstname + "." + $User.Lastname + "@" + $domain
    $Mobile = $User.Mobile
    $Home = $User.PersonalEmail
    New-ADUser -Name "$Displayname" -DisplayName "$Displayname" -SamAccountName $SAM -UserPrincipalName $UPN -GivenName "$UserFirstname" -Surname "$UserLastname" -AccountPassword (ConvertTo-SecureString $Password -AsPlainText -Force) -Enabled $true -Path "$OU" -ChangePasswordAtLogon $false –PasswordNeverExpires $true -MobilePhone $Mobile -HomePhone $Home
    $RemoteRouting = "smtp:" + $UPN
    Enabled-RemoteMailbox $SAM -RemoteRoutingAddress $RemoteRouting
}

The script will prompt the OU path where you want to create the users, the domain and the password you want to use.

It then creates the account, with the fields populated by the CSV file.
Those fields are Firstname, Lastname, Username, Mobile, PersonalEmail
Once the account is created, it will then create the mailbox on 365.

All that's left to do is assign the licenses.

27 December 2018

Replace Primary SMTP Address | AD

I've recently had to replace the Primary SMTP address for all users within an organisation.  Of course this is a lot easier if you script it.

I needed to do this as the client was changing their primary address, but wanted to retain all the current proxyAddresses as well.

This was achieved by using two scripts.

$Users = Get-ADUser -SearchBase 'OU=ouname,OU=ouname,OU=ouname,OU=ouname,DC=domai,DC=com,DC=au' -Filter * -Properties mail,ProxyAddresses | Select-Object samaccountname,ProxyAddresses
    
Foreach ($User in $Users)

            {
            $Samaccountname = $User.samaccountname
            $SMTP = "SMTP:$samaccountname@newdomain.com.au"
            Set-ADUser $samaccountname -Add @{proxyAddresses=$SMTP}
            } 

This script adds the new SMTP address for all users within a certain OU.  Of course this will cause some troubles on its own, as there's now going to be two SMTP addresses, marked as primary.

The following script clears this up:

Get-ADUser -SearchBase 'OU=ouname,OU=ouname,OU=ouname,OU=ouname,DC=domai,DC=com,DC=au' -Filter * -Properties mail,ProxyAddresses |
    Foreach {  
        $proxies = $_.ProxyAddresses | 
            ForEach-Object{
                $a = $_ -replace 'SMTP','smtp'
                if($a -match 'newdomain.com.au'){
                    $a -replace 'smtp','SMTP'
                }else{
                    $a
                }
            }
        $_.ProxyAddresse = $proxies
        Set-ADUser -instance $_

    }

21 December 2018

proxyAddress Attribute doesn't copy when using Active Directory Migration Tool (ADMT)

I recently needed to perform a cross-forest migration for a client.  I used ADMT to move the users across, however I needed to retain the Mail and the proxyAddress attribute as they had Office 365.

By default, ADMT excludes these attributes from the migration, meaning you're going to be left with users that don't have this information.  This will cause lots of issues if you're needing to use O365.

Luckily, there's a simply way to get this sorted, by removing the items from the Exclusion list.

1. Create a new VBS script by coping the following info a Notepad document, then saving as DisplayExclusionList.vbs

Set o = CreateObject("ADMT.Migration")
WScript.Echo o.SystemPropertiesToExclude

2. Open an Administrative Command Prompt, navigate to C:\Windows\SysWow64, then run the the command

cscript.exe C:\Temp\DisplayExclusionList.vbs
Obviously you'd need to copy the vbs file to C:\Temp first


Note: I took the screenshot after applying this change, so the mail and proxyAddress attributes are already missing.

3. Once you have done this, you will see the list of all the items that are in the exclusions list.  From here you can create a similar script which will amend that list and remove mail and proxyAddress

Set o = CreateObject("ADMT.Migration")

o.SystemPropertiesToExclude = "msDS-PSOApplied,msDS-HostServiceAccount,attributeCertificateAttribute,audio,carLicense,departmentNumber,employeeNumber,employeeType,gecos,gidNumber,homePostalAddress,houseIdentifier,ipHostNumber,jpegPhoto,labeledURI,loginShell,memberUid,msDFSR-ComputerReferenceBL,msDFSR-MemberReferenceBL,msDS-ObjectReferenceBL,msDS-SourceObjectDN,msExchAssistantName,msExchHouseIdentifier,msExchLabeledURI,msRADIUS-FramedIpv6Route,msRADIUS-SavedFramedIpv6Route,msSFU30Aliases,msSFU30Name,msSFU30NisDomain,msSFU30PosixMember,msSFU30PosixMemberOf,networkAddress,nisMapName,otherMailbox,photo,preferredLanguage,registeredAddress,roomNumber,secretary,shadowExpire,shadowFlag,shadowInactive,shadowLastChange,shadowMax,shadowMin,shadowWarning,textEncodedORAddress,uid,uidNumber,unixHomeDirectory,unixUserPassword,userPKCS12,userSMIMECertificate,x500uniqueIdentifier"

Whilst this might look like a really long command, all I did was copy the output from the DisplayExclusionsList.vbs file, then input it at the end of the script.

After running the migration again, the attributes moved through very nicely and saved me a lot of time!!

30 June 2018

DCPromo fails with: "The directory service is missing mandatory configuration information, and is unable to determine the ownership of floating single-master operation roles"


I was recently decommissioning an old DC as part of an infrastructure upgrade project for a client of ours. When attempting the DCPROMO process to remove the old DC, I encountered the following error:


This is very easy to resolve, however it usually is a result of an old DC that's no longer in the network that's not been decommissioned properly.

There are two types of error messages that look almost the same, however they will both hold you up when trying to decommission the server:


  • ForestDnsZones
  • DomainDnsZones
The same process can be followed to resolve each of these messages, and I would suggest that if you encounter the error above, then you sort these both out.

To investigate the issue, you can run the following command, which will tell you the dSMORoleOwner:

dsquery * CN=Infrastructure,DC=ForestDnsZones,DC=domain,DC=local -attr fSMORoleOwner

I received the following results, which shows the orphaned object.  You can see this by the "0ADEL:XXXXX" part in the return query.


In order to resolve this, you need to set the new server as the role owner.  This can be done in ADSI Edit.

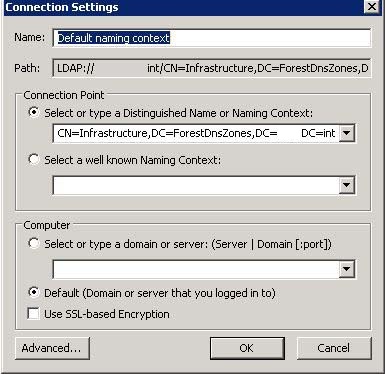
Open up ADSI Edit and navigate to the following path:

CN=Infrastructure,DC=ForestDnsZones,DC=domain,DC=com


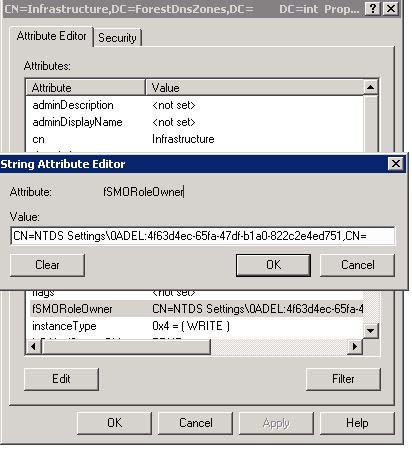
Right-click > Properties on 'infrastructure', and under Attribute Editor, search for fSMORoleOwner.


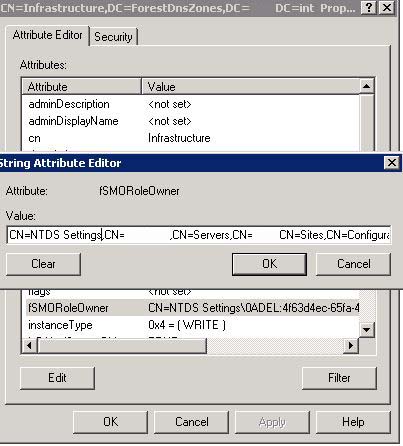
Now replace this with the location of your PDC which should have all the FSMO roles assigned to it:

CN=NTDS Settings,CN=ServerName,CN=Servers,CN=Perth,CN=Sites,CN=Configuration,DC=Domain,DC=com


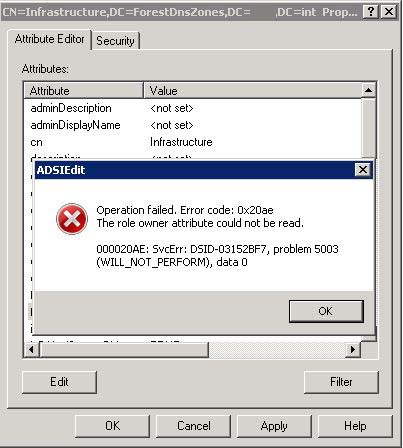
That's it!  You're done.  If you do notice you get the following error, it will be because you're probably making this change on the troublesome DC.  Make sure you do this on one of the other working DCs and you will avoid any errors.

30 May 2017

Hide User from GAL - Office 365 | AD Attribute

The following method will allow you to hide a user from the Global Address List if you're using Office 365 with Azure AD Connect.

From within AD, click on View, then Advanced Features


Find the user you'd like to amend and open up their AD object (note you will need to find the user account within AD, you can't search for it).

Find the following attribute and set it to True

msExchHideFromAddressLists


The next time Azure AD Connect syncs, it will update this attribute and the users will be hidden from the GAL.

Note: the GAL can take up to 24 hours to sync for each Outlook application.

28 April 2017

Create new AD User with Remote Mailbox | Office 365 Hybrid

I recently had a client who had a Hybrid Office 365 who required a set of users to be created, and Office 365 mailboxes created at hte same time.  Whilst I could have had a script to create the users, then go through and add mailboxes to them, I decided that it would be better to smash it all in one hit.

Thanks to my colleague Gareth for writing this script

The following process is comprised of two steps.


  1. Run a script that references a CSV File
  2. A CSV file that has all the relevant information in it
In this case my CSV file had the following:


The BackupEmail was put there at the Client's request.  It was just an area to put the user's personal email address within the AD object.  

The script used is the following, which needs to be saved as CreateUsers.csv.  Note the bold areas which are the variables that have been included.


$Users = Import-Csv -Path "C:\Userlist.csv"
$OU = "OU=Sub-OU,OU=Parent-OU,DC=DOMAIN,DC=com,DC=au"     
foreach ($User in $Users)           
{           
    $Displayname = $User.Firstname + " " + $User.Lastname           
    $UserFirstname = $User.Firstname           
    $UserLastname = $User.Lastname           
    $SAM = $User.Username         
    $UPN = $User.Firstname + "." + $User.Lastname + "@domain"        
    $Password = "<insertpassword>" 
    $Mobile = $User.Mobile
     $remoterouting = "smtp:" + $UPN
     $Notes = $User.BackupEmail
    New-ADUser -Name "$Displayname" -DisplayName "$Displayname" -SamAccountName $SAM -UserPrincipalName $UPN -GivenName "$UserFirstname" -Surname "$UserLastname" -AccountPassword (ConvertTo-SecureString $Password -AsPlainText -Force) -Enabled $true -Path "$OU" -ChangePasswordAtLogon $false –PasswordNeverExpires $true -MobilePhone $Mobile -HomePhone $Notes
    Enable-RemoteMailbox $SAM -RemoteRoutingAddress $remoterouting
}

Save the script as well as the .csv file into the same location, then run the script through Exchange Management Shell.

This will create the user account and will also create the Office 365 Mailbox which can be viewed from either Exchange On Prem, or the O365 Tenant.  Remember that it takes a bit of time for Azure AD Connect to sync all the AD objects as well.  It might help to force an Azure AD Connect sync.

The last step you will need to do is to assign an Office 365 license to that particular user, or users.

20 March 2017

Configure Squid Proxy with LDAP Auth | Active Directory

Recently a client of mine asked if we could implement a proxy server which forced each user to authenticate with their AD credentials.  They currently had a rather cut-down Squid server running in their environment and it was logging traffic, but there was no way to work out which users were browsing the most.  There was IP tracking, but when using a hot-desk situation, no user had a specific machine.

The following steps are what I've done to get this up and running where it forces each user to authenticate against AD, and denies all access if they don't authenticate correctly.

Assumptions: there is the assumption that you've already got a working copy of Linux up and running in your virtual environment.  In this case, I was using Ubunut 16.04.
The other assumption is that you have installed the LDAP role within Server Manager within your AD environment.

1. Download/Install Squid
sudo apt-get install squid
This will install Squid onto the Linux machine.  

2. Open ldap.conf which can be found at /etc/ldap/ldap.conf
3. Set BASE to your domain (in my case its test.internal as I've blogged this within a test environment).  I've updated the URI section too, however it's hashed out and not needed.
4. Edit squid.conf which can be found here: /etc/squid/squid.conf
5. Search for the follow section auth_param basic program, then enter the following details:
Note: most of this will already be there, you will just need to un-hash it.  The IP address used is the DC.  The blurred out section is the password I have used for the Administrator account which is mentioned within this section.
Also note that the credentialsttl will be how long a user can be logged in for before they're prompted again.  For testing purposes I set it to 15 minutes, you could set this to 2 hours.
6. Within the same document, search for acl safe_ports and then add the highlighted section below:
7. In the same document, search for http_access allow localhost, then add the highlighted section underneath it
8. Search for cache_dir ufs and then un-hash that section
9. Update the proxy settings within your environment to point to the Squid server on port 3128.  When you try to access a website, you should be greeted with the following message:


Install reporting tool for tracking user's browsing
In order to track the user's browsing, you will need to get Webmin, and also SARG.  These work together to allow you to make nice little reports which will show where users have been going and how much data they're using etc.

The following tasks will be completed within the Terminal
1. sudo nano /etc/apt/sources.list
2. Add the following two lines to the document you've just opened up
deb http://download.webmin.com/download/repository sarge contrib
deb http://webmin.mirror.somersettechsolutions.co.uk/repository sarge contrib
3. Save the document and close out of it
4. sudo wget http://www.webmin.com/jcameron-key.asc
5. sudo apt-key add jcameron-key.asc
6. sudo apt-get update
7. sudo apt-get install webmin -y
8. sudo ufw allow 10000

This will then allow you to access the Webmin web portal on https://localhost:10000
Log in with your administrator (local admin) credentials

Click on un-used modules then find Squid Proxy
You will most likely see a message saying it wasn't able to find squid.  This will be because it's looking for /squid3/ rather than just /squid/.  You will need to edit the config and change squid3 to just squid everywhere you see it.


In order to use the Squid Report Generator, you will need to install SARG.  To do this, open Terminal and type the following:

sudo apt-get install sarg

Then you can click on Squid Report Generator within Webmin and be able to run reports on usage etc.

30 May 2016

Unable to Access Exchange Management Console 2010

Recently I was on a new client's server and I accessed the Exchange Management Console for Exchange 2010.  When expanding "Microsoft Exchange On-Premises", I received the following error message:


In order to get around this, you must look at the Security Group called Organisation Management.  Check the membership of this group, and ensure that the user account you're using to open up EMC is within this group.  In this case, my user account hadn't been added to this group which was why I received that error message.


After adding my user account to the group, I clicked Retry within EMC, and it worked perfectly for me.