Showing posts with label SCCM. Show all posts

16 December 2020

How to install Microsoft Access Runtime 2016 Silently

 I have recently needed to install Microsoft Access Runtime 2016 silently through SCCM.

Whilst you can install the software silently, it still shows up asking to accept the EULA, so subsequently SCCM will time out as it's waiting for user input.

In order to get around this, you can do the following:

  1. Extract files using AccessRuntimeXXXXX.exe /extract:ExtractedFiles.
  2. Open Notepad and copy the following in:
    <Configuration Product="AccessRT">
    <Display Level="None" CompletionNotice="no" SuppressModal="yes" AcceptEula="yes" />
    <Logging Type="standard" Path="C:\Windows\Temp\" Template="Microsoft_Access_2016_Runtime_Setup(*).log" />
    <COMPANYNAME Value="Company Name" />
    <Setting Id="SETUP_REBOOT" Value="Never" />
    </Configuration>
  3. Save this as config.xml
  4. When you create your application within SCCM, have the command line to run it as the following
    setup.exe /config /config/xml

14 December 2020

DISM to remove Win10 Appx apps from a .WIM file

Here's a great way to remove packages from a WIM file to ensure you don't have to build and capture another image within SCCM.  

This has come about due to a client having an image, and later requiring certain apps to be removed.

Create a new folder on your server called "Mounted_Image"

Mount your WIM file to that location with the following command:

Mount-WindowsImage -ImagePath "E:\SourceFiles\CapturedWims\CAPTURE001.wim" -Index 1 -Path "c:\Mounted_image"

Now create a PS1 file with the following, which will allow you to remove the various appx packages:

$apps=@( 	
	"9E2F88E3.Twitter"
	"ClearChannelRadioDigital.iHeartRadio"
	"Flipboard.Flipboard"
	"king.com.CandyCrushSodaSaga"
	"Microsoft.3DBuilder"
	"Microsoft.BingFinance"
	"Microsoft.BingNews"
	"Microsoft.BingSports"
	"Microsoft.BingWeather"
	"Microsoft.CommsPhone"
	"Microsoft.Getstarted"
	"Microsoft.Messaging"
	"Microsoft.MicrosoftOfficeHub"
    "Microsoft.MicrosoftSolitaireCollection"
	"Microsoft.Office.OneNote"
	"Microsoft.Office.Sway"
	"Microsoft.People"
	"Microsoft.SkypeApp"
	"Microsoft.Windows.Phone"
	"Microsoft.WindowsMaps"
	"Microsoft.WindowsPhone"
	"Microsoft.WindowsSoundRecorder"
	"Microsoft.XboxApp"
	"Microsoft.ZuneMusic"
	"Microsoft.ZuneVideo"
	"microsoft.windowscommunicationsapps"
	"Microsoft.MinecraftUWP"
	"ShazamEntertainmentLtd.Shazam"	
    "Microsoft.Xbox.TCUI"
    "Microsoft.XboxGameOverlay"
    "Microsoft.XboxGamingOverlay"
    "Microsoft.XboxIdentityProvider"
    "Microsoft.XboxSpeechToTextOverlay"
    "Microsoft.StorePurchaseApp"
    "Microsoft.Wallet"
    "Microsoft.WindowsAlarms"
    "Microsoft.WindowsFeedbackHub"
    	
)

foreach ($app in $apps) {	
	Get-AppXProvisionedPackage -path C:\Mounted_Image | where DisplayName -EQ $app | Remove-AppxProvisionedPackage
    }

That'll then go through and remove the various packages from the WIM file.

You can test after this by running the following command:

Get-AppxProvisionedPackage -Path c:\Mounted_Image

Once you are done, make sure you save the WIM file and dismount with the following command:

Dismount-WindowsImage -Path c:\Mounted_Image -Save


06 November 2020

Task Sequence: Image Capture Wizard has failed with the error code (0x00004005)

 If you have this error when you try to capture a image with SCCM

Task Sequence Error:

Running: Image Capture Wizard

Description:  Task Sequence: Image Capture Wizard has failed with the error code (0x00004005).

Solution: 

To overcome this 3 SYSPREP time limitation, following are the walkaround:

1. Open REGEDIT and look for:

HKEY_LOCAL_MACHINE\SYSTEM\Setup\Status\SysprepStatus\CleanupState\

Set to value: 2

HKEY_LOCAL_MACHINE\SYSTEM\Setup\Status\SysprepStatus\GeneralizationState\

Set to value: 7

HKEY_LOCAL_MACHINE\SOFTWARE\Microsoft\WindowsNT\CurrentVersion\SoftwareProtectionPlatform\SkipRearm

Set to value: 1  

Then, run the command:

msdtc -uninstall (wait a few seconds)

msdtc -install (wait a few seconds) 

Then, reboot the system and try to run SYSPREP again.

01 February 2018

TFTP Open Timeout - PXE Boot | SCCM 2012 R2

Recently I was setting up PXE booting with SCCM 2012 R2 (new setup).  When starting the client workstation up and pressing F12 to network boot, I got the following error:


Having a look online to find out what this issue was, I struggled to find the exact cause of my particular issue.  There were many blogs and posts about this issue, but nothing referred to a solution which would have helped me.

It turns out that this is a bug with Microsoft and there is a Hot Fix available to download.  The Hot Fix is available here.

After installing this Hot Fix, I rebooted the SCCM server, then attempted to boot to PXE again on the client workstation.  This time it worked perfectly!

15 November 2017

Monitor SCCM Updates

With recent versions of SCCM, you can now perform in-place updates of SCCM.  This is a great way of updating the application without having to download external ISOs etc.

The only issue is that once you have kicked off the install, you have no way of monitoring the progress within the application itself.  We have to move to the LOG files in order to monitor this.

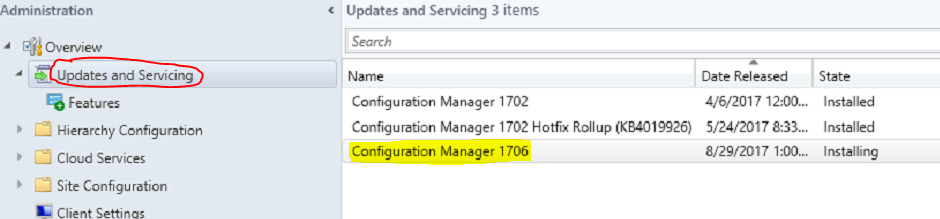
You can see the update highlighted here:


If you right-click the update, you can see "Install Update Pack".


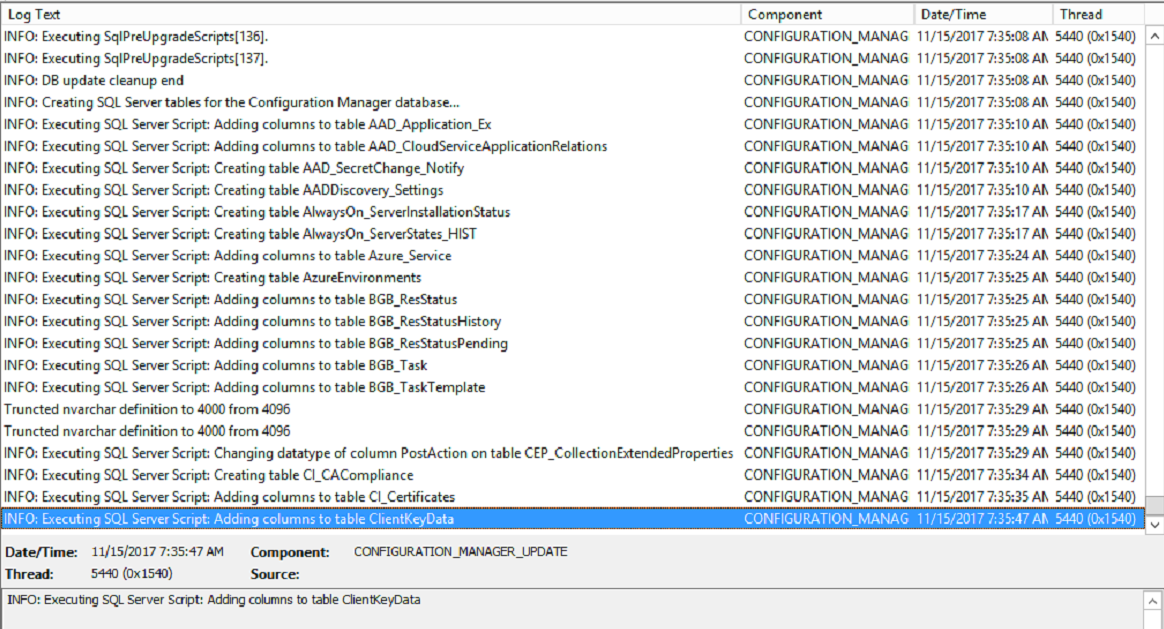
Once you have done this, the only way to monitor the progress is by opening up the following LOG file within CMTrace:

C:\Program Files\Microsoft Configuration Manager\Logs\CMUpdate.log


This will update automatically as there's new information, and it's an easy way to see where the installation is at and whether there's any problems.

29 March 2017

Update App Deployment Client Connectivity Restriction | SCCM

I recently had a client who's using SCCM, and was needing to install a particular application on many computers.  These machines happened to be in a workshop and they were testing the deployment by doing the manual install (through Software Centre).  They noticed that whilst they elected to install this particular app on about 30 machines, most of the workstations would say "Waiting to install", whilst only about 5 or so machines would actually be installing the app at one time.

Ultimately every machine received the application, however they wanted to know why it was limited to this small number, and what we could do to increase that.

To update this number to allow more machines simultaneously installing applications, we need to do the following:

Administration > Site Configuration > Sites > Configure Site Components > Software Distribution

The highlighted section is what I had updated.

The next part I updated was the following:

Administration > Site Configuration > Sites > Right-click site name and click Properties > "Sender" tab

I updated the circled settings to be 15 each.


15 December 2016

Missing Application in Task Sequence | SCCM 2012

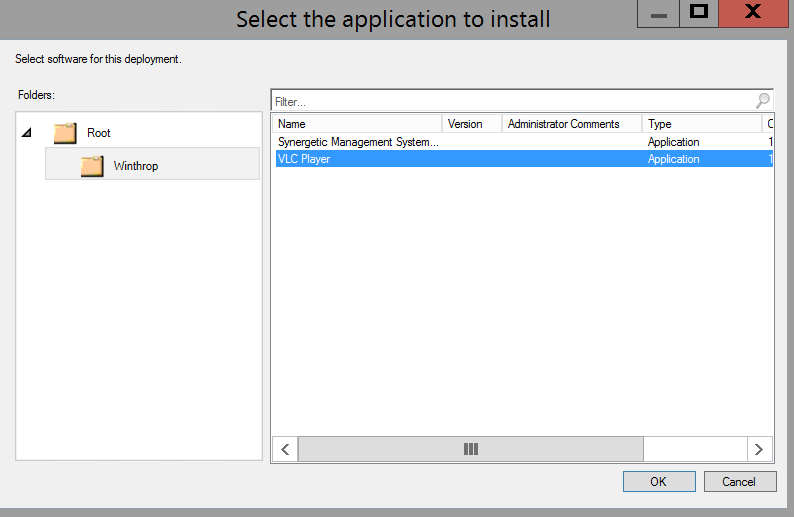
Recently a client of mine was trying to add an application to be installed as part of the 'Install Application' sequence within an Operating System Deployment Task Sequence.  They were able to find many applications that were available, however they couldn't see this particular one (in this case it was VLC).

The application was showing up under Apps:


When adding it into the Task Sequence, there was no error messages, it was just not there:


To resolve this, go into the application itself, click on the Deployment Type tab, then click User Experience and make sure its set to Logon Requirement: Whether or not a user is logged in.


Once you've done this, it will allow you to see the app and choose to add it into the Task Sequence. 


12 December 2016

Enable Multicast | SCCM 2012

This is a quick post to show you how to enable Multicast deployments through SCCM 2012.


  1. Click Administration
  2. Click Servers and Site System Roles
  3. Click on the SCCM server
  4. Double-click on Distribution Point
  5. Tick the Enable Multicast option


Once you have done that, you will need to enable the multicast distribution for any packages/operating systems you may have.  To do this, do the following:


  1. Click on Software Library
  2. Click on the folder where you've saved your packages or operating systems
  3. Right-click on the Operating System or Package and click on Properties
  4. Click on Distribution Settings
  5. Tick Allow this package to be transferred via Multicast


It is not recommended that you enable Multicast when using SCCM.  This has been known to cause issues with the WDS service constantly crashing. 

Winthrop Australia provides some of the best IT Support in Perth.  Contact us today to find out how we can help you.

19 October 2016

PXE Boot | Boot into WinPE then Immediate Restart

I recently came across a little issue where I was PXE Booting a machine into the WinPE environment to start a Task Sequence to image the machine.  Once it had loaded and it had passed the "Loading Network Settings" window, it immediately restarted.

The most common cause for this is that you don't have the correct NIC drivers.  I rebooted again, then pressed F8 which brought me to a command prompt.   Once I was there, I waited until  it went past the "Loading Network Settings" page, then ran an IPCONFIG to see whether I got an IP address.  In this case I did.  That means it wasn't a NIC driver issue.

The next thing to check is the BIOS time.  Make sure this is accurate.  In my case, this wasn't accurate at all.  Once I reset this,  I rebooted again into WinPE, and the Task Sequence started without any problem.

A quick 5 second fix could help you save an hour of troubleshooting!

14 October 2016

OSD Task Sequence Failure | 0x80072EE2 | Network Connectivity Issues

Recently when I was out at a client, they were running OSD (Operating System Deployment) on a particular model of machine (Dell Optiplex 7040) and it started throwing up error messages during the "Download Operating System" step.  The error message was 0x80072EE2.

When pressing F8 to check smsts.log, there was nothing there out of the ordinary.  The only interesting thing I could see there, was that it hadn't added in the latest log data yet, so as far as it was concerned, there was nothing wrong with the OSD.

I checked my IP, which was fine.  I tried pinging the SCCM server (and any other server on the network) and noticed that I was getting a lot of packet loss.  This explains the issue that I was getting.  Essentially, the network connectivity would be completely find up until a point where it would start getting massive packet loss, and then fail during the download.

I ruled out a physical issue with cabling, patching and the device by trying different network ports on the wall, and also trying different Dell machines (all 7040 however).  I received the issue on all of the machines, virtually at the same point in the Task Sequence.

I attempted to inject different drivers into the Boot image, but that didn't help either.  I was happy that this wasn't a driver issue, and it wasn't a physical networking issue.  The look continues!

I added in three Task Sequence Variables into the beginning of my OSD Task Sequence.  The idea behind these was to make the deployment less delicate, and to continuing working through the TS  if there's some packet loss etc.

The variables I added are the following:


After adding these TS Variables in there, I restarted the machine and went through the OSD sequence.  This time it completed without any issues.

Essentially the issue was that with the drivers and WinPE versions on this particular  machine, the NIC was a bit flakey.  Packets were dropped etc which originally caused it to fail.  These variables just told the Task Sequence to be less particular when it comes to timing out.  There will still be that  intermittent packet loss when doing the TS, but this time it won't cause it to fail.

06 October 2016

SCCM | Editing Object | Cannot edit the object, which is in use by ‘’ at Site ‘

Recently I have been working on a client's SCCM server, and it has been crashing a lot.  The problem with crashing, is that it doesn't update SQL to tell it that the item is no longer in use, therefore it remains 'locked'.  This means that if you try to open the object (in this case it's a boot image), it will say "Cannot edit the object, which is in use by <username> at site <sitename>.

You can try to resolve the issue by clicking 'retry edit', but it usually fails.

In order to get around this, there are two SQL queries that you will need to do which will allow you to edit the object immediately.  They are the following:

select * from SEDO_LockState where LockStateID <> 0

and

DELETE from SEDO_LockState where LockID = ‘<LockID of the record identified in the previous query>’

That's it!  Once you've done that, you should be able to go into the ConfigMgr console and open up the object that was previously locked.

15 September 2016

Intel AMT: Configuration | AMT Status: Detected | Not Externally Provisioned

Recently I have been trying to setup and configure Intel SCS to leverage Intel AMT features through SCCM 2012 R2.  I've done this before and it's worked fine, but for whatever reason, with this particular client, SCCM is failing to detected that the workstations have been configured, and that AMT is Externally Provisioned (thus not allowing me to control the power etc).

After running the Intel AMT: Configuration Task Sequence (which works by the way), I get the following messages in the AMTOPMGR.log file:


I've tested that I can log into the web GUI with the admin credentials and that's all fine, but for whatever reason, I'm getting AMT Status is 1 which translates to 'detected', rather than 'externally provisioned'.  I checked all my settings and everything had been configured accurately.

The machine account was in the appropriate ACL which was mentioned in the SCS profile (that's a big one if you haven't done that).  There was nothing online which actually related to the issue I was having, so I logged a ticket with Intel themselves.  After a couple of hours of troubleshooting with an Intel guy from Oregon, US (who was very helpful) we basically came to the conclusion that we couldn't find out what was actually causing this error message.  Everything had been configured correctly.

With the end goal in mind and wanting to be able to start up lots of computers, or a single device using the AMT Wake-Up feature, we comprimised and used a third party application called MeshCommander.  This application is installed on the SCCM server and essentially provides a whole lot more functionality to the Out of Band Management through SCCM.

To obtain the AMT Functionality, run the Intel AMT: Configuration Task Sequence as per ususal.  Then run the Discovery AMT Status like you normally would.  It will show up as Detected which is fine.  From here, you can right-click on a device and click on the MeshCommander option:


Select Kerberos and TLS.


Once you have done this, and provided there's nothing wrong with your AMT Configuration TS, it will allow you full access to the Intel AMT section of that workstation.  Allowing you to power the device up and use Serial over LAN etc.


If you're wanting to power up an entire device collection, simply right-click on that collection and select the MeshCommander Option:


Whilst I was pulling my hair out trying to get this one resolved, I'm actually grateful that I had this issue, because the solution that Intel suggested to achieve the overall outcome seems to be a lot better than the initial solution of simply using the Power-On feature through Intel SCS and SCCM.

Overall, this is actually a much better way to control the machines through Intel AMT.  I highly recommend it.

09 September 2016

Intel SCS/SCCM | Intel AMT: Configuration Task Sequence | Failed to parse the XML file

I have recently been setting up Intel SCS/AMT configuration with SCCM 2012 for a client of mine. It's all going fairly smoothly but I noticed that when testing the Intel AMT: Configuration Task Sequence, it's failing (across multiple test machines).

Checking the SMSTS.log file, I can see the following error message:

"Failed to parse the XML file. Possible reasons - the file does not exist or access to it is denied; the file contains incorrect parameters; incorrect or missing encryption password/parameter"

At the end of this error message, it references the .XML file that I have setup as part of the configuration requirements.  

I checked the following

  • Location
    • Confirmed the .XML file is in the same location as the ACUConfig.exe file.  If it can read the one, it's reasonable to assume it can read the other.
    • Ensured that this had been packaged correctly and the distribution points had been updated.
  • Permissions
    • Ensured that permissions on the files and the folders allow the service account to access these files.
  • Password
    • Confirmed the password was correctly added into the configuration.bat file.
  • Decryption
    • Confirmed that I could access this .XML file using the password that had been added to the configuration.bat file.
I then decided to go through the ACU Wizard again to create a completely brand new .XML file.  This was just to humour the issue to see whether it had something to do with the file itself.  Needless to say, we got the same issue.

The next thing I tried to do was run the SCSEncryption.exe file manually to see whether it could decrypt the .xml file. This was successful:


So this confirms that decrypting the file isn't the problem and that the password is in fact correct. Nevertheless, it's still failing with the same error message.  The last thing I tried was to copy the ACUConfig.exe, the associated DLL, the XML and the Configure.bat files to a local machine (Desktop) and then run the configure.bat file from there.  This means that it will be referencing the file that I 100% know is there.  When doing this, I still got the same error message:


To work around this and to get this up and running (which obviously was the priority here), I improvised and actually leveraged the decrypted version of the XML file.  I ran the SCSEncryption.exe file against the XML file which then replaces it with the decrypted version.  I edited the Configure.bat file to remove reference to decryption and the password.

.\acuconfig /output console /output file ConfigAMT.log /verbose ConfigAMT ".\XMLDocumentName.xml" 

Taking the decryption completely out of the equation, I updated the Task Sequence, and then ran it again.  This time it was successful!  

I'm sure re-installing the add-on and re-creating all the files would have also worked, but that wasn't an option in this case.  Whilst the XML file is no longer encrypted, you can use NTFS permissions to ensure that only the service accounts can access and view this file.  If you do this, it should be no different to if you left the XML file decrypted, except now it works! 

07 September 2016

Asset Intelligence | SCCM | Expired credentials/certificate/token | Need to re-provision online account

This one is a nice and easy one.
If you're using SCCM 2012 and you're wanting to leverage the Asset Intelligence site role, you will most likely encounter the following error message if you haven't been assigned a certificate from Microsoft.


When you go through the initial setup, it will ask you to add the location of a .pfx file which would have been supplied by Microsoft.  In order to resolve this and allow SCCM to connect to the Microsoft Database, you will need to obtain a certificate.  This can be downloaded from a Microsoft Hotfix (https://support.microsoft.com/en-us/kb/3060648).  You can also obtain a certificate from your Microsoft account rep.  

You will need to extract these files and then you will find the certificate file.


Once you have this certificate, you will simply need to add it into the properties for the Site Service Role:


After you have updated this setting so it's using the certificate, you will then need to disable and then re-enable the Asset Intelligence Sync point.  Simply un-tick this, apply, then re-tick and apply again.

06 September 2016

Intel SCS: Platform Discovery | Task Sequence Failing

So I am currently in the middle of setting up and configuring Intel SCS to leverage Out of Band Management through SCCM 2012 for a client of mine.  This is something I have done before and didn't have a problem with, but in this environment, for some reason I'm having a few issues.

After installing the SCCM add-on, I enabled the Intel SCS: Platform Discovery add-in, which was created automatically.  I deployed it to a number of computers to ensure that it's working and that the machines show up in Intel AMT: Exists Device Collection.

Unfortunately I ran into some issues with this one:


The above are the error messages that are showing up within the SMSTS.log file.

From here, I changed the package to download all the data locally, then to run the TS.  When this happened, I got a different error saying that it couldn't locate the ACUConfig.exe file.  I copied this file over to the Platform Discovery folder, along with the associated DLL.


Once I had done this, the package was then updated to the distribution points and the Task Sequence was then re-deployed.  I selected the TS to download all the data locally before running.  This now seems to be working fine!  

I've refreshed the Device Collections and they're populating as intended.  The weird part is that I've had setups which have worked perfectly fine without having to manually copy these two files over, but for some reason, this time it just wasn't working. 

The good news is that this is now working for us! 

17 August 2016

Software Center | Application Installation Error | 0x87D00607

Recently a client of mine was deploying some applications within SCCM 2012 R2 using the Software Center.  The application was setup correctly and was showing in the Software Center, but it was failing when the user tried to install the app.

They were getting the following error message:


Looking further into this error message and checking the SCCM configuration, it looks like the subnet wasn't included within the Boundaries and Boundary Groups in SCCM itself.  This is why the deployment was failing.  In order to resolve this, the subnet needed to be added into the appropriate boundary, and then into the Boundary Group.  Once this was done,  you can hit 'Retry' and it will work for you immediately. 


03 August 2016

Operating System Deployment (OSD) with USMT Task Sequence Guide | SCCM 2012 R2

I have recently been setting up User State Migration as part of Operating System Deployment through SCCM 2012 R2.  What this will allow, is the re-installation of an Operating System whilst saving the user's locally saved data, such as data on Desktop, My Docs, background picture etc.  You can even go as far as to allow users to initial their own OS Refresh if they were having problems on their workstation.  It's a very good way in reducing IT Support overheads if you've got a stable SOE image.

The reason for this blog post however, is that USMT and OSD is a pain to get working well, and there's not a lot of information out there that specifically shows you how the Tasks Sequences should be configured.  After two days of playing around with SCCM trying to get this all working, 1,000,000 log files and a lot of Googling, I managed to get everything resolved and have got a stable Task Sequence running to refresh the Operating System.

Below are the requirements you will need to not only Build and Capture your image, but then also create the Task Sequence to refresh your OS with USMT.

Build and Capture
When setting up OSD and using USMT, it is critical that you correctly Build and Capture an image.  What I mean by this is that if you use the B&C Task Sequence and don't correctly set it up (it doesn't just work natively), you will have issues down the line with the second Task Sequence.

Once you have gone through the process of creating the Build and Capture task sequence, go to edit it and make the following changes:

Partition Disk 0 - BIOS

Partition Disk 0 - UEFI

Preserve Drive Letter - False


Apply Operating System
Select the Windows 7 Professional Image (or whatever one you're wanting to install), then select Logical drive letter stored in a variable, and type in System


Once you've done this, you will be able to run the Build and Capture task sequence.  Make sure it's saved to a location that computers will have access to.  This will be used when you're creating your OSD with USMT task sequence.

Operating System Deployment with USMT Task Sequence
This is the main Task Sequence for copying the user's local data, refreshing the Operating System, then copying the local data back.  This will usually be accessed from the Software Center within the Windows Operating System of the user's computer.

There's not too many settings you will need to change here, but if you don't get this right, it will cause hours of grief and Googling to try and work out why it's failing.

Partition Disk 0 - BIOS

Partition Disk 0 - UEFI

Preserve Drive Letter - False


Apply Operating System
Select the "2-2" image that you would have created within the Build and Capture sequence.  Then select Logical drive letter stored in a variable and type in System


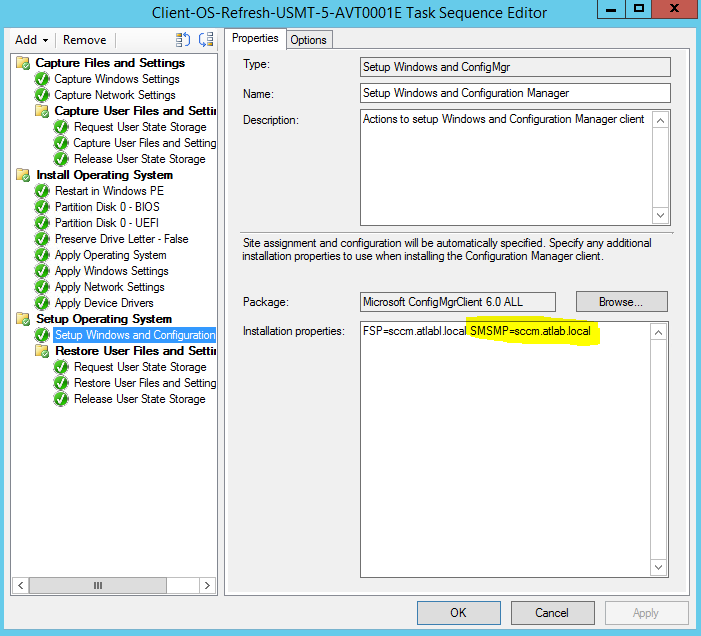
Setup Windows and ConfigMgr
Make sure you add the highlighted section below.  This is not automatically added in.  This will be the FQDN of your SCCM server.


That's it!  If you've made sure that security permissions are set correctly (NTFS) on the SCCM server where USMT data will be stored and where data will be referenced, you will find that OSD will work smoothly and there shouldn't be any errors with your setup.

02 August 2016

OSD Task Sequence Fails | Formatting Drive | SCCM 2012 R2 | 0x80070057

Recently I was running a Task Sequence in SCCM 2012 R2 to refresh the Operating System on a workstation.  The Task Sequence would use USMT to capture the user data, then format the HDD and reinstall the OS.

It was running fine until it got to the point where it was going to format the drive, then I got this error:

Upon receiving this error, there were two items that I checked.  The first was within the Task Sequence itself.
As you can see down the bottom of the screenshot, the destination is set to Logical drive letter stored in a variable.  The Variable name has been define as System.  When checking the Partition Disk 0 section, I noticed that there was no variable set for the appropriate partition.


Make sure you go through both the BIOS and the UEFI section and add System as a variable for the 'Primary' partition.  

After doing this, I checked out my .wim file that this Task Sequence was using and made sure that appropriate permissions were set on the folder.  In this case I just gave Everyone read access to the .wim file.  

After making these two changes, I ran the Task Sequence again, and as you can see, it progressed past this point.


If you're running a Task Sequence and you get the 0x80070057 error message, make sure you check these two items before troubleshooting further.  It may save you hours!

01 August 2016

Failed to Run Task Sequence | 0X8004005 | SCCM 2012 R2

When running a Task Sequence through SCCM on a workstation, you may run into the following error message:


Whilst there could be other reasons that you're getting this error message, the first thing you should do is to check your BIOS Clock.  Make sure this is accurate, reboot and then run the Task Sequence again.

A lot of times you will find that this resolves the issue.

15 July 2016

Intel SCS Task Sequences not working with SCCM 2012 R2 | Intel AMT: Configuration

This post follows on from my previous post which was about running a Task Sequence for Intel AMT: Discovery.  This post is in relation to the next Task Sequence in the list, which is called Intel AMT: Configuration.

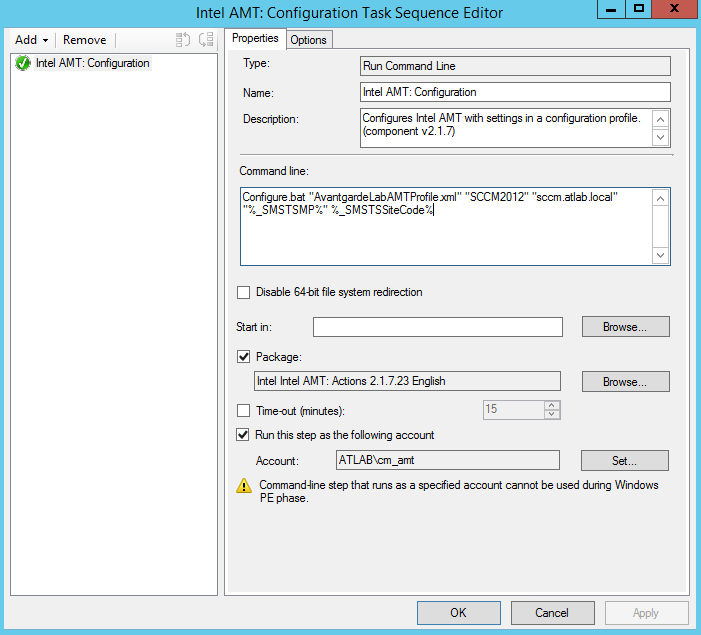
This Task Sequence has the following details within SCCM:


Essentially the %% details are taken from within the Configure.bat script.  Running the TS isn't a problem, but it is deciding to fail when after it's downloaded the required data:

Surprise surprise!  I guess it wouldn't be SCCM if there wasn't issues!  Now the fun part of finding out why it's failing!  I had a look at the event logs on the workstation that I was running this TS on and I came across this event:


So we've got a few errors here.  TCP Error, Caller is unauthorised, Valid password not found.  From here I checked the SMSTS.log files to see what was happening.  The logs were about 41 pages long, so I'm not going to copy it all here, but there were various errors within this:

<![LOG[Failed to run the action: Intel AMT: Configuration. 
The process cannot access the file because another process has locked a portion of the file. (Error: 00000021; Source: Windows)]LOG]!><time="15:10:04.029-480" date="07-14-2016" component="TSManager" context="" type="3" thread="2724" file="instruction.cxx:895">

I had a look at the Configuration.bat file that the Task Sequence was calling and made a few changes to the contents:


I also ensured that the following contents had been edited so it was showing the correct SCCM server, and site:


Once I had done this, I ran the batch file again from the local workstation (instead of running it through Software Center) so I could see how it was running, and whether there were any error messages etc.  This time it progressed a lot further than before.  I don't have a screenshot of the error message that I was getting this time, but it was essentially connecting to the AMT device and then erroring out saying that the password was incorrect. 

Looking into the setup of the whole script/software, it looks like Intel SCS and Intel AMT: Configure relies on AMT not being configured on the local device.  What had happened was this device had been setup with MEBx (which is essentially the AMT login through BIOS) where it forces you to reset the password.  When this script was trying to connect to the device, it was using the default "admin" password which was incorrect as it had been changed.  This is why it was failing. 

The only way to get around this was to take out the CMOS battery to completely reset the BIOS and MEBx.  After doing this, I confirmed that the "admin" password was back in, not the custom password we had originally configured.  When running the script now through Software Center, it works!!


After doing this, I was able to Discover AMT Status through SCCM:


Once that was complete, it now showed me that the device had been externally provisioned!  


We can now control the device through SCCM:


Part 1 - Intel AMT: Discovery