I've recently had to replace the Primary SMTP address for all users within an organisation. Of course this is a lot easier if you script it.
I needed to do this as the client was changing their primary address, but wanted to retain all the current proxyAddresses as well.
This was achieved by using two scripts.
$Users = Get-ADUser -SearchBase 'OU=ouname,OU=ouname,OU=ouname,OU=ouname,DC=domai,DC=com,DC=au' -Filter * -Properties mail,ProxyAddresses | Select-Object samaccountname,ProxyAddresses
Foreach ($User in $Users)
{
$Samaccountname = $User.samaccountname
$SMTP = "SMTP:$samaccountname@newdomain.com.au"
Set-ADUser $samaccountname -Add @{proxyAddresses=$SMTP}
}
This script adds the new SMTP address for all users within a certain OU. Of course this will cause some troubles on its own, as there's now going to be two SMTP addresses, marked as primary.
The following script clears this up:
Get-ADUser -SearchBase 'OU=ouname,OU=ouname,OU=ouname,OU=ouname,DC=domai,DC=com,DC=au' -Filter * -Properties mail,ProxyAddresses |
Foreach {
$proxies = $_.ProxyAddresses |
ForEach-Object{
$a = $_ -replace 'SMTP','smtp'
if($a -match 'newdomain.com.au'){
$a -replace 'smtp','SMTP'
}else{
$a
}
}
$_.ProxyAddresse = $proxies
Set-ADUser -instance $_
}
27 December 2018
21 December 2018
proxyAddress Attribute doesn't copy when using Active Directory Migration Tool (ADMT)
I recently needed to perform a cross-forest migration for a client. I used ADMT to move the users across, however I needed to retain the Mail and the proxyAddress attribute as they had Office 365.
By default, ADMT excludes these attributes from the migration, meaning you're going to be left with users that don't have this information. This will cause lots of issues if you're needing to use O365.
Luckily, there's a simply way to get this sorted, by removing the items from the Exclusion list.
1. Create a new VBS script by coping the following info a Notepad document, then saving as DisplayExclusionList.vbs
Set o = CreateObject("ADMT.Migration")
WScript.Echo o.SystemPropertiesToExclude
2. Open an Administrative Command Prompt, navigate to C:\Windows\SysWow64, then run the the command
cscript.exe C:\Temp\DisplayExclusionList.vbs
Obviously you'd need to copy the vbs file to C:\Temp first
 Note: I took the screenshot after applying this change, so the mail and proxyAddress attributes are already missing.
3. Once you have done this, you will see the list of all the items that are in the exclusions list. From here you can create a similar script which will amend that list and remove mail and proxyAddress
Set o = CreateObject("ADMT.Migration")
o.SystemPropertiesToExclude = "msDS-PSOApplied,msDS-HostServiceAccount,attributeCertificateAttribute,audio,carLicense,departmentNumber,employeeNumber,employeeType,gecos,gidNumber,homePostalAddress,houseIdentifier,ipHostNumber,jpegPhoto,labeledURI,loginShell,memberUid,msDFSR-ComputerReferenceBL,msDFSR-MemberReferenceBL,msDS-ObjectReferenceBL,msDS-SourceObjectDN,msExchAssistantName,msExchHouseIdentifier,msExchLabeledURI,msRADIUS-FramedIpv6Route,msRADIUS-SavedFramedIpv6Route,msSFU30Aliases,msSFU30Name,msSFU30NisDomain,msSFU30PosixMember,msSFU30PosixMemberOf,networkAddress,nisMapName,otherMailbox,photo,preferredLanguage,registeredAddress,roomNumber,secretary,shadowExpire,shadowFlag,shadowInactive,shadowLastChange,shadowMax,shadowMin,shadowWarning,textEncodedORAddress,uid,uidNumber,unixHomeDirectory,unixUserPassword,userPKCS12,userSMIMECertificate,x500uniqueIdentifier"
Whilst this might look like a really long command, all I did was copy the output from the DisplayExclusionsList.vbs file, then input it at the end of the script.
After running the migration again, the attributes moved through very nicely and saved me a lot of time!!
By default, ADMT excludes these attributes from the migration, meaning you're going to be left with users that don't have this information. This will cause lots of issues if you're needing to use O365.
Luckily, there's a simply way to get this sorted, by removing the items from the Exclusion list.
1. Create a new VBS script by coping the following info a Notepad document, then saving as DisplayExclusionList.vbs
Set o = CreateObject("ADMT.Migration")
WScript.Echo o.SystemPropertiesToExclude
2. Open an Administrative Command Prompt, navigate to C:\Windows\SysWow64, then run the the command
cscript.exe C:\Temp\DisplayExclusionList.vbs
Obviously you'd need to copy the vbs file to C:\Temp first

3. Once you have done this, you will see the list of all the items that are in the exclusions list. From here you can create a similar script which will amend that list and remove mail and proxyAddress
Set o = CreateObject("ADMT.Migration")
o.SystemPropertiesToExclude = "msDS-PSOApplied,msDS-HostServiceAccount,attributeCertificateAttribute,audio,carLicense,departmentNumber,employeeNumber,employeeType,gecos,gidNumber,homePostalAddress,houseIdentifier,ipHostNumber,jpegPhoto,labeledURI,loginShell,memberUid,msDFSR-ComputerReferenceBL,msDFSR-MemberReferenceBL,msDS-ObjectReferenceBL,msDS-SourceObjectDN,msExchAssistantName,msExchHouseIdentifier,msExchLabeledURI,msRADIUS-FramedIpv6Route,msRADIUS-SavedFramedIpv6Route,msSFU30Aliases,msSFU30Name,msSFU30NisDomain,msSFU30PosixMember,msSFU30PosixMemberOf,networkAddress,nisMapName,otherMailbox,photo,preferredLanguage,registeredAddress,roomNumber,secretary,shadowExpire,shadowFlag,shadowInactive,shadowLastChange,shadowMax,shadowMin,shadowWarning,textEncodedORAddress,uid,uidNumber,unixHomeDirectory,unixUserPassword,userPKCS12,userSMIMECertificate,x500uniqueIdentifier"
Whilst this might look like a really long command, all I did was copy the output from the DisplayExclusionsList.vbs file, then input it at the end of the script.
After running the migration again, the attributes moved through very nicely and saved me a lot of time!!
28 August 2018
Deleting Data on Deduped Volume Doesn't Clear Up Space
I have recently cleared up some data on a drive volume which was deduped via Server 2012 R2. The dedupe functionality was working extremely well, and I was getting 80% dedupe on a 3.5TB volume, so no complaints there, however when it came time to archive off some data and then delete it, I noticed that the data wasn't actually freeing up.
This little issue will only occur when you've got Dedupe enabled via the Server OS. Luckily, there's an easy way to get around this, with a quick PowerShell command.
The solution is to enable something called Garbage Collection. This is actually a scheduled job that is designed to reclaiming any unused chunks of data that are no longer being referenced by files that have been recently modified or deleted. WHilst it may run on a scheduled basis, we need to force it to run here, to speed up that process.
Open up PowerShell and type in the following command:
Start-DedupJob D: -Type GarbageCollection -Verbose
The drive letter in bold is whatever your volume is which you'd like to run this on. Once you've done this, the server will kick into action and will start cleaning up the volume. You can monitor it's progress by using the following command:
Get-DedupJob
16 August 2018
Reset SA Password - SQL Server
I recently needed to get into an SQL database, which only had the SA account as a 'sysadmin'. The unfortunate thing was the client didn't have the SA password documented anywhere. So we needed to reset that password somehow, or risk having to completely reinstall SQL!
Luckily, there's a relatively easy way to be able to get into a locked out SQL database, by resetting the SA password. The only caveat, is that you are a local administrator of the SQL server itself. Most of the time it's going to be on the domain, so as long as you have a Domain Admin account, you're going to be able to get in rather easily.
Fisrtly, you will need to download PsExec. It's from the Microsoft website. Extract the contents to your desktop of the server or somewhere you can easily access the .exes within it.
Through CMD, navigate to the location of the EXEs.
psexec -s -i "C:\Program Files (x86)\Microsoft SQL Server\110\Tools\Binn\ManagementStudio\ssms.exe"
This will fire up SQL Management Studio, running as the system account. Once you've done that, go into the security section of SQL and reset the password for the SA account!
It's that simple! Shouldn't take you more than 5 minutes to get in and reset the password, provided you come across this blog ;-)
09 August 2018
Poor SMB performance on new File Server (2012 R2)
Recently upon setting up a new server environment for a client, I noticed that workstations had rather poor performance when accessing data from an SMB on the File and Print server. Transferring of data to the file server was rather slow, and opening up .exes from the network took ~50 seconds before I was prompted to run the application (not acceptable). All servers were Server 2012 R2, and it was running on a Dell T440 with Hyper-V. All the NICs are Broadcom, and the drivers were fully up to date.
After looking into this issue, I discovered that some settings on the Network Adapters needed to be changed. When checking the properties of the network adapter (in this case I had two NICs in a team, so I had to do it on both of them), go to Advanced, and set the following items to Disabled:

After looking into this issue, I discovered that some settings on the Network Adapters needed to be changed. When checking the properties of the network adapter (in this case I had two NICs in a team, so I had to do it on both of them), go to Advanced, and set the following items to Disabled:
- Large Send Offload V2 (IPv4)
- Large Send Offload V2 (IPv6)
- TCP/UDP Checksum Offload (IPv4)
- TCP/UDP Checksum Offload (IPv6)
- Virtual Machine Queues

Keep in mind that when doing this, it will drop off the network adapter for about 10 seconds. If you're doing this on a live Virtual Host, make sure you only do it to one adapter, and wait for the adapter to come back up online, and ensure the NIC Team is fully active again before performing this on the second NIC. This will ensure you don't lose network connectivity to the host, and subsequently to the Virtual Machines.
After doing this for both NICs, I tested netowrk connectivity, and it was considerably faster. Even just loading the file structure on a network drive was immediate, rather than a 1-2 second wait. Testing it out on the same .exe that I had issues with before, it's gone from opening in ~50 seconds, to opening in ~1-2 seconds.
30 June 2018
DCPromo fails with: "The directory service is missing mandatory configuration information, and is unable to determine the ownership of floating single-master operation roles"
I was recently decommissioning an old DC as part of an infrastructure upgrade project for a client of ours. When attempting the DCPROMO process to remove the old DC, I encountered the following error:

This is very easy to resolve, however it usually is a result of an old DC that's no longer in the network that's not been decommissioned properly.
There are two types of error messages that look almost the same, however they will both hold you up when trying to decommission the server:
- ForestDnsZones
- DomainDnsZones
The same process can be followed to resolve each of these messages, and I would suggest that if you encounter the error above, then you sort these both out.
To investigate the issue, you can run the following command, which will tell you the dSMORoleOwner:
dsquery * CN=Infrastructure,DC=ForestDnsZones,DC=domain,DC=local -attr fSMORoleOwner
I received the following results, which shows the orphaned object. You can see this by the "0ADEL:XXXXX" part in the return query.

In order to resolve this, you need to set the new server as the role owner. This can be done in ADSI Edit.
Open up ADSI Edit and navigate to the following path:
CN=Infrastructure,DC=ForestDnsZones,DC=domain,DC=com

Right-click > Properties on 'infrastructure', and under Attribute Editor, search for fSMORoleOwner.
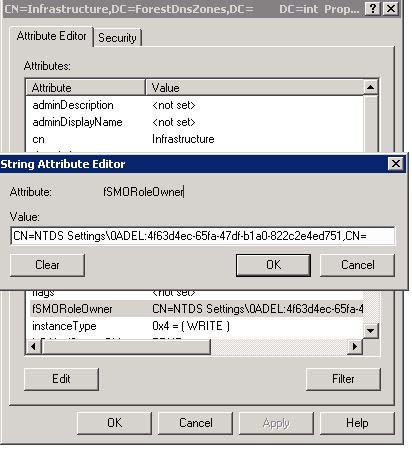
Now replace this with the location of your PDC which should have all the FSMO roles assigned to it:
CN=NTDS
Settings,CN=ServerName,CN=Servers,CN=Perth,CN=Sites,CN=Configuration,DC=Domain,DC=com
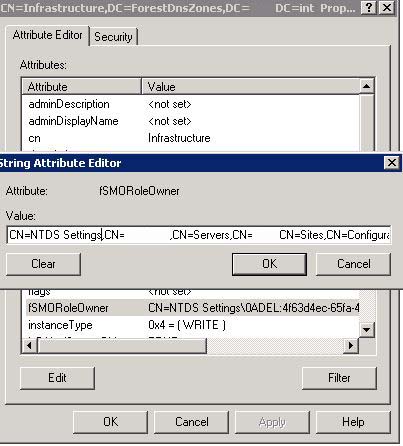
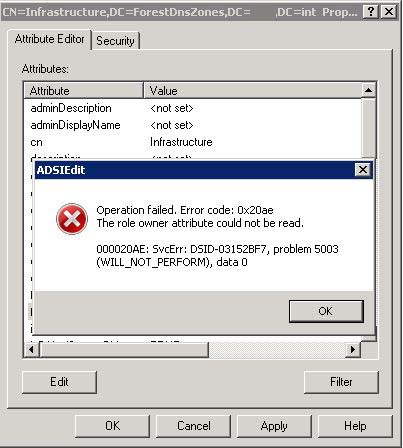
That's it! You're done. If you do notice you get the following error, it will be because you're probably making this change on the troublesome DC. Make sure you do this on one of the other working DCs and you will avoid any errors.
13 April 2018
Backup Exec causing Hyper-V checkpoint build up
Recently when deploying a new network for a client, we installed Backup Exec 15 to run backups of their Virtual Machines from Hyper-V. The backups were working fine, but I noticed that for one VM, there was an excessive amount of checkpoints created, around the time that BE backs up each night.


This command worked well for all the VMs, except APFP01, which had the multiple checkpoints. I got the following error message when I ran that command:


If you have a look at the type of checkpoint, you will notice these are 'recovery' checkpoints, and can't simply be deleted (.AVHDX files).

This creates problems when you're wanting to edit the Virtual Machine settings (especially the hard drives of the Virtual Machine), as it will say there's a checkpoint associated with the machine and you can't edit it. In my case, I was wanting to expand the File Server's storage, but wasn't able to until I sorted out the checkpoints.
The other VMs has the same problem (recovery checkpoints showing up), but there was only one per VM. After looking online, and having to log a support call with Backup Exec, they informed me that this is a feature bug of Service Pack 3. The following link shows their support article:
This article explains that you need to change the backup setting from 'Faster Processing Method', to 'Standard Processing Method'. After doing this, and running a new backup (confirming that it worked etc), I was able to run the PowerShell commands to remove the additional checkpoints.
Get-VMSnapshot -VMName 'VMName' -ComputerName 'HOST' -SnapshotType Recovery | Remove- VMSnapshot

CATASTROPHIC FAILURE! - It's not actually too bad. It just means that you're not going to be able to automatically remove and merge with the command that I had mentioned above. To fix this issue, we're going to have to manually merge each .avhdx file. Firstly let me note that you will have to power down the virtual server before doing this. To do this, you have to go into the location of the Virtual Machines, and find the .vhdx and .avhdx. You need to find the newest .avhdx file, and rename the file extension to .vhdx (remove the 'a'). Once you've done that, click on Edit Disk in Hyper-V, find the .vhdx that you've just renamed, click Merge, then click Merge with Parent. This will take a while depending on the amount of data that you've got. Once that has finished, find the next newest .avhdx file, and rename etc. Repeat the same process and merge with parent disk. Keep doing this until you've merged all the .avhdx files, and you're just left with your original .vhdx file.
Now once you have done this, you're still going to have the checkpoints showing up in Hyper-V. I haven't been able to remove these checkpoints from Hyper-V using any of the commands used within that Backup Exec KB article. To get the server back up and running, you will need to create a new Virtual Machine, and just set the drives to the existing .vhdx files. Once you boot up, this will run exactly the same as the previous server. You can then delete the old, problematic VM from Hyper-V. Just keep in mind that the Virtual Disks you're using are still in the old folder, so don't delete the folder from Hyper-V.
Something that I came across when I was doing this, was that the second drive didn't attach to the server fully. It showed the C: drive and booted without problem etc, but the E: drive was missing. I just had to go into Disk Management and set the disk to Online, as it was offline for some reason.
After doing all of this, I have been able to expand the drives without issue, and there have been no further checkpoints created from Backup Exec (after changing that setting).
21 March 2018
Redirect Virtual Directory to External Website using URL Rewrite
I recently had a client with an externally facing IIS server using the Default Website, and multiple Virtual Directories. They wanted everyone accessing one particular Virtual Directory to be redirected to a completely separate website. The ultimate goal in mind was to ensure that only internal users connecting to http://hostname/virtualdirectory will have access to the page.
After look into the best way to make this work, I found that utilising URL Rewrite on their IIS server would give the best solution.
After replicating the setup in a test lab, I managed to get the URL Rewrite working, to only redirect to an external website when someone accessed http://subdomain.domain.com/virtualdirectory
The following config was entered into the web.config file for the specific Virtual Directory.
<system.webServer>
<rewrite>
<rules>
<rule name="External Redirect" stopProcessing="true">
<match url="Test4" negate="true" />
<conditions>
<add input="{HTTP_HOST}" ignoreCase="true" negate="true" pattern="IIS"/>
</conditions>
<action type="Redirect" url="http://www.google.com.au" redirectType="Found" />
</rule>
</rules>
</rewrite>
</system.webServer>
The items in bold require changing to match your specific IIS setup. These are currently set to replicate my test lab environment.

When navigating to http://iis/test4, it loads the page. When navigating to http://subdomain.domain.com/test4, it redirects to Google. The setting is specific to the Virtual Directory, and other VDs are not affected by this.
After look into the best way to make this work, I found that utilising URL Rewrite on their IIS server would give the best solution.
After replicating the setup in a test lab, I managed to get the URL Rewrite working, to only redirect to an external website when someone accessed http://subdomain.domain.com/virtualdirectory
The following config was entered into the web.config file for the specific Virtual Directory.
<system.webServer>
<rewrite>
<rules>
<rule name="External Redirect" stopProcessing="true">
<match url="Test4" negate="true" />
<conditions>
<add input="{HTTP_HOST}" ignoreCase="true" negate="true" pattern="IIS"/>
</conditions>
<action type="Redirect" url="http://www.google.com.au" redirectType="Found" />
</rule>
</rules>
</rewrite>
</system.webServer>
The items in bold require changing to match your specific IIS setup. These are currently set to replicate my test lab environment.
When navigating to http://iis/test4, it loads the page. When navigating to http://subdomain.domain.com/test4, it redirects to Google. The setting is specific to the Virtual Directory, and other VDs are not affected by this.
21 February 2018
WSUS Fails to Connect
Recently I had a WSUS server which had to be rebooted. Upon restarting the server, I noticed that I could no longer get into the WSUS console. When trying to connect I was receiving the following error message:

Checking the Event Logs, I found two events which showed the following:


My next step was to check the health of WSUS with the following command:
WsusUtil.exe checkhealth
This was run from "C:\Program Files\Update Services\Tools" directory
Running this command gave me the following result:

Upon looking into this further, I noticed that there was a Windows Update which has caused some issues in the past for some people. The update is KB3159706. I checked my server and I did not have this update installed, but thought I would humour it and try the fix anyway. The fix mentioned in the KB article actually resolved the issue. I did the following to get it back up and running:
1. Install the HTTP Activation role under .NET Framework 4.5 Features through Server Manager.


Checking the Event Logs, I found two events which showed the following:


My next step was to check the health of WSUS with the following command:
WsusUtil.exe checkhealth
This was run from "C:\Program Files\Update Services\Tools" directory
Running this command gave me the following result:

1. Install the HTTP Activation role under .NET Framework 4.5 Features through Server Manager.

2. Restart the WSUS service

Yep...it was that easy! After doing that, adding the WSUS server back into the MMC console worked fine and everything was back up and running again.
16 February 2018
Clear the Windows.Old file on C:
If you're like me and you're using an SSD which may not be too large, you might find that there's a significant chunk of data being used up by the Windows.Old file. This contains rollback data from your previous installation before upgrading to Windows 10. If you're not planning on rolling back, then I suggest you clear it up and get rid of that wasted data usage.
To do this, you will need to do the following:
1. Run Disk-Clean Up utility from the Start Menu
2. Click Clean up system files


To do this, you will need to do the following:
1. Run Disk-Clean Up utility from the Start Menu
2. Click Clean up system files
3. Find Previous Windows installations and tick that
4. Click OK and it will clean up all the data on your C: drive that has been wasted in the Windows.Old file.
01 February 2018
TFTP Open Timeout - PXE Boot | SCCM 2012 R2
Recently I was setting up PXE booting with SCCM 2012 R2 (new setup). When starting the client workstation up and pressing F12 to network boot, I got the following error:

Having a look online to find out what this issue was, I struggled to find the exact cause of my particular issue. There were many blogs and posts about this issue, but nothing referred to a solution which would have helped me.
It turns out that this is a bug with Microsoft and there is a Hot Fix available to download. The Hot Fix is available here.
After installing this Hot Fix, I rebooted the SCCM server, then attempted to boot to PXE again on the client workstation. This time it worked perfectly!
31 January 2018
Publish a Shared Calendar | PowerShell | Office 365
I recently needed to publish a Shared Calendar (i.e. Shared Mailbox's Calendar) to the internet, so it could be embedded into a website.
Whilst I'm sure we all know how to publish our own calendars, publishing a calendar that's shared to you is a little bit more difficult. It's not as simple as just going into OWA and then publishing from there, or using Outlook. This needs to be done using PowerShell.
1. Sign into Office 365 | PowerShell
2. Enter the following:
Set-MailboxCalendarFolder <mailboxname>@domain.com:\calendar - PublishedEnabled $True
This will then publish the calendar you've just defined in bold to the internet. Now you will need to get the URL to access this.
3. Enter the following:
Get-MailboxCalendarFolder <mailboxname>@domain.com:\calendar | fl
You will then get the following output:
RunspaceId : 0f40e5da-5712-4043-8bbc-fb11049c0307
Identity : calroom1:\calendar
PublishEnabled : True
PublishDateRangeFrom : ThreeMonths
PublishDateRangeTo : ThreeMonths
DetailLevel : AvailabilityOnly
SearchableUrlEnabled : False
PublishedCalendarUrl : http://outlook.office365.com/owa/calendar/6eba91c3eb20499fabc3d831f38b961b@contoso.com
/5c3a873ee338449bb7d39dd2f7280b933185741279014858945/calendar.html
PublishedICalUrl : http://outlook.office365.com/owa/calendar/6eba91c3eb20499fabc3d831f38b961b@contoso.com
/5c3a873ee338449bb7d39dd2f7280b933185741279014858945/calendar.ics
IsValid : True
ObjectState : Unchanged
The URL for accessing the calendar is highlighted in yellow above.
Also pay close attention to the three items above which are highlighted in blue. You will most likely need to change these from ThreeMonths to OneYear, and also change the availability to reviewer if you'd like the public to actually see the contents of the calendar.
09 January 2018
Reset NTFS Permissions | Export & Import Existing Permissions
I recently encountered a newly installed File Server which had some busted NTFS on it. The file permissions had been copied over from the old File Server, and whilst they looked like they applied well, it was causing some issues accessing files etc.
I decided it was time to completely refresh the permissions on all the folders and sub-folders, to ensure that they applied correctly.
To do this, there's three steps which need to be taken.
I decided it was time to completely refresh the permissions on all the folders and sub-folders, to ensure that they applied correctly.
To do this, there's three steps which need to be taken.
- Export the existing NTFS permissions
- Reset permissions
- Restore old permissions
This is actually quite a simple task to do, and can be done by using ICACLS. The following guide will explain how this can be done.
1. Open PowerShell as Admin (you can also do this within an Administrative command prompt)
2. Run the following command:
icacls C:\TEMP\* /save "C:\Temp\AclFile.txt" /T /C
The part in bold is the 'source' of your NTFS permissions. Selecting "/T" at the end ensures it goes through all the sub-folders as well to copy the permissions of them.
3. Run the following command to reset the permissions:
icacls C:\Temp\* /reset /T /C /L
The part in bold is the 'source' of your NTFS permissions.
4. Restore the permissions by using the following command:
icacls C:\Temp /restore "C:\Temp\AclFile.txt" /T /C
The part in bold is the 'target' of your NTFS permissions.
Note: before doing anything changes to permissions on a File Server, make sure you have either a working backup, or you've recently snapshotted the server.
/T - Traverse all subfolders to match files/directories. This will apply permission changes to all subfolders whether or not they are set to inherit permissions from the parent. On very large directory structures this may take some time as the command has to traverse the entire tree. /C - Continue on file errors (access denied) Error messages are still displayed. /L - Perform the operation on a symbolic link itself, not its target.
02 January 2018
Issues Updating Print Drivers | KB3170455
Recently a client of mine updated their print drivers on the Print Server (through Print Managemnet). Users suddenly had issues printing, where Word would say "Driver Update Required". When a user would go to right-click on the printer and click on "Update Driver", they would get essentially a UAC prompt asking whether they trust that particular printer:

 When they click Install Driver, it looks like it's installing and then it just falls back to the same message. It looks like there's an endless loop where users can't print because of the driver update requirement, but they can't install the driver either.
These printers are deployed through Print Management and are deployed via GPO. There are Point and Print restriction policies in place as well to remove any warnings or UAC prompts for installing new drivers, or updating drivers:


There's currently only two options to get around this:


These printers are deployed through Print Management and are deployed via GPO. There are Point and Print restriction policies in place as well to remove any warnings or UAC prompts for installing new drivers, or updating drivers:

In theory, this should mean that there's no warnings and the drivers should just update. I've had a look on the workstations and they're applying the policy correctly and the changes are there, so it's not an issue with applying the actual GPO. With this in mind though, the warnings are still showing up and the drivers can't be updated.
When running the troubleshooter, it asks whether you want to install the updates with elevated privileges. When doing this, it works fine. After a lot of troubleshooting, this ticket was actually escalated to Microsoft support to look into this.
They confirmed the following:
There was a Windows Security Update recently released which targeted the security of printing. This was KB3170455 and this was the culprit! Essentially what this update does is require drivers to meet certain criteria before they can be used. The criteria is the following:
- Package aware
- Digitally signed
- Catalogue print drivers

Apparently the official drivers we had downloaded from the Canon website did not meet this criteria. Uninstalling this update has resolved the issue for all users.
At the time of writing this blog, there is no official word from Microsoft acknowledging the issue caused by their security update other than what the support technician has told me, but they have confirmed that since the update, there have been a large number of support calls raised to their help-desk.
There's currently only two options to get around this:
- Download another driver that meets the criteria
- Remove the Windows Security Update from all servers and workstations
Note: if you are a small enough company, you can work around this by installing the driver update with elevated privileges.
Subscribe to:
Posts (Atom)