Showing posts with label Office 365. Show all posts

08 April 2021

Switching to the Office 365 Monthly Update Channel

 The following registry change can be made if you'd like to update Office 365 software (i.e. Word/Excel/Outlook) from Semi Annual to Monthly Channel.  This is definitely the recommended setting if you have the Office 365 subscription to ensure you're always getting the most up to date software.

Open Regedit and navigate to the following:

HKEY_LOCAL_MACHINE\SOFTWARE\Microsoft\Office\ClickToRun\Configuration


Search for CDNBaseUrl 


You can simply replace the URL within the key with one of hte above, depending on what you want to set.  Once you've done this, you can re-open the Office app and search for updates.  It'll start updating. 

08 January 2019

Hybrid O365 User Creation

Here's a simple script created by a colleague of mine, for creating a new user account and assigning an O365 mailbox. 

$Users = Import-Csv -Path "C:\Users.csv"
$OU = read.host "What OU would you like the users created in?"       
$domain = read.host "What is your domain?"
$Password = read.host "What password would you like to set all accounts to?"     
foreach ($User in $Users)            
{            
    $Displayname = $User.Firstname + " " + $User.Lastname            
    $UserFirstname = $User.Firstname            
    $UserLastname = $User.Lastname            
    $SAM = $User.Username          
    $UPN = $User.Firstname + "." + $User.Lastname + "@" + $domain
    $Mobile = $User.Mobile
    $Home = $User.PersonalEmail
    New-ADUser -Name "$Displayname" -DisplayName "$Displayname" -SamAccountName $SAM -UserPrincipalName $UPN -GivenName "$UserFirstname" -Surname "$UserLastname" -AccountPassword (ConvertTo-SecureString $Password -AsPlainText -Force) -Enabled $true -Path "$OU" -ChangePasswordAtLogon $false –PasswordNeverExpires $true -MobilePhone $Mobile -HomePhone $Home
    $RemoteRouting = "smtp:" + $UPN
    Enabled-RemoteMailbox $SAM -RemoteRoutingAddress $RemoteRouting
}

The script will prompt the OU path where you want to create the users, the domain and the password you want to use.

It then creates the account, with the fields populated by the CSV file.
Those fields are Firstname, Lastname, Username, Mobile, PersonalEmail
Once the account is created, it will then create the mailbox on 365.

All that's left to do is assign the licenses.

27 December 2018

Replace Primary SMTP Address | AD

I've recently had to replace the Primary SMTP address for all users within an organisation.  Of course this is a lot easier if you script it.

I needed to do this as the client was changing their primary address, but wanted to retain all the current proxyAddresses as well.

This was achieved by using two scripts.

$Users = Get-ADUser -SearchBase 'OU=ouname,OU=ouname,OU=ouname,OU=ouname,DC=domai,DC=com,DC=au' -Filter * -Properties mail,ProxyAddresses | Select-Object samaccountname,ProxyAddresses
    
Foreach ($User in $Users)

            {
            $Samaccountname = $User.samaccountname
            $SMTP = "SMTP:$samaccountname@newdomain.com.au"
            Set-ADUser $samaccountname -Add @{proxyAddresses=$SMTP}
            } 

This script adds the new SMTP address for all users within a certain OU.  Of course this will cause some troubles on its own, as there's now going to be two SMTP addresses, marked as primary.

The following script clears this up:

Get-ADUser -SearchBase 'OU=ouname,OU=ouname,OU=ouname,OU=ouname,DC=domai,DC=com,DC=au' -Filter * -Properties mail,ProxyAddresses |
    Foreach {  
        $proxies = $_.ProxyAddresses | 
            ForEach-Object{
                $a = $_ -replace 'SMTP','smtp'
                if($a -match 'newdomain.com.au'){
                    $a -replace 'smtp','SMTP'
                }else{
                    $a
                }
            }
        $_.ProxyAddresse = $proxies
        Set-ADUser -instance $_

    }

31 January 2018

Publish a Shared Calendar | PowerShell | Office 365

I recently needed to publish a Shared Calendar (i.e. Shared Mailbox's Calendar) to the internet, so it could be embedded into a website.

Whilst I'm sure we all know how to publish our own calendars, publishing a calendar that's shared to you is a little bit more difficult.  It's not as simple as just going into OWA and then publishing from there, or using Outlook.  This needs to be done using PowerShell.

1. Sign into Office 365 | PowerShell

2. Enter the following:
Set-MailboxCalendarFolder <mailboxname>@domain.com:\calendar - PublishedEnabled $True

This will then publish the calendar you've just defined in bold to the internet.  Now you will need to get the URL to access this. 

3. Enter the following:
Get-MailboxCalendarFolder <mailboxname>@domain.com:\calendar | fl

You will then get the following output:

RunspaceId           : 0f40e5da-5712-4043-8bbc-fb11049c0307
Identity             : calroom1:\calendar
PublishEnabled       : True
PublishDateRangeFrom : ThreeMonths
PublishDateRangeTo   : ThreeMonths
DetailLevel          : AvailabilityOnly
SearchableUrlEnabled : False
PublishedCalendarUrl : http://outlook.office365.com/owa/calendar/6eba91c3eb20499fabc3d831f38b961b@contoso.com
/5c3a873ee338449bb7d39dd2f7280b933185741279014858945/calendar.html

PublishedICalUrl : http://outlook.office365.com/owa/calendar/6eba91c3eb20499fabc3d831f38b961b@contoso.com
/5c3a873ee338449bb7d39dd2f7280b933185741279014858945/calendar.ics

IsValid              : True
ObjectState          : Unchanged


The URL for accessing the calendar is highlighted in yellow above.

Also pay close attention to the three items above which are highlighted in blue.  You will most likely need to change these from ThreeMonths to OneYear, and also change the availability to reviewer if you'd like the public to actually see the contents of the calendar.

07 September 2017

Veeam for Office 365 | Invalid Exchange Server version

Recently I noticed that clients of mine who were using Veeam for Office 365 started having issues with the product backing up their emails.

After looking into this, it looks as if Microsoft have updated their Exchange backend version without telling anyone, which has caused this issue.  Whilst there's no update available through Veeam at the moment, logging a support case with them provided me with a fix to get this up and running.

The error message in question here states "Invalid Exchange Server version".  This starts to fail for most mailboxes, and will eventually fail for all mailboxes.  Obviously this is a P1 issue, as you don't have backups up and running.

The fix is only available if you're running version 1.0.0.912, and is the following:


Download the hostfix file from https://storage.veeam.com/Fix_113114_fbcf2c440c.zip and follow the instruction to apply the hot fix. 

The workflow:
  1. Stop all the jobs
  2. Stop “Veeam Backup for Microsoft Office 365 Service”
  3. Rename and replace Veeam.Ews.dll with the DLL from the archive in C:\Program Files\Veeam\Backup365 (don't forget to back up the original DLL)
  4. Start “Veeam Backup for Microsoft Office 365 Service”
  5. Retry the job

After performing this fix, it has 100% resolved the issue for my clients.

30 May 2017

Hide User from GAL - Office 365 | AD Attribute

The following method will allow you to hide a user from the Global Address List if you're using Office 365 with Azure AD Connect.

From within AD, click on View, then Advanced Features


Find the user you'd like to amend and open up their AD object (note you will need to find the user account within AD, you can't search for it).

Find the following attribute and set it to True

msExchHideFromAddressLists


The next time Azure AD Connect syncs, it will update this attribute and the users will be hidden from the GAL.

Note: the GAL can take up to 24 hours to sync for each Outlook application.

07 May 2017

Office 365 Hybrid Deployment - Mail Loop

If you're ever in the middle of an Office 365 Hybrid deployment, you've configured everything correctly but you notice that when you're testing the mail flow from one premise to the other, it's causing a continuous mail flow (you will receive a NDR), the first thing I would suggest you look into is whether there's a gateway in the middle of your on-prem Exchange and your Office 365 environment.

Office 365 Hybrid is only supported if you have nothing between your on prem Exchange, and the O365 environment.  That means no IronPorts etc getting in the way.

I recently encountered an issue where there was a continuous mail flow symptom.  Office 365 was trying to deliver the email to on prem Exchange, it was caught up in the IronPort and then it tried to deliver it back to Office 365.  To get around this I opened Exchange up to the internet by NATting Port 25 on a different WAN IP which would bypass the IronPorts entirely.  I amended the Connectors in Office 365 so they'd connect through that address, rather than through the IronPorts.

Once this was done, the issue resolved itself immediately.

28 April 2017

Create new AD User with Remote Mailbox | Office 365 Hybrid

I recently had a client who had a Hybrid Office 365 who required a set of users to be created, and Office 365 mailboxes created at hte same time.  Whilst I could have had a script to create the users, then go through and add mailboxes to them, I decided that it would be better to smash it all in one hit.

Thanks to my colleague Gareth for writing this script

The following process is comprised of two steps.


  1. Run a script that references a CSV File
  2. A CSV file that has all the relevant information in it
In this case my CSV file had the following:


The BackupEmail was put there at the Client's request.  It was just an area to put the user's personal email address within the AD object.  

The script used is the following, which needs to be saved as CreateUsers.csv.  Note the bold areas which are the variables that have been included.


$Users = Import-Csv -Path "C:\Userlist.csv"
$OU = "OU=Sub-OU,OU=Parent-OU,DC=DOMAIN,DC=com,DC=au"     
foreach ($User in $Users)           
{           
    $Displayname = $User.Firstname + " " + $User.Lastname           
    $UserFirstname = $User.Firstname           
    $UserLastname = $User.Lastname           
    $SAM = $User.Username         
    $UPN = $User.Firstname + "." + $User.Lastname + "@domain"        
    $Password = "<insertpassword>" 
    $Mobile = $User.Mobile
     $remoterouting = "smtp:" + $UPN
     $Notes = $User.BackupEmail
    New-ADUser -Name "$Displayname" -DisplayName "$Displayname" -SamAccountName $SAM -UserPrincipalName $UPN -GivenName "$UserFirstname" -Surname "$UserLastname" -AccountPassword (ConvertTo-SecureString $Password -AsPlainText -Force) -Enabled $true -Path "$OU" -ChangePasswordAtLogon $false –PasswordNeverExpires $true -MobilePhone $Mobile -HomePhone $Notes
    Enable-RemoteMailbox $SAM -RemoteRoutingAddress $remoterouting
}

Save the script as well as the .csv file into the same location, then run the script through Exchange Management Shell.

This will create the user account and will also create the Office 365 Mailbox which can be viewed from either Exchange On Prem, or the O365 Tenant.  Remember that it takes a bit of time for Azure AD Connect to sync all the AD objects as well.  It might help to force an Azure AD Connect sync.

The last step you will need to do is to assign an Office 365 license to that particular user, or users.

21 March 2017

Increase Public Folder Quotas | Office 365

Recently a client of mine received a warning message saying a certain Public Folder was running low on space and they needed to delete some items.


This is the standard message you get from Exchange/Office 365 if your mailbox is running out of space etc, however with this being Office 365, I would have thought this limit would be much larger (or at least the client wouldn't have encountered this message for a period of time).

I logged into Office 365 and checked the Public Folder settings to make sure nothing was explicitly set, and that they were just getting the default quotas.


Whilst you can simply change the storage quotas section to not use the organisation quota defaults, this wasn't really practical as this client had about 15 different Public Folders.  It was much easier to just change the entire organisation's quota defaults and have it affect all the Public Folders.

In order to change this, you will need to do the following:

1. Sign into Office 365 through PowerShell
Note: this links to a previous blog post of mine which goes through how to sign into O365 using PS
2. Type the following command to find out what the current warning and prohibit quotas are set to:

Get-OrganizationConfig -DefaultPublicFolderIssueWarningQuota,DefaultPublicFolderProhibitPostQuota


As you can see here, the warning message is set to 1.7GB, and the prohibit message is set to 2GB. Neither of which is really acceptable. 

I changed this to warn at mailbox size 45GB, and prohibit at mailbox size 49GB.  This will mean that they will not have to worry about this filling up for a long period of time.

In order to do this, I typed two commands:


  1. Set-OrganizationConfig -DefaultPublicFolderProhibitPostQuota 49GB
  2. Set-OrganizationConfig -DefaultPublicFolderIssueWarningQuota 45GB
You can see in the below screenshot that after doing this, I then ran the Get-OrganizationConfig again to confirm the limits.


21 February 2017

Import Mail Contacts into Office 365 from CSV File | PowerShell

This blog post has been created as I have recently needed to upload hundreds of Mail Contacts into Office 365.

1. Create a CSV file which has the following columns:
ExternalEmailAddress,Name,FirstName,LastName

2. Populate the CSV file with the required contents.  Name will be their Display Name, so there cannot be any spaces etc.  Usually with this I will populate the FirstName & LastName and then have the following for Name:
=C2&D2
This will combine the first name and the last name and remove any spaces etc.  Then just drag this down for all the users and it will populate for everyone.

3. Save this file as ImportContacts.csv
4. Open PowerShell ISE and add the following contents
(change the bold section to reflect where you've saved your ImportContacts CSV file).

#Connect To Exchange Online 
$UserCredential = Get-Credential 
$Session = New-PSSession -ConfigurationName Microsoft.Exchange -ConnectionUri https://outlook.office365.com/powershell-liveid/ -Credential $UserCredential -Authentication Basic -AllowRedirection 
Import-PSSession $Session

#Function to pick the CSV File 
Function Get-FileName($initialDirectory) 

[System.Reflection.Assembly]::LoadWithPartialName(“System.windows.forms”) | 
Out-Null

$OpenFileDialog = New-Object System.Windows.Forms.OpenFileDialog 
$OpenFileDialog.initialDirectory = $initialDirectory 
$OpenFileDialog.filter = “All files (*.*)| *.*” 
$OpenFileDialog.ShowDialog() | Out-Null 
$OpenFileDialog.filename 
} #end function Get-FileName 
#Command To Launch Function and store it in the variable 
$PathToCSV = Get-FileName -initialDirectory "C:\Users\adam.arkwright\Desktop\ImportContacts.csv"

#Commands to import CSV file to contacts then export the contact list for comparison 
Import-Csv $PathToCSV | %{New-MailContact -Name $_.Name -DisplayName $_.Name -ExternalEmailAddress $_.ExternalEmailAddress -FirstName $_.FirstName -LastName $_.LastName} 
Get-MailContact | Select DisplayName,ExternalEmailAddress,FirstName,LastName | Out-GridView 
Get-MailContact | Select DisplayName,ExternalEmailAddress | Export-Csv "C:\Users\adam.arkwright\Desktop\ExportedContacts.csv"

5. Save this as ImportContacts.ps1 somewhere easily accessible. 
6. Open PowerShell as administrator and run ImportContacts.ps1

This will then ask you for your Office 365 Username and Password.  Make sure you use the administrator credentials.  If there's any issues, you may find a File Explorer windows pop up.  If this happens, simply navigate to where you've saved the .csv file and double click on it.  Then it will go through and start importing all the contents into your Office 365 tenant.

24 January 2017

Set passwords to never expire | Office 365

Whilst the majority of Office 365 users would have DirSync configured so users will be using their Active Directory user accounts & passwords, some businesses will be using the cloud user accounts, which have their passwords expire.

It's very simple to configure all cloud O365 accounts to have their passwords never expire, which will especially stop the inconvenience of having to update admin accounts etc.

To do this, you will need to log into Office 365 through PowerShell.  You will also need to do the second part of the attached blog by connecting to the MSOL service.

Once you've done that, use the following command:

Get-MSOLUser | Set-MSOLUser -PasswordNeverExpires $true


22 January 2017

Office 365 Published Calendar | Publish Date Range | Extend Past 6 Months

I recently had a client who uses an Office 365 calendar to show up on a website of theirs.  This was to make a certain calendar publicly available to everyone.  They realised that the calendar on their WordPress website was only showing six months ahead of time, and didn't show anything further than that.

This can be changed to a maximum of 12 months ahead of time for viewing calendar items, which I think is sufficient for a publicly available calendar (published calendar).  In order to find out the current setting, you will need to do this through PowerShell with the following command:

Get-MailboxCalendarFolder -Identity <EmailAddress>:\calendar


The field you're looking for is PublishDateRangeTo.  In the screenshot above, it shows the already changed field.  By default, this is set to SixMonths.

This explains why your published calendar suddenly goes blank after exactly six months.  In order to change this, you will need to use the following command:

Set-MailboxCalendarFolder -Identity <EmailAddress>:\calendar -PublishDateRangeTo OneYear

Once you have done this, use the following command to double-check and make sure it's showing the correct setting now.

Get-MailboxCalendarFolder -Identity <EmailAddress>:\calendar

If you check your published calendar, you will see that it now shows 12 months worth of events.

13 January 2017

Assign License via PowerShell | Office 365 | Script

Thanks to my colleague Gareth Harris for this script.

I have recently been running a few large-scale (1000+ mailboxes) and I've had to rely on scripts for assigning licenses and converting mailboxes to shared mailboxes etc.

This blog will cover the script to assign a specific Office 365 license to multiple users, based on their UPN.
  1. Create a folder on your machine called "Office 365"
  2. Create a CSV file with the header of "UserPrincipalName" and then fill the column up with the UPNs of the mailboxes/accounts that you wish to convert to Shared Mailboxes.  Save this as license.csv
  3. Open Notepad and add the following contents:
    $AccountSkuId = "<tenantname>:STANDARDWOFFPACK_IW_faculty"
    $UsageLocation = "AU"
    $Users = Import-Csv "C:\Folder\SubFolder\Office 365\License.csv"
    $Users | ForEach-Object {
    Set-MsolUser -UserPrincipalName $_.UserPrincipalName -UsageLocation $UsageLocation
    Set-MsolUserLicense -UserPrincipalName $_.UserPrincipalName -AddLicenses $AccountSkuId
    }
  4. Save this file as "AssignOfficeLicense.ps1"
To find out the AccountSkuId, you can use the following Cmdlet:

Get-MsolAccountSku

Simply copy the entire line of the license you want, and paste that here:

Log into Office 365 through PowerShell.  You can follow this blog post to be able to do that.  You will also need to use the final cmdlet in that post to connect to MSOL.

Navigate to the Office 365 folder and then run the .ps1 file with the following command:

.\AssignOfficeLicense.ps1

That will then go ahead and start assigning all the Office licenses to the mailboxes that you have mentioned in the CSV file. 

Thanks to my colleague Gareth Harris for this script.

Convert to Shared Mailbox | Office 365 | Script

Thanks to my colleague Gareth Harris for this script.

I have recently been running a few large-scale (1000+ mailboxes) and I've had to rely on scripts for assigning licenses and converting mailboxes to shared mailboxes etc.

This blog will cover the script to convert mailboxes to a Shared Mailbox, and then remove any associated Office 365 licenses with that user.


  1. Create a folder on your machine called "Office 365"
  2. Create a CSV file with the header of "UserPrincipalName" and then fill the column up with the UPNs of the mailboxes/accounts that you wish to convert to Shared Mailboxes.  Save this as license.csv
  3. Open Notepad and add the following contents:
    Import-csv "C:\Folder\SubFolder\Office 365\License.CSV" | foreach {
    $UPN = $_.userPrincipalName
    Set-Mailbox $UPN -Type “Shared”
    $MSOLSKU = (Get-MSOLUser -UserPrincipalName $UPN).Licenses[0].AccountSkuId
    }
  4. Save this file as "ConvertToShared.ps1"
Once you have done this, you will need to sign into Office 365 through PowerShell.  To do this, you can head over to this blog and follow the steps here.

Once you've done this, change your directory to the 'Office 365' folder that you had created.  Then run the 'ConvertToShared.ps1' file.  

.\ConvertToShared.ps1

This will then start the process of converting the mailboxes to 'Shared', and will also remove the licenses if there were any assigned.

Thanks to my colleague Gareth Harris for this script.

Sign into Office 365 | PowerShell

The following commands are used to sign into the PowerShell side of Office 365.  This is mainly for my use as I have to keep Googling where to find it.

$UserCredential = Get-Credential

$Session = New-PSSession -ConfigurationName Microsoft.Exchange -ConnectionUri https://outlook.office365.com/powershell-liveid/ -Credential $UserCredential -Authentication Basic -AllowRedirection

Import-PSSession $Session

If you need to use the MSOL commands, you will need to sign into that too, which you can use the following command:

Connect-MsolService -Credential $UserCredential

12 December 2016

Disable Yammer for all users | Office 365

I recently did an Office 365 migration where our client was using E3 licenses.  This includes a Yammer subscription, which they were not interested in using at this stage.  I was asked to disable this service for all users.

To do this, I did the following:

Get-MsolAccountSku | Format-List –property accountskuid,activeunits,consumedunits
This will show you which license pack you're currently using:


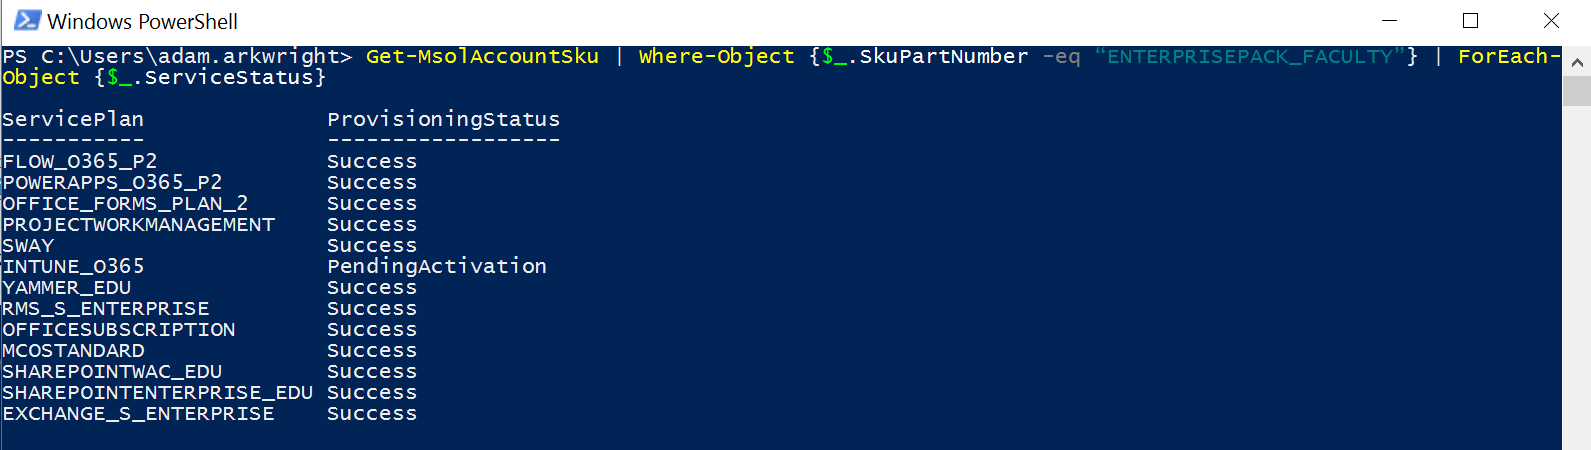
Get-MsolAccountSku | Where-Object {$_.SkuPartNumber -eq “ENTERPRISEPACK_FACULTY”} | ForEach-Object {$_.ServiceStatus}
This shows the license packs that are available for this particular O365 License:
In this case we're wanting to disable "Yammer_EDU".
Type the following:
$x = New-MsolLicenseOptions -AccountSkuId “AccountSKUID:ENTERPRISEPACK_FACULTY” -DisabledPlans “YAMMER_EDU”
Note: the bold section is the AccountSKUID which has been blurred out in this case, but can be found here:
To apply this to all users who have a current O365 license, type the following:
Get-MsolUser -all | Where-Object {$_.isLicensed -eq $True} | Set-MsolUserLicense -LicenseOptions $x
This will take ~5 minutes or so depending on the amount of users you have in your Tenant, however once this has completed, you will notice that the Yammer license is now set to 'off'.

23 November 2016

ExportO365UserInfo.ps1 | You cannot call a method on a null-valued expression

Recently I was performing an Office 365 migration for a client who's on premise Exchange environment was 2007.  Once I had migrated the mail boxes, I needed to convert the users to Mail Enabled Users (MEUs).  This is explained on Microsoft's website here.

There are two scripts you're required to run.  When you're running the first one, which is ExportO365UserInfo.ps1, the MS website states you need to do this from EMS.  This is incorrect.  If you run this script from EMS, you will get the following error message:

You cannot call a method on a null-valued expression.
At C:\migrace\ExportO365UserInfo.ps1:53 char:52
+             $CloudEmailAddress = $CloudEmailAddress.ToString <<<< ().ToLower(
).Replace('smtp:', '')
    + CategoryInfo          : InvalidOperation: (ToString:String) [], RuntimeE
   xception
    + FullyQualifiedErrorId : InvokeMethodOnNull


In order to get around this, and to make the scirpt work, simply run this in normal Powershell instead of EMS.  It will work well and it will create the required cloud.csv file.


Once you've done that, you can run the second command within EMS for it to work well. 

Winthrop Australia provides IT Support and Consultancy in the Perth area.

21 November 2016

Un-hide users from GAL

Exchange 2007
I am in the middle of running an Office 365 migration and during this migration, it's required that I un-hide the users from the GAL (disabled users) in order for O365 to recognise them and migrate them.

My client wants the disabled user's mailbox migrated and then converted to a Shared Mailbox in order to maintain an archive of the mail.  In order to do this, we need a list of all the mailboxes that are hidden, then we can hide them.  Once we're done we can use that same list to hide them again.

Generate CSV for all mailboxes hidden from the GAL

Get-Mailbox | Where {$_.HiddenFromAddressListsEnabled -eq $True} | Select Identity, HiddenFromAddressListsEnabled | export-csv c:\HiddenFromGAL.csv

Set $Users parameter

$users = import-csv C:\HiddenFromGAL.csv

Un-hide the hidden users

Foreach($_ in $users) {Set-mailbox $_.identity -HiddenFromAddressListsEnabled $false}

This will then allow you to perform the migration (in this case I am doing a Staged migration) without O365 failing to find the user accounts.  Once you're done, simply repeat the last two stages. The final stage, change $False to $True.

Contact Winthrop Australia to find out how we can provide you with IT Support in Perth.

Office 365 Migration | Unable to create endpoint | Unable to connect to remote server

I recently was running through an Office 365 Migration (Staged) where I was trying to create the Migration Endpoint.  As I was going through the configuration I was getting the following error message:

After manually typing in the details, I got the following message:


This one was a tricky one as I was running the test through the 'Test Exchange Connectivity' website, and it was all passing without issues.  So it wasn't an autodiscover issue from what I could see. 

After looking into this one for a few hours and not being able to find what the issue could be, I came across an issue with the Autodiscover and IPv6.  When I was on the on-prem exchange server and I tried to ping the FQDN, it resolved an IPv6 address, even though this was disabled on the NIC.

To get around this, I had to edit the Hosts file on the server itself to resolve the IPv4 address when I pinged the server name, and hte FQDN.  After doing this, when I went through the process to create the new migration point, I was able to get past this point and it discovered the server details automatically. 


24 May 2016

Azure AD Connect not syncing to Office 365

Recently we received a call from a client advising that he was in the Office 365 Admin Portal, and noticed that there hadn't been a sync for the last 3 days or so.  He'd asked us to log in and take a look.

DirSync, or Azure AD Connect as it is now called, relies on two account credentials to work properly.  A domain admin account, and an admin O365 account.  Generally, you will create a service account for Azure AD Connect, mark it as a Domain Admin, and then never change the password again.  The Admin Account you should rarely change the password to either.

In this case, the password for the Office 365 Admin account had been reset, which caused authentication to fail and the sync to no longer work.  Running the Azure AD Connect wizard again to re-enter the new credentials will resolve this issue straight away, and you will notice the synchronisation happening immediately.