17 August 2016

Software Center | Application Installation Error | 0x87D00607

Recently a client of mine was deploying some applications within SCCM 2012 R2 using the Software Center.  The application was setup correctly and was showing in the Software Center, but it was failing when the user tried to install the app.

They were getting the following error message:


Looking further into this error message and checking the SCCM configuration, it looks like the subnet wasn't included within the Boundaries and Boundary Groups in SCCM itself.  This is why the deployment was failing.  In order to resolve this, the subnet needed to be added into the appropriate boundary, and then into the Boundary Group.  Once this was done,  you can hit 'Retry' and it will work for you immediately. 


15 August 2016

SYSPREP and Capture a workstation using WDT

I have recently been out at a client who are wanting to create a new SOE image.  This will be 100% used by a USB drive to image machines.  The reason behind this is that the workstations being images are 'kiosk' machines which don't have any network access other than internet, sos it rules out WDS or SCCM deployment.

The client currently has Windows Deployment Toolkit installed, so I have used this to create the SYSPREPed image.  There are a few 'gotchyas', so I thought I would blog this process to clear it up.

Desired Outcome
The client would like to setup a workstation and install software on the machine.  Once the software has been installed and everything is up to date,  they'd like to image this machine and deploy it to about ~30 machines across three sites.

Process
The first step is to cleanly install Windows (in this case it's Windows 10) and make sure it's fully up to date with Windows Updates.  Once that is done, you can start installing your desired applications and get them up to date as well.

From the WDT server, you are going to be working in the Deployment Workbench.  Assuming that you have already created a new Deployment Share, do the following:

Create a new Task Sequence and set it to Sysprep and Capture


Once this has been created,  go into the Deployment Share location and edit the ClientSettings.ini file.


Change this to the following:


Once you have done that, you are then able to run the commands from the reference computer.  Make sure your user account has access to the share that has been created when you created the deployment share, then map the drive using CMD
.
Net Use * \\ServerName\DeploymentShare$

This will then ask you to authenticate with your domain account.  Once you've done that, you can run the following VB Script:

\\ServerName\DeploymentShare\Scripts\LiteTouch.vbs

This will then run and will asks you where you want to save the .WIM file to.  Once you have selected this, you can just kick the capture off and wait for this to complete.  Once this has completed, you now have a sysprepped image that you are able to use for either USB deployment or to import into WDS or SCCM.

I will make another post about imaging the computers at a later time.

03 August 2016

Operating System Deployment (OSD) with USMT Task Sequence Guide | SCCM 2012 R2

I have recently been setting up User State Migration as part of Operating System Deployment through SCCM 2012 R2.  What this will allow, is the re-installation of an Operating System whilst saving the user's locally saved data, such as data on Desktop, My Docs, background picture etc.  You can even go as far as to allow users to initial their own OS Refresh if they were having problems on their workstation.  It's a very good way in reducing IT Support overheads if you've got a stable SOE image.

The reason for this blog post however, is that USMT and OSD is a pain to get working well, and there's not a lot of information out there that specifically shows you how the Tasks Sequences should be configured.  After two days of playing around with SCCM trying to get this all working, 1,000,000 log files and a lot of Googling, I managed to get everything resolved and have got a stable Task Sequence running to refresh the Operating System.

Below are the requirements you will need to not only Build and Capture your image, but then also create the Task Sequence to refresh your OS with USMT.

Build and Capture
When setting up OSD and using USMT, it is critical that you correctly Build and Capture an image.  What I mean by this is that if you use the B&C Task Sequence and don't correctly set it up (it doesn't just work natively), you will have issues down the line with the second Task Sequence.

Once you have gone through the process of creating the Build and Capture task sequence, go to edit it and make the following changes:

Partition Disk 0 - BIOS

Partition Disk 0 - UEFI

Preserve Drive Letter - False


Apply Operating System
Select the Windows 7 Professional Image (or whatever one you're wanting to install), then select Logical drive letter stored in a variable, and type in System


Once you've done this, you will be able to run the Build and Capture task sequence.  Make sure it's saved to a location that computers will have access to.  This will be used when you're creating your OSD with USMT task sequence.

Operating System Deployment with USMT Task Sequence
This is the main Task Sequence for copying the user's local data, refreshing the Operating System, then copying the local data back.  This will usually be accessed from the Software Center within the Windows Operating System of the user's computer.

There's not too many settings you will need to change here, but if you don't get this right, it will cause hours of grief and Googling to try and work out why it's failing.

Partition Disk 0 - BIOS

Partition Disk 0 - UEFI

Preserve Drive Letter - False


Apply Operating System
Select the "2-2" image that you would have created within the Build and Capture sequence.  Then select Logical drive letter stored in a variable and type in System


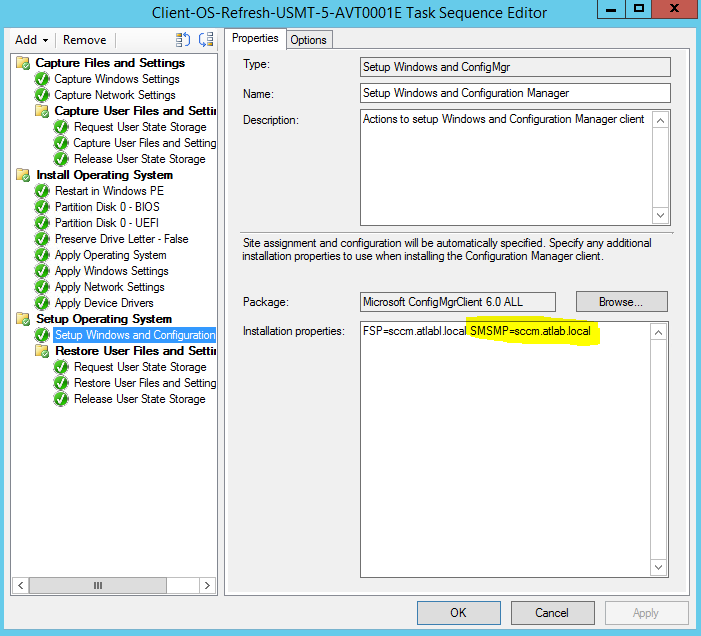
Setup Windows and ConfigMgr
Make sure you add the highlighted section below.  This is not automatically added in.  This will be the FQDN of your SCCM server.


That's it!  If you've made sure that security permissions are set correctly (NTFS) on the SCCM server where USMT data will be stored and where data will be referenced, you will find that OSD will work smoothly and there shouldn't be any errors with your setup.

02 August 2016

OSD Task Sequence Fails | Formatting Drive | SCCM 2012 R2 | 0x80070057

Recently I was running a Task Sequence in SCCM 2012 R2 to refresh the Operating System on a workstation.  The Task Sequence would use USMT to capture the user data, then format the HDD and reinstall the OS.

It was running fine until it got to the point where it was going to format the drive, then I got this error:

Upon receiving this error, there were two items that I checked.  The first was within the Task Sequence itself.
As you can see down the bottom of the screenshot, the destination is set to Logical drive letter stored in a variable.  The Variable name has been define as System.  When checking the Partition Disk 0 section, I noticed that there was no variable set for the appropriate partition.


Make sure you go through both the BIOS and the UEFI section and add System as a variable for the 'Primary' partition.  

After doing this, I checked out my .wim file that this Task Sequence was using and made sure that appropriate permissions were set on the folder.  In this case I just gave Everyone read access to the .wim file.  

After making these two changes, I ran the Task Sequence again, and as you can see, it progressed past this point.


If you're running a Task Sequence and you get the 0x80070057 error message, make sure you check these two items before troubleshooting further.  It may save you hours!

01 August 2016

Failed to Run Task Sequence | 0X8004005 | SCCM 2012 R2

When running a Task Sequence through SCCM on a workstation, you may run into the following error message:


Whilst there could be other reasons that you're getting this error message, the first thing you should do is to check your BIOS Clock.  Make sure this is accurate, reboot and then run the Task Sequence again.

A lot of times you will find that this resolves the issue.

15 July 2016

Intel SCS Task Sequences not working with SCCM 2012 R2 | Intel AMT: Configuration

This post follows on from my previous post which was about running a Task Sequence for Intel AMT: Discovery.  This post is in relation to the next Task Sequence in the list, which is called Intel AMT: Configuration.

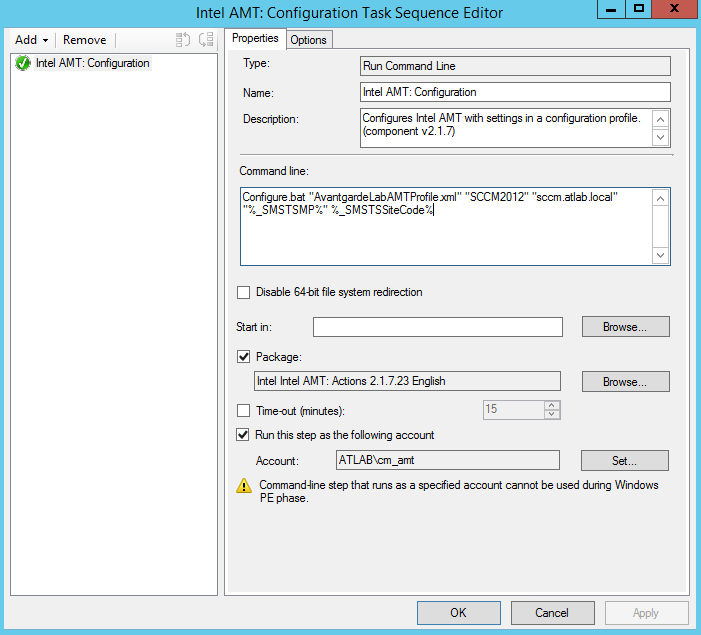
This Task Sequence has the following details within SCCM:


Essentially the %% details are taken from within the Configure.bat script.  Running the TS isn't a problem, but it is deciding to fail when after it's downloaded the required data:

Surprise surprise!  I guess it wouldn't be SCCM if there wasn't issues!  Now the fun part of finding out why it's failing!  I had a look at the event logs on the workstation that I was running this TS on and I came across this event:


So we've got a few errors here.  TCP Error, Caller is unauthorised, Valid password not found.  From here I checked the SMSTS.log files to see what was happening.  The logs were about 41 pages long, so I'm not going to copy it all here, but there were various errors within this:

<![LOG[Failed to run the action: Intel AMT: Configuration. 
The process cannot access the file because another process has locked a portion of the file. (Error: 00000021; Source: Windows)]LOG]!><time="15:10:04.029-480" date="07-14-2016" component="TSManager" context="" type="3" thread="2724" file="instruction.cxx:895">

I had a look at the Configuration.bat file that the Task Sequence was calling and made a few changes to the contents:


I also ensured that the following contents had been edited so it was showing the correct SCCM server, and site:


Once I had done this, I ran the batch file again from the local workstation (instead of running it through Software Center) so I could see how it was running, and whether there were any error messages etc.  This time it progressed a lot further than before.  I don't have a screenshot of the error message that I was getting this time, but it was essentially connecting to the AMT device and then erroring out saying that the password was incorrect. 

Looking into the setup of the whole script/software, it looks like Intel SCS and Intel AMT: Configure relies on AMT not being configured on the local device.  What had happened was this device had been setup with MEBx (which is essentially the AMT login through BIOS) where it forces you to reset the password.  When this script was trying to connect to the device, it was using the default "admin" password which was incorrect as it had been changed.  This is why it was failing. 

The only way to get around this was to take out the CMOS battery to completely reset the BIOS and MEBx.  After doing this, I confirmed that the "admin" password was back in, not the custom password we had originally configured.  When running the script now through Software Center, it works!!


After doing this, I was able to Discover AMT Status through SCCM:


Once that was complete, it now showed me that the device had been externally provisioned!  


We can now control the device through SCCM:


Part 1 - Intel AMT: Discovery

14 July 2016

Intel SCS Task Sequences not working with SCCM 2012 R2 | Intel AMT: Discovery

Recently I have been labbing a new setup with SCCM 2012 R2 with Intel SCS.  The idea was to get Out of Band Management working with SCCM for some workstations which had Intel AMT.  I followed this guide, which was very helpful in getting everything setup.  The only difference was that I was using the latest version of Intel SCS 11.0 rather than version 9.0.  When I ran into some issues (and let's face it, you always run into issues when using SCCM), I noticed that there was literally nothing online with regard to the issue I was having...so here it is!

The problem I hit was when I was enabling the various Task Sequences to run discovery and configuration of the workstations for Intel AMT.  The first task sequence works fine, which is Intel SCS Platform Discovery.  The second task sequence however; Intel AMT Discovery fails when I try to run it.  I'm not really able to find out what is going on through the logs, as you know with SCCM, it's almost impossible to find anything as there's like 1,000,000 logs to sift through.

Looking into the Task Sequence, all it does it call up a batch file called Discover.bat.  I ran this script manually, adding a pause command at the end so I could see what was going on.  I noticed the following errors:


So it looks like there's nothing wrong with SCCM, and there's potentially nothing wrong with the batch script.  The issue looks to be certificate related.  Great!

Looking at the batch file, it calls an Executable file to run.  I opened this file up (right-click, Properties), then checked the Digital Signatures of the file:


As you can see, there's a lot of intermediary certificates that are required.  I only had the Root CA certificate installed.  I went through that list and installed each certificate, then ran the Task Sequence again from Software Center (through SCCM).  This time it was successful.  In future, we will need to ensure that these certificates are exported and then deployed to all computers within the network.

Part 2 - Intel AMT: Configuration

04 July 2016

Remote Desktop licensing mode is not configured

Recently when I was on a client's server, I noticed a message popping up saying that Remote Desktop licensing mode was not configured.


When looking at the RD Licensing Diagnoser, it showed the following details:


The warning says "The licensing mode for the Remote Desktop Session HOst server is not configured".  Down the bottom of the screen, you can also see "The Remote Desktop Session Host server is not configured with any license server".


To fix this problem you will need to run two PowerShell commands to ensure that the server is targeting the correct licensing server.  The commands are the following:

$obj = gwmi -namespace "Root/CIMV2/TerminalServices" Win32_TerminalServiceSetting

$obj. SetSpecifiedLicenseServerList("licserver.domain.local")

Change the last section to ensure that the FQDN of the licensing server has been added in.  Once you've done that final command, you should see the following:


The final step once this is done is to change a registry entry.  Changing this registry entry will manually set the licensing mode of the server.  Open up Regedit and go to the following location:

HKLM\SYSTEM\CurrentControlSet\Control\Terminal Server\RCM\Licensing Core\LicensingMode

LicensingMode is a DWORD which will need to have it's value changed.  Your options are below:

2 - Per Device
4 - Per User

I changed mine to '4' as I wanted it to be licensed 'per user'.  


Once you've done that, simply reboot the server and you should no longer have this problem.


01 July 2016

File Server Resource Manager (FSRM) showing inaccurate quota usage

Recently a client of mine came to me saying that File Server Resource Manager (FSRM) Quotas wasn't reporting accurately.  On this particular network, Folder Redirection had been enabled and all data was being redirected back to the file server.  There was a 250MB quota setup for each user's redirected folder (ie Desktops has 250MB limit).

FSRM Quotas was showing that a particular user's Desktop folder was using 160% of the quota limit.


When checking how much data is actually being used in that folder through FSRM, it shows the following:


When checking the file location, it's also showing that the folder is empty.  I ensured that Hidden Folders were being shown.

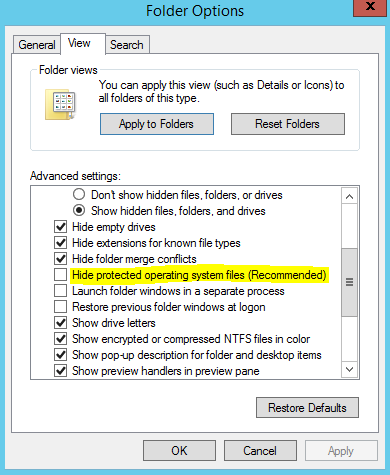
Checking the 'Size on Disk', it definitely gave the same file size of 401mb, so I knew that there's definitely something within that folder that's not being shown to me.  I checked the view settings of the folder and had to un-tick the following item:


With that un-ticked, I was now able to see the Recycle Bin within the user's folder:


So now we have worked out why FSRM is showing what it's showing, we need to remove all the Recycle Bin files from each user's Folder Redirection location.  This was relatively easy, and I did it with a batch script, which had the following in it:

for /d %%i in (E:\Users\FolderRedirection\Desktops\*) do @ rd /q/s "%%i\$Recycle.Bin

for /d %%i in (E:\Users\FolderRedirection\Documents\*) do @ rd /q/s "%%i\$Recycle.Bin

for /d %%i in (E:\Users\FolderRedirection\Pictures\*) do @ rd /q/s "%%i\$Recycle.Bin

for /d %%i in (E:\Users\FolderRedirection\Music\*) do @ rd /q/s "%%i\$Recycle.Bin

for /d %%i in (E:\Users\FolderRedirection\Videos\*) do @ rd /q/s "%%i\$Recycle.Bin

pause

Running this script goes through all the usernames and then removes all the $Recycle.Bin files within the specific folders.  You will need to adjust the location to ensure that it's targeting the correct folders within your network. 

30 June 2016

Microsoft Word 2013 - Insufficient Memory or Disk Space

Recently a client called up saying that they are getting the following error message every time they open up Word:

This error is only appearing on one particular user's computer (not the entire office) and also when they open Word in Safe Mode, it's non-existent, which is a good sign.  When the client is getting this error message, when they try to close down Word, they also receive the following message:


The strange thing is that this error message only appears when the user gets the "Insufficient memory or disk space" error as well.

After looking into the computer, the first thing I did was to delete the normal.dotm file.  This alone didn't make any difference and the error messages were still coming up.  After this, I checked the Add-Ins and disabled all of the add-ins which were originally enabled.  With all the add-ins disabled, Word was working perfectly.  This obviously now points to an issue with Add-Ins.  I ensured that there were no GPOs which were affecting Office (there was but I un-linked them and confirmed the issue was still happening).  

Repair of Office didn't resolve the issue, nor did an uninstall of Office.  Sometimes when uninstalling Office, it doesn't actually remove all files, folders and registry entries which are associated with the application.  This could be why the uninstall and reinstall didn't work.  To get around this, you need to run the Microsoft FixIt to obliterate all traces of Office.  This can be found here.

After nuking Office, rebooting and then reinstalling, Word was now behaving itself and the add-ins are now working.  

Inflate VMDK file - VMWare

Recently I had a request come through from a client to change a Virtual Machine's disk from Thin to Thick provisioned.

To achieve this is relatively easy and can be done by following these steps:

1. Log into vSphere and get the location of where the Virtual Machine disk is located


2. Power off the Virtual Machine
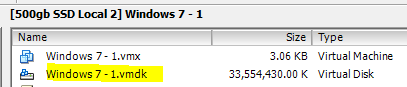
3. Browse the Datastore and find the .vmdk file


4. Right-click on the .vmdk file and click Inflate


5. This will then inflate the drive up to the provisioned size you had originally selected when you created the drive.
6. Power on Virtual Machine

There shouldn't be a need to do anything further once the Virtual Machine has been powered on.  It will boot up the same as it did before, but the difference is that the .vmdk file is now Thick Provisioned.


Note that you cannot have any Snapshots associated with this virtual machine before going through this process.

28 June 2016

Configure SSL for Apache Tomcat

Recently a client of mine required SSL to be enabled for Apache Tomcat.  A 3rd party had installed their software and setup Tomcat, but required it to be configured for SSL  This was a rather large pain to get going, but now that it's working, I feel it would be rather helpful having the full instructions on what to do to get it all up and running.

Basically how it works is that you have to create a KeyStore that will reside on the server that's running Tomcat.  This KeyStore will contain certificates for the server and will be referenced by a server.xml file which controls Tomcat.

Generate the CSR
1. Create a new folder in C: called "Tomcat SSL".  This will house all the certificates and KeyStores associated with this task.

2. From a Command Prompt, navigate to the Java folder and find keytool.exe
Usually located here: C:\Program Files (x86)\Java\jre1.8.0_91\bin

3. Create the new KeyStore by typing in the following command:
keytool.exe -genkey -alias [fqdn of website] -keyalg RSA -keystore "C:\Tomcat SSL\Keystore.jks"

This will then ask you to type in a password.  It doesn't have to be too complex, but make sure it's something you can remember.

CMD will then prompt you for the following information:

  • First and Last name
  • Name of organisation unit
  • Name of organisation
  • City of Locality
  • State or Province
  • two-letter country code for this unit
Once you've done that, confirm that you have all the details correct by typing in yes and then hitting enter.

4. Generate a CSR to create the certificate from.  To do this, type the following command:
keytool.exe -certreq -keyalg RSA -Alias [fqdn of website] -KeyStore [Location of Keystore.jks file] -File "C:\Tomcat SSL\tomcatssl.csr"

This will then ask you to type in the password that you had set in the last section to confirm that you have permissions to do this.  Once you have done this, you will need to go to a CA and generate a new key.  I personally use DigiCert to get this done.  When you create the certificate, it will ask you what platform you want to generate it for.  Choose tomcat.  

Once DigiCert have generated the certificate and you go to download it, it will ask you how you wish to download this.  Select that you want to have all the individual .crt files within a .zip file.


This will include the certificate that you have just generated, as well as the root certificate and also an intermediary certificate.  You can work out which certificate is which by viewing the certificate, then clicking on Certification Path

The order will usually be the following
  1. TrustedRoot.crt - Root
  2. DigiCertCA.crt - Intermediary
  3. [fqdn of website].crt
Knowing which cert is which will come in hand in the next step.

Import the Certificates
5. Import the RootCA certificate with the following command:
keytool.exe -import -alias root -keystore "C:\Tomcat SSL\keystore.jks" -trustcacerts -file "C:\Tomcat SSL\TrustedRoot.crt"


6. Enter the KeyStore password to allow this certificate to be imported.

7. Import the Intermediary certificate with the following command:
keytool.exe -import -alias intermed -keystore "C:\Tomcat SSL\keystore.jks" -File "C:\Tomcat SSL\DigiCertCA.crt"

8. Enter the KeyStore password to allow this certificate to be imported

9. Import the final certificate with the following command:
keytool.exe -import -alias [fqdn of website] -keystore "C:\Tomcat SSL\keystore.jks" -File "C:\Tomcat SSL\[fqdn of website].crt"

10. Enter the KeyStore password to allow this certificate to be imported.

This now finishes the requirements to get the certificates installed and ready to go on the Tomcat server.  Now we have to tell Tomcat to use SSL and to use the specific KeyStore to obtain the certificates etc.

Configure Tomcat's SSL Connectors
1. Go to the following location 
C:\Program Files (x86)\Apache Software Foundation\Tomcat 8.0\conf

2. Find server.xml and open this up in Notepad

3. Scroll down the document until you can find the following section:

<!-- Define a SSL/TLS HTTP/1.1 Connector on port 8443
         This connector uses the NIO implementation that requires the JSSE
         style configuration. When using the APR/native implementation, the
         OpenSSL style configuration is required as described in the APR/native
         documentation -->

4. Right under this section, you will see the Connector Port showing as 8443 and then what protocol it is

5. Remove what has been written there and type in the following:
<Connector port="443" protocol="HTTP/1.1"
               maxThreads="150" SSLEnabled="true" scheme="https" secure="true"
               clientAuth="false" SSLProtocol="TLS" 
keystoreFile="C:\Tomcat SSL\keystore.jks"
keystorePass="[password of keystore]"  />

6. Changing the port from 8443 to 443 will mean that you don't have to go to https://localhost:8443, but you can just go to https://localhost.

7. That whole section should look like the following:

    <!-- Define a SSL/TLS HTTP/1.1 Connector on port 8443
         This connector uses the NIO implementation that requires the JSSE
         style configuration. When using the APR/native implementation, the
         OpenSSL style configuration is required as described in the APR/native
         documentation -->
   
    <Connector port="443" protocol="HTTP/1.1"
               maxThreads="150" SSLEnabled="true" scheme="https" secure="true"
               clientAuth="false" SSLProtocol="TLS" 
keystoreFile="conf/keystore.jks"
keystorePass="[password of keystore]"  />

8. Find the Apache Tomcat service and restart it

9. Once you have restarted the serivce, you should be able to go to https://localhost and it will load the tomcat webpage using TCP443.

10. Remember that because you're accessing it internally and testing using localhost, it's going to give you a certificate error.  This will not happen if you're accessing it using the FQDN of the website