29 March 2017

Update App Deployment Client Connectivity Restriction | SCCM

I recently had a client who's using SCCM, and was needing to install a particular application on many computers.  These machines happened to be in a workshop and they were testing the deployment by doing the manual install (through Software Centre).  They noticed that whilst they elected to install this particular app on about 30 machines, most of the workstations would say "Waiting to install", whilst only about 5 or so machines would actually be installing the app at one time.

Ultimately every machine received the application, however they wanted to know why it was limited to this small number, and what we could do to increase that.

To update this number to allow more machines simultaneously installing applications, we need to do the following:

Administration > Site Configuration > Sites > Configure Site Components > Software Distribution

The highlighted section is what I had updated.

The next part I updated was the following:

Administration > Site Configuration > Sites > Right-click site name and click Properties > "Sender" tab

I updated the circled settings to be 15 each.


21 March 2017

Increase Public Folder Quotas | Office 365

Recently a client of mine received a warning message saying a certain Public Folder was running low on space and they needed to delete some items.


This is the standard message you get from Exchange/Office 365 if your mailbox is running out of space etc, however with this being Office 365, I would have thought this limit would be much larger (or at least the client wouldn't have encountered this message for a period of time).

I logged into Office 365 and checked the Public Folder settings to make sure nothing was explicitly set, and that they were just getting the default quotas.


Whilst you can simply change the storage quotas section to not use the organisation quota defaults, this wasn't really practical as this client had about 15 different Public Folders.  It was much easier to just change the entire organisation's quota defaults and have it affect all the Public Folders.

In order to change this, you will need to do the following:

1. Sign into Office 365 through PowerShell
Note: this links to a previous blog post of mine which goes through how to sign into O365 using PS
2. Type the following command to find out what the current warning and prohibit quotas are set to:

Get-OrganizationConfig -DefaultPublicFolderIssueWarningQuota,DefaultPublicFolderProhibitPostQuota


As you can see here, the warning message is set to 1.7GB, and the prohibit message is set to 2GB. Neither of which is really acceptable. 

I changed this to warn at mailbox size 45GB, and prohibit at mailbox size 49GB.  This will mean that they will not have to worry about this filling up for a long period of time.

In order to do this, I typed two commands:


  1. Set-OrganizationConfig -DefaultPublicFolderProhibitPostQuota 49GB
  2. Set-OrganizationConfig -DefaultPublicFolderIssueWarningQuota 45GB
You can see in the below screenshot that after doing this, I then ran the Get-OrganizationConfig again to confirm the limits.


20 March 2017

Configure Squid Proxy with LDAP Auth | Active Directory

Recently a client of mine asked if we could implement a proxy server which forced each user to authenticate with their AD credentials.  They currently had a rather cut-down Squid server running in their environment and it was logging traffic, but there was no way to work out which users were browsing the most.  There was IP tracking, but when using a hot-desk situation, no user had a specific machine.

The following steps are what I've done to get this up and running where it forces each user to authenticate against AD, and denies all access if they don't authenticate correctly.

Assumptions: there is the assumption that you've already got a working copy of Linux up and running in your virtual environment.  In this case, I was using Ubunut 16.04.
The other assumption is that you have installed the LDAP role within Server Manager within your AD environment.

1. Download/Install Squid
sudo apt-get install squid
This will install Squid onto the Linux machine.  

2. Open ldap.conf which can be found at /etc/ldap/ldap.conf
3. Set BASE to your domain (in my case its test.internal as I've blogged this within a test environment).  I've updated the URI section too, however it's hashed out and not needed.
4. Edit squid.conf which can be found here: /etc/squid/squid.conf
5. Search for the follow section auth_param basic program, then enter the following details:
Note: most of this will already be there, you will just need to un-hash it.  The IP address used is the DC.  The blurred out section is the password I have used for the Administrator account which is mentioned within this section.
Also note that the credentialsttl will be how long a user can be logged in for before they're prompted again.  For testing purposes I set it to 15 minutes, you could set this to 2 hours.
6. Within the same document, search for acl safe_ports and then add the highlighted section below:
7. In the same document, search for http_access allow localhost, then add the highlighted section underneath it
8. Search for cache_dir ufs and then un-hash that section
9. Update the proxy settings within your environment to point to the Squid server on port 3128.  When you try to access a website, you should be greeted with the following message:


Install reporting tool for tracking user's browsing
In order to track the user's browsing, you will need to get Webmin, and also SARG.  These work together to allow you to make nice little reports which will show where users have been going and how much data they're using etc.

The following tasks will be completed within the Terminal
1. sudo nano /etc/apt/sources.list
2. Add the following two lines to the document you've just opened up
deb http://download.webmin.com/download/repository sarge contrib
deb http://webmin.mirror.somersettechsolutions.co.uk/repository sarge contrib
3. Save the document and close out of it
4. sudo wget http://www.webmin.com/jcameron-key.asc
5. sudo apt-key add jcameron-key.asc
6. sudo apt-get update
7. sudo apt-get install webmin -y
8. sudo ufw allow 10000

This will then allow you to access the Webmin web portal on https://localhost:10000
Log in with your administrator (local admin) credentials

Click on un-used modules then find Squid Proxy
You will most likely see a message saying it wasn't able to find squid.  This will be because it's looking for /squid3/ rather than just /squid/.  You will need to edit the config and change squid3 to just squid everywhere you see it.


In order to use the Squid Report Generator, you will need to install SARG.  To do this, open Terminal and type the following:

sudo apt-get install sarg

Then you can click on Squid Report Generator within Webmin and be able to run reports on usage etc.

21 February 2017

Import Mail Contacts into Office 365 from CSV File | PowerShell

This blog post has been created as I have recently needed to upload hundreds of Mail Contacts into Office 365.

1. Create a CSV file which has the following columns:
ExternalEmailAddress,Name,FirstName,LastName

2. Populate the CSV file with the required contents.  Name will be their Display Name, so there cannot be any spaces etc.  Usually with this I will populate the FirstName & LastName and then have the following for Name:
=C2&D2
This will combine the first name and the last name and remove any spaces etc.  Then just drag this down for all the users and it will populate for everyone.

3. Save this file as ImportContacts.csv
4. Open PowerShell ISE and add the following contents
(change the bold section to reflect where you've saved your ImportContacts CSV file).

#Connect To Exchange Online 
$UserCredential = Get-Credential 
$Session = New-PSSession -ConfigurationName Microsoft.Exchange -ConnectionUri https://outlook.office365.com/powershell-liveid/ -Credential $UserCredential -Authentication Basic -AllowRedirection 
Import-PSSession $Session

#Function to pick the CSV File 
Function Get-FileName($initialDirectory) 

[System.Reflection.Assembly]::LoadWithPartialName(“System.windows.forms”) | 
Out-Null

$OpenFileDialog = New-Object System.Windows.Forms.OpenFileDialog 
$OpenFileDialog.initialDirectory = $initialDirectory 
$OpenFileDialog.filter = “All files (*.*)| *.*” 
$OpenFileDialog.ShowDialog() | Out-Null 
$OpenFileDialog.filename 
} #end function Get-FileName 
#Command To Launch Function and store it in the variable 
$PathToCSV = Get-FileName -initialDirectory "C:\Users\adam.arkwright\Desktop\ImportContacts.csv"

#Commands to import CSV file to contacts then export the contact list for comparison 
Import-Csv $PathToCSV | %{New-MailContact -Name $_.Name -DisplayName $_.Name -ExternalEmailAddress $_.ExternalEmailAddress -FirstName $_.FirstName -LastName $_.LastName} 
Get-MailContact | Select DisplayName,ExternalEmailAddress,FirstName,LastName | Out-GridView 
Get-MailContact | Select DisplayName,ExternalEmailAddress | Export-Csv "C:\Users\adam.arkwright\Desktop\ExportedContacts.csv"

5. Save this as ImportContacts.ps1 somewhere easily accessible. 
6. Open PowerShell as administrator and run ImportContacts.ps1

This will then ask you for your Office 365 Username and Password.  Make sure you use the administrator credentials.  If there's any issues, you may find a File Explorer windows pop up.  If this happens, simply navigate to where you've saved the .csv file and double click on it.  Then it will go through and start importing all the contents into your Office 365 tenant.

17 February 2017

Windows 10 | Connect to wireless automatically before logging in

A client of mine had a MS Surface running Windows 10.  They were almost 100% wireless and kept running into issues where they'd login to their profile and then it would connect to the wireless.  That's not usually a problem, however in this case it was a roaming profile and caused some issues with connectivity.

To get around this, I was able to save the credentials prior to logging in, which allowed the Surface to connect to the Wireless before they actually go through the login process, and ensure that it has access to a Domain Controller.

Click on the 'WiFi' option from Network Settings


Click Wireless Properties
Click Advanced Settings

Select User Credentials then click Save Credentials.  It will then ask you to type in a username and password which it will then use to authenticate against the wireless prior to logging in.

Note: this isn't a scalable solution, and merely designed to get one or two users up and running on wireless devices.  This will cause problems if the user's password expires as well.

For a scalable solution, you will need to use Group Policy and define a Service Account username and password.

24 January 2017

Set passwords to never expire | Office 365

Whilst the majority of Office 365 users would have DirSync configured so users will be using their Active Directory user accounts & passwords, some businesses will be using the cloud user accounts, which have their passwords expire.

It's very simple to configure all cloud O365 accounts to have their passwords never expire, which will especially stop the inconvenience of having to update admin accounts etc.

To do this, you will need to log into Office 365 through PowerShell.  You will also need to do the second part of the attached blog by connecting to the MSOL service.

Once you've done that, use the following command:

Get-MSOLUser | Set-MSOLUser -PasswordNeverExpires $true


22 January 2017

Office 365 Published Calendar | Publish Date Range | Extend Past 6 Months

I recently had a client who uses an Office 365 calendar to show up on a website of theirs.  This was to make a certain calendar publicly available to everyone.  They realised that the calendar on their WordPress website was only showing six months ahead of time, and didn't show anything further than that.

This can be changed to a maximum of 12 months ahead of time for viewing calendar items, which I think is sufficient for a publicly available calendar (published calendar).  In order to find out the current setting, you will need to do this through PowerShell with the following command:

Get-MailboxCalendarFolder -Identity <EmailAddress>:\calendar


The field you're looking for is PublishDateRangeTo.  In the screenshot above, it shows the already changed field.  By default, this is set to SixMonths.

This explains why your published calendar suddenly goes blank after exactly six months.  In order to change this, you will need to use the following command:

Set-MailboxCalendarFolder -Identity <EmailAddress>:\calendar -PublishDateRangeTo OneYear

Once you have done this, use the following command to double-check and make sure it's showing the correct setting now.

Get-MailboxCalendarFolder -Identity <EmailAddress>:\calendar

If you check your published calendar, you will see that it now shows 12 months worth of events.

18 January 2017

Configure SMTP Relay from On-Prem to Office 365

The following steps will guide you through creating a SMTP relay on a server which will allow you to use the Scan to Email functionality on printers/copiers etc, relaying through Office 365.

This is probably the easiest way to get devices emailing out once you've migrated to Office 365.

1. Find a server that you're going to use as the SMTP Relay, go to Server Manager and then Add Roles and Features

2. From Server Manager, click on Tools, then IIS 6.
If you haven't installed this yet, please do so

3. Expand the serer name, right click on SMTP Virtual Server #1 and click on Properties
4. Click Access tab, then Relay.  Then select either specific IPs or select "All except the list below".
5. Click the Delivery tab, then click Outbound Security, tick Basic Authentication, then enter a username and password of an Office 365 mailbox.  This is used for authentication with your Office 365 tenant.
6. Make sure TLS Encryption has been ticked
7. Click Delivery, then Advanced, then enter smtp.office365.com as the Smart Host address.

That is all you need to do to get the SMTP Relay up and running.  To test this is rather easy as well, and it's highly recommended that you test it before configuring devices to send through this relay service.  

Test Relay Service
1. Create a new Notepad document with the following contents

FROM: scantoemail@domain.com (same as the mailbox you're authenticating with)
TO: adam@mydomain.com (email you're sending the test to)
SUBJECT: Test email

Save this as Email.txt.  Copy this .txt file to C:\inetpub\mailroot\Pickup.  It should immediately disappear as it's picked up and sent through the relay.  

If this arrives in your mailbox, then it's all up and running.  Just make sure that when you're configuring printers etc, the send 'from' address needs to be the same address that you're authenticating with on the SMTP Relay server.  If the emails don't match up, it will error out and won't send.  You can setup the devices to send anonymously as well, and the authentication is done on the SMTP Relay server side. 

13 January 2017

Assign License via PowerShell | Office 365 | Script

Thanks to my colleague Gareth Harris for this script.

I have recently been running a few large-scale (1000+ mailboxes) and I've had to rely on scripts for assigning licenses and converting mailboxes to shared mailboxes etc.

This blog will cover the script to assign a specific Office 365 license to multiple users, based on their UPN.
  1. Create a folder on your machine called "Office 365"
  2. Create a CSV file with the header of "UserPrincipalName" and then fill the column up with the UPNs of the mailboxes/accounts that you wish to convert to Shared Mailboxes.  Save this as license.csv
  3. Open Notepad and add the following contents:
    $AccountSkuId = "<tenantname>:STANDARDWOFFPACK_IW_faculty"
    $UsageLocation = "AU"
    $Users = Import-Csv "C:\Folder\SubFolder\Office 365\License.csv"
    $Users | ForEach-Object {
    Set-MsolUser -UserPrincipalName $_.UserPrincipalName -UsageLocation $UsageLocation
    Set-MsolUserLicense -UserPrincipalName $_.UserPrincipalName -AddLicenses $AccountSkuId
    }
  4. Save this file as "AssignOfficeLicense.ps1"
To find out the AccountSkuId, you can use the following Cmdlet:

Get-MsolAccountSku

Simply copy the entire line of the license you want, and paste that here:

Log into Office 365 through PowerShell.  You can follow this blog post to be able to do that.  You will also need to use the final cmdlet in that post to connect to MSOL.

Navigate to the Office 365 folder and then run the .ps1 file with the following command:

.\AssignOfficeLicense.ps1

That will then go ahead and start assigning all the Office licenses to the mailboxes that you have mentioned in the CSV file. 

Thanks to my colleague Gareth Harris for this script.

Convert to Shared Mailbox | Office 365 | Script

Thanks to my colleague Gareth Harris for this script.

I have recently been running a few large-scale (1000+ mailboxes) and I've had to rely on scripts for assigning licenses and converting mailboxes to shared mailboxes etc.

This blog will cover the script to convert mailboxes to a Shared Mailbox, and then remove any associated Office 365 licenses with that user.


  1. Create a folder on your machine called "Office 365"
  2. Create a CSV file with the header of "UserPrincipalName" and then fill the column up with the UPNs of the mailboxes/accounts that you wish to convert to Shared Mailboxes.  Save this as license.csv
  3. Open Notepad and add the following contents:
    Import-csv "C:\Folder\SubFolder\Office 365\License.CSV" | foreach {
    $UPN = $_.userPrincipalName
    Set-Mailbox $UPN -Type “Shared”
    $MSOLSKU = (Get-MSOLUser -UserPrincipalName $UPN).Licenses[0].AccountSkuId
    }
  4. Save this file as "ConvertToShared.ps1"
Once you have done this, you will need to sign into Office 365 through PowerShell.  To do this, you can head over to this blog and follow the steps here.

Once you've done this, change your directory to the 'Office 365' folder that you had created.  Then run the 'ConvertToShared.ps1' file.  

.\ConvertToShared.ps1

This will then start the process of converting the mailboxes to 'Shared', and will also remove the licenses if there were any assigned.

Thanks to my colleague Gareth Harris for this script.

Sign into Office 365 | PowerShell

The following commands are used to sign into the PowerShell side of Office 365.  This is mainly for my use as I have to keep Googling where to find it.

$UserCredential = Get-Credential

$Session = New-PSSession -ConfigurationName Microsoft.Exchange -ConnectionUri https://outlook.office365.com/powershell-liveid/ -Credential $UserCredential -Authentication Basic -AllowRedirection

Import-PSSession $Session

If you need to use the MSOL commands, you will need to sign into that too, which you can use the following command:

Connect-MsolService -Credential $UserCredential

04 January 2017

Stop Server Manager from showing at logon | RDS

I recently configured a new RDS solution for a client where Server Manager was always popping up when logging in.  I didn't want this to happen for users, so I needed to make the required registry change for this to no longer happen:


Computer\HKEY_LOCAL_MACHINE\SOFTWARE\Microsoft\ServerManager

There should already be a DWORD called DoNotOpenServerManagerAtLogon which is set to Decimal: 0.  Simply change this over to Decimal: 1 (as opposed to Hexadecimal: 1) to stop this from happening again.

You will still be able to open up Server Manager, however this won't appear automatically when logging in.

If you require IT Support in the Perth area, contact Winthrop Australia

An Access-Request message was received from RADIUS client x.x.x.x with a Message-Authenticator attribute that is not valid

A client of mine recently had Enterprise Wireless (PEAP) wireless configured which connects to a NPS server to authenticate users connecting up.  People had issues connecting to the wireless after a new Domain Controller was brought online.

Checking the Event Logs, I found the following error:


This indicates that the Shared Secret between the Access Point and what's configured on the NPS (usually a DC) is not the same.  In order to get around this, I checked the settings of each Access Point and updated the Shared Secret.


Once you've done this, log into each access point and update the Shared Secret on to ensure that it's the same.  Once you've done this, the access points should communicate with the DC (or NPS) successfully.

Winthrop Australia provides IT Support in Perth.

31 December 2016

Poor Network Performance | Network Shares (Server 2012 R2)

I was recently doing some work for a client where they had noticed that the network performance from their workstations to the File Server was rather poor.  When transferring data to the File Servers (and any other shares on the Virtual Host), it was very slow.

All the VMs were either Server 2016 or 2012 R2, and it was running on a Virtual Host which was Server 2012 R2.  The Server was a Lenovo x3650 m5.  All the NICs were Broadcom and the drivers were fully up to date.

After looking into the issue, I found that some of the settings on the Network Adapters needed to be changed/updated (on the Virtual Host itself) to allow for faster transfer speeds.  To do this, I needed to open up each Network Adapter, then click on Configure, then the Advanced tab.  Once I did this, I had to set the following options to Disabled:
  • TCP/UDP Checksum Offload (IPv4)
  • TCP/UDP Checksum Offload (IPv6)
  • Large Send Offload V2 (IPv4)
  • Large Send Offload V2 (IPv6)
  • Virtual Machine Queues
Just remember that when performing these changes, it will drop the network connectivity to the adapter for about 5 seconds.  If you're making this change on a live host, it will potentially disrupt network traffic to the VMs and the Host.  If you have a NIC Team in place, do this to one Adapter, then wait for it to come back online before doing it to the next one to make sure that network connectivity to the host itself remains active. 

After doing this to the NICs in my NIC Team, I tested the network connectivity and it was considerably faster.

28 December 2016

Directory service is missing mandatory configuration information | Server 2008R2

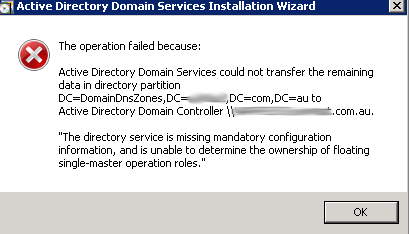
I was recently demoting a Domain Controller as I had upgraded to Server 2016, when I came across the following error message:


What this means is that the fSMORoleOwner is most likely pointing to the server that you're trying to decommission, and of course you can't do this.  So what needs to be done is to update this to point to another DC that's active.

First, to confirm this, you will need to go into ADSI Edit. Connect to the following:


Once you've done this, open up DC=Infrastructure:


Look for fSMORoleOwner and check the server name that is referenced here:

In this case, it's showing my new DC, however originally it was showing the DC that I was wanting to decommission.  In order to resolve this, I used the following script:

const ADS_NAME_INITTYPE_GC = 3
const ADS_NAME_TYPE_1779 = 1
const ADS_NAME_TYPE_CANONICAL = 2

set inArgs = WScript.Arguments

if (inArgs.Count = 1) then
    ' Assume the command line argument is the NDNC (in DN form) to use.
    NdncDN = inArgs(0)
Else
    Wscript.StdOut.Write "usage: cscript fixfsmo.vbs NdncDN"
End if

if (NdncDN <> "") then

    ' Convert the DN form of the NDNC into DNS dotted form.
    Set objTranslator = CreateObject("NameTranslate")
    objTranslator.Init ADS_NAME_INITTYPE_GC, ""
    objTranslator.Set ADS_NAME_TYPE_1779, NdncDN
    strDomainDNS = objTranslator.Get(ADS_NAME_TYPE_CANONICAL)
    strDomainDNS = Left(strDomainDNS, len(strDomainDNS)-1)
     
    Wscript.Echo "DNS name: " & strDomainDNS

    ' Find a domain controller that hosts this NDNC and that is online.
    set objRootDSE = GetObject("LDAP://" & strDomainDNS & "/RootDSE")
    strDnsHostName = objRootDSE.Get("dnsHostName")
    strDsServiceName = objRootDSE.Get("dsServiceName")
    Wscript.Echo "Using DC " & strDnsHostName

    ' Get the current infrastructure fsmo.
    strInfraDN = "CN=Infrastructure," & NdncDN
    set objInfra = GetObject("LDAP://" & strInfraDN)
    Wscript.Echo "infra fsmo is " & objInfra.fsmoroleowner

    ' If the current fsmo holder is deleted, set the fsmo holder to this domain controller.

    if (InStr(objInfra.fsmoroleowner, "\0ADEL:") > 0) then

        ' Set the fsmo holder to this domain controller.
        objInfra.Put "fSMORoleOwner",  strDsServiceName
        objInfra.SetInfo

        ' Read the fsmo holder back.
        set objInfra = GetObject("LDAP://" & strInfraDN)
        Wscript.Echo "infra fsmo changed to:" & objInfra.fsmoroleowner

    End if

End if

Create a new VBS file with the above script, and called it "FixFSMO.vbs".  Copy this to the desktop of a DC that's active and then run the following command:

cscript fixfsmo.vbs DC=DomainDnsZones,DC=contoso,DC=com


You will also need to run the same command, but for ForestDNSZone.  

cscript fixfsmo.vbs DC=ForestDNSZones,DC=contoso,DC=com

Once you've done this, check the ADSI object again and you will notice this has now updated to an active DC.  Let this sit for 15 minutes or so to ensure that it syncs to all DCs, and then you should be able to re-run the DCPROMO to demote the Domain Controller. 

Migrate DHCP Server to Server 2016

The following process can be followed when you're creating a new Domain Controller, and you'd like to migrate DHCP settings from an old DC to a new one.

I have done this from Server 2008R2 to Server 2016, however this can be used from 2008 to 2016.
  1. Log in to the old (existing) Domain Controller running DHCP
  2. Open up an Administrative Command Prompt
  3. Type the following:
    netsh dhcp server export C:\Users\<username>\Desktop\dhcp.txt all
  4. Copy the .txt file over to the desktop of the new DC
  5. Open up an Administrative Command Prompt
  6. Type the following:
    netsh dhcp server import C:\Users\<username>\Desktop\dhcp.txt all
  7. Open DHCP on the new 2016 server.  You will notice all the settings have now been migrated (including reservations and leases)
Once you've done this, you will then need to authorise the new DC and unauthorise the old DC.  This should happen automatically when you authorise the new DC, however make sure you double check this on the old one. 

To be on the safe as once you've done this, make sure you disable the DHCP Server service on the old DC.  This will ensure it does not start again if you were to reboot the server.

If you require IT Support in Perth, contact Winthrop Australia

Enable Split Tunnelling | Windows 10 VPN

In older versions of Windows (eg 7/8.1 etc) you were able to enable Split Tunnelling by removing the default gateway IP address from the IPv4 settings of a VPN's properties.  This is now not available on Windows 10 and you can't actually click on the IPv4 properties.

In Windows 10, you now need to enable Split Tunnelling through PowerShell.   It is done with a simple command:

Set-VPNConnection "VPN Name" -SplitTunneling $true


To verify that this was successful, you can type the following command to get the details of your VPN connection:

Get-VPNConnection


Winthrop Australia can supply all your IT Support needs in Perth, and most of Australia

21 December 2016

SMTP Relay Not Sending Mail

We have a SMTP Relay configured on a client's server to relay mail from on-prem to their Office 365 tenant.  This allows Scan to Email functionality from printers etc.

Recently a client told me that they're trying to scan to email but it's failing for them.  I created a test email.txt file which was to just send a simple email.  I put this file in the 'Pickup' folder, and it just stayed there.  Usually it's picked up immediately and relayed.


I checked the services and noticed that the Simple Mail Transfer Protocol (SMTP) service was stopped, and for some reason it was set to 'Manual'.  A quick manual start and then changing this to 'Automatic' resolved the issue for me.

If you require IT Support or Consultancy, contact Winthrop Australia

15 December 2016

Missing Application in Task Sequence | SCCM 2012

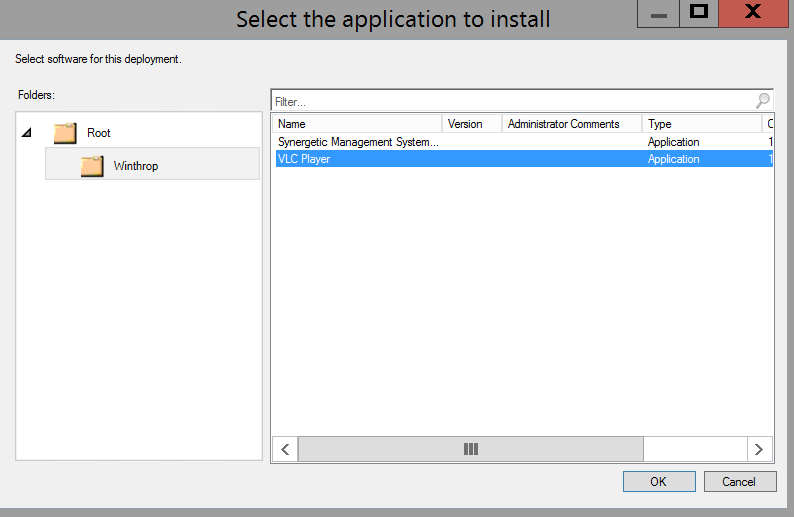
Recently a client of mine was trying to add an application to be installed as part of the 'Install Application' sequence within an Operating System Deployment Task Sequence.  They were able to find many applications that were available, however they couldn't see this particular one (in this case it was VLC).

The application was showing up under Apps:


When adding it into the Task Sequence, there was no error messages, it was just not there:


To resolve this, go into the application itself, click on the Deployment Type tab, then click User Experience and make sure its set to Logon Requirement: Whether or not a user is logged in.


Once you've done this, it will allow you to see the app and choose to add it into the Task Sequence. 


12 December 2016

Enable Multicast | SCCM 2012

This is a quick post to show you how to enable Multicast deployments through SCCM 2012.


  1. Click Administration
  2. Click Servers and Site System Roles
  3. Click on the SCCM server
  4. Double-click on Distribution Point
  5. Tick the Enable Multicast option


Once you have done that, you will need to enable the multicast distribution for any packages/operating systems you may have.  To do this, do the following:


  1. Click on Software Library
  2. Click on the folder where you've saved your packages or operating systems
  3. Right-click on the Operating System or Package and click on Properties
  4. Click on Distribution Settings
  5. Tick Allow this package to be transferred via Multicast


It is not recommended that you enable Multicast when using SCCM.  This has been known to cause issues with the WDS service constantly crashing. 

Winthrop Australia provides some of the best IT Support in Perth.  Contact us today to find out how we can help you.

Disable Yammer for all users | Office 365

I recently did an Office 365 migration where our client was using E3 licenses.  This includes a Yammer subscription, which they were not interested in using at this stage.  I was asked to disable this service for all users.

To do this, I did the following:

Get-MsolAccountSku | Format-List –property accountskuid,activeunits,consumedunits
This will show you which license pack you're currently using:


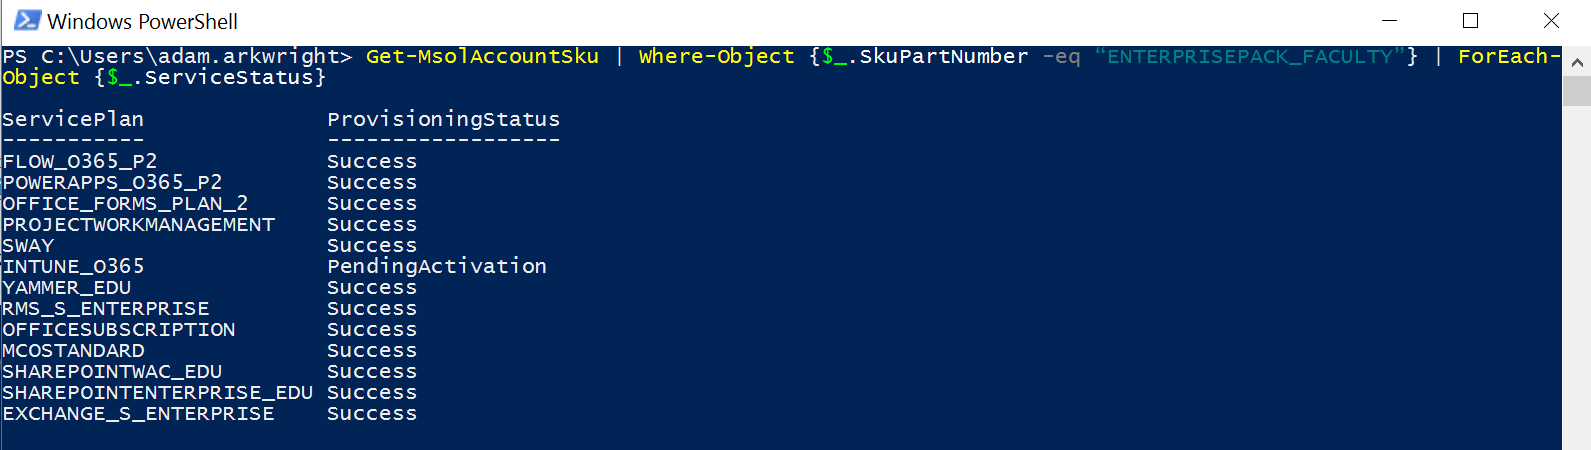
Get-MsolAccountSku | Where-Object {$_.SkuPartNumber -eq “ENTERPRISEPACK_FACULTY”} | ForEach-Object {$_.ServiceStatus}
This shows the license packs that are available for this particular O365 License:
In this case we're wanting to disable "Yammer_EDU".
Type the following:
$x = New-MsolLicenseOptions -AccountSkuId “AccountSKUID:ENTERPRISEPACK_FACULTY” -DisabledPlans “YAMMER_EDU”
Note: the bold section is the AccountSKUID which has been blurred out in this case, but can be found here:
To apply this to all users who have a current O365 license, type the following:
Get-MsolUser -all | Where-Object {$_.isLicensed -eq $True} | Set-MsolUserLicense -LicenseOptions $x
This will take ~5 minutes or so depending on the amount of users you have in your Tenant, however once this has completed, you will notice that the Yammer license is now set to 'off'.