13 April 2018

Backup Exec causing Hyper-V checkpoint build up

Recently when deploying a new network for a client, we installed Backup Exec 15 to run backups of their Virtual Machines from Hyper-V.  The backups were working fine, but I noticed that for one VM, there was an excessive amount of checkpoints created, around the time that BE backs up each night.

If you have a look at the type of checkpoint, you will notice these are 'recovery' checkpoints, and can't simply be deleted (.AVHDX files).  

This creates problems when you're wanting to edit the Virtual Machine settings (especially the hard drives of the Virtual Machine), as it will say there's a checkpoint associated with the machine and you can't edit it.  In my case, I was wanting to expand the File Server's storage, but wasn't able to until I sorted out the checkpoints.

The other VMs has the same problem (recovery checkpoints showing up), but there was only one per VM.  After looking online, and having to log a support call with Backup Exec, they informed me that this is a feature bug of Service Pack 3.  The following link shows their support article:


This article explains that you need to change the backup setting from 'Faster Processing Method', to 'Standard Processing Method'.  After doing this, and running a new backup (confirming that it worked etc), I was able to run the PowerShell commands to remove the additional checkpoints.

Get-VMSnapshot -VMName 'VMName' -ComputerName 'HOST' -SnapshotType Recovery | Remove- VMSnapshot


This command worked well for all the VMs, except APFP01, which had the multiple checkpoints.  I got the following error message when I ran that command:


CATASTROPHIC FAILURE! - It's not actually too bad.  It just means that you're not going to be able to automatically remove and merge with the command that I had mentioned above.  To fix this issue, we're going to have to manually merge each .avhdx file.  Firstly let me note that you will have to power down the virtual server before doing this.  To do this, you have to go into the location of the Virtual Machines, and find the .vhdx and .avhdx.  You need to find the newest .avhdx file, and rename the file extension to .vhdx (remove the 'a').  Once you've done that, click on Edit Disk in Hyper-V, find the .vhdx that you've just renamed, click Merge, then click Merge with Parent.  This will take a while depending on the amount of data that you've got.  Once that has finished, find the next newest .avhdx file, and rename etc.  Repeat the same process and merge with parent disk.  Keep doing this until you've merged all the .avhdx files, and you're just left with your original .vhdx file.

Now once you have done this, you're still going to have the checkpoints showing up in Hyper-V.  I haven't been able to remove these checkpoints from Hyper-V using any of the commands used within that Backup Exec KB article.  To get the server back up and running, you will need to create a new Virtual Machine, and just set the drives to the existing .vhdx files.  Once you boot up, this will run exactly the same as the previous server.  You can then delete the old, problematic VM from Hyper-V.  Just keep in mind that the Virtual Disks you're using are still in the old folder, so don't delete the folder from Hyper-V.

Something that I came across when I was doing this, was that the second drive didn't attach to the server fully.  It showed the C: drive and booted without problem etc, but the E: drive was missing.  I just had to go into Disk Management and set the disk to Online, as it was offline for some reason.

After doing all of this, I have been able to expand the drives without issue, and there have been no further checkpoints created from Backup Exec (after changing that setting).  

21 March 2018

Redirect Virtual Directory to External Website using URL Rewrite

I recently had a client with an externally facing IIS server using the Default Website, and multiple Virtual Directories.  They wanted everyone accessing one particular Virtual Directory to be redirected to a completely separate website.  The ultimate goal in mind was to ensure that only internal users connecting to http://hostname/virtualdirectory will have access to the page.

After look into the best way to make this work, I found that utilising URL Rewrite on their IIS server would give the best solution.

After replicating the setup in a test lab, I managed to get the URL Rewrite working, to only redirect to an external website when someone accessed http://subdomain.domain.com/virtualdirectory

The following config was entered into the web.config file for the specific Virtual Directory.

<system.webServer>
  <rewrite>
    <rules>
      <rule name="External Redirect" stopProcessing="true">
        <match url="Test4" negate="true" />
        <conditions>
          <add input="{HTTP_HOST}" ignoreCase="true" negate="true" pattern="IIS"/>
        </conditions>
        <action type="Redirect" url="http://www.google.com.au" redirectType="Found" />
      </rule>
    </rules>
  </rewrite>
</system.webServer>

The items in bold require changing to match your specific IIS setup.  These are currently set to replicate my test lab environment.


When navigating to http://iis/test4, it loads the page.  When navigating to http://subdomain.domain.com/test4, it redirects to Google.  The setting is specific to the Virtual Directory, and other VDs are not affected by this.

21 February 2018

WSUS Fails to Connect

Recently I had a WSUS server which had to be rebooted.  Upon restarting the server, I noticed that I could no longer get into the WSUS console.  When trying to connect I was receiving the following error message:


Checking the Event Logs, I found two events which showed the following:


My next step was to check the health of WSUS with the following command:

WsusUtil.exe checkhealth
This was run from "C:\Program Files\Update Services\Tools" directory

Running this command gave me the following result:


Upon looking into this further, I noticed that there was a Windows Update which has caused some issues in the past for some people.  The update is KB3159706.  I checked my server and I did not  have this update installed, but thought I would humour it and try the fix anyway.  The fix mentioned in the KB article actually resolved the issue.  I did the following to get it back up and running:

1. Install the HTTP Activation role under .NET Framework 4.5 Features through Server Manager.


2. Restart the WSUS service


Yep...it was that easy!  After doing that, adding the WSUS server back into the MMC console worked fine and everything was back up and running again.

16 February 2018

Clear the Windows.Old file on C:

If you're like me and you're using an SSD which may not be too large, you might find that there's a significant chunk of data being used up by the Windows.Old file.  This contains rollback data from your previous installation before upgrading to Windows 10.  If you're not planning on rolling back, then I suggest you clear it up and get rid of that wasted data usage.

To do this, you will need to do the following:

1. Run Disk-Clean Up utility from the Start Menu
2. Click Clean up system files
3. Find Previous Windows installations and tick that
4. Click OK and it will clean up all the data on your C: drive that has been wasted in the Windows.Old file.

01 February 2018

TFTP Open Timeout - PXE Boot | SCCM 2012 R2

Recently I was setting up PXE booting with SCCM 2012 R2 (new setup).  When starting the client workstation up and pressing F12 to network boot, I got the following error:


Having a look online to find out what this issue was, I struggled to find the exact cause of my particular issue.  There were many blogs and posts about this issue, but nothing referred to a solution which would have helped me.

It turns out that this is a bug with Microsoft and there is a Hot Fix available to download.  The Hot Fix is available here.

After installing this Hot Fix, I rebooted the SCCM server, then attempted to boot to PXE again on the client workstation.  This time it worked perfectly!

31 January 2018

Publish a Shared Calendar | PowerShell | Office 365

I recently needed to publish a Shared Calendar (i.e. Shared Mailbox's Calendar) to the internet, so it could be embedded into a website.

Whilst I'm sure we all know how to publish our own calendars, publishing a calendar that's shared to you is a little bit more difficult.  It's not as simple as just going into OWA and then publishing from there, or using Outlook.  This needs to be done using PowerShell.

1. Sign into Office 365 | PowerShell

2. Enter the following:
Set-MailboxCalendarFolder <mailboxname>@domain.com:\calendar - PublishedEnabled $True

This will then publish the calendar you've just defined in bold to the internet.  Now you will need to get the URL to access this. 

3. Enter the following:
Get-MailboxCalendarFolder <mailboxname>@domain.com:\calendar | fl

You will then get the following output:

RunspaceId           : 0f40e5da-5712-4043-8bbc-fb11049c0307
Identity             : calroom1:\calendar
PublishEnabled       : True
PublishDateRangeFrom : ThreeMonths
PublishDateRangeTo   : ThreeMonths
DetailLevel          : AvailabilityOnly
SearchableUrlEnabled : False
PublishedCalendarUrl : http://outlook.office365.com/owa/calendar/6eba91c3eb20499fabc3d831f38b961b@contoso.com
/5c3a873ee338449bb7d39dd2f7280b933185741279014858945/calendar.html

PublishedICalUrl : http://outlook.office365.com/owa/calendar/6eba91c3eb20499fabc3d831f38b961b@contoso.com
/5c3a873ee338449bb7d39dd2f7280b933185741279014858945/calendar.ics

IsValid              : True
ObjectState          : Unchanged


The URL for accessing the calendar is highlighted in yellow above.

Also pay close attention to the three items above which are highlighted in blue.  You will most likely need to change these from ThreeMonths to OneYear, and also change the availability to reviewer if you'd like the public to actually see the contents of the calendar.

09 January 2018

Reset NTFS Permissions | Export & Import Existing Permissions

I recently encountered a newly installed File Server which had some busted NTFS on it.  The file permissions had been copied over from the old File Server, and whilst they looked like they applied well, it was causing some issues accessing files etc.

I decided it was time to completely refresh the permissions on all the folders and sub-folders, to ensure that they applied correctly.

To do this, there's three steps which need to be taken.
  1. Export the existing NTFS permissions
  2. Reset permissions
  3. Restore old permissions
This is actually quite a simple task to do, and can be done by using ICACLS.  The following guide will explain how this can be done. 

1. Open PowerShell as Admin (you can also do this within an Administrative command prompt)
2. Run the following command:
icacls C:\TEMP\* /save "C:\Temp\AclFile.txt" /T /C
The part in bold is the 'source' of your NTFS permissions.  Selecting "/T" at the end ensures it goes through all the sub-folders as well to copy the permissions of them.

3. Run the following command to reset the permissions:
icacls C:\Temp\* /reset /T /C /L
The part in bold is the 'source' of your NTFS permissions.

4. Restore the permissions by using the following command:
icacls C:\Temp /restore "C:\Temp\AclFile.txt" /T /C

The part in bold is the 'target' of your NTFS permissions.

Note: before doing anything changes to permissions on a File Server, make sure you have either a working backup, or you've recently snapshotted the server. 


/T - Traverse all subfolders to match files/directories. This will apply permission changes to all subfolders whether or not they are set to inherit permissions from the parent. On very large directory structures this may take some time as the command has to traverse the entire tree. /C - Continue on file errors (access denied) Error messages are still displayed. /L - Perform the operation on a symbolic link itself, not its target.

02 January 2018

Issues Updating Print Drivers | KB3170455

Recently a client of mine updated their print drivers on the Print Server (through Print Managemnet).  Users suddenly had issues printing, where Word would say "Driver Update Required".  When a user would go to right-click on the printer and click on "Update Driver", they would get essentially a UAC prompt asking whether they trust that particular printer:


When they click Install Driver, it looks like it's installing and then it just falls back to the same message.  It looks like there's an endless loop where users can't print because of the driver update requirement, but they can't install the driver either.

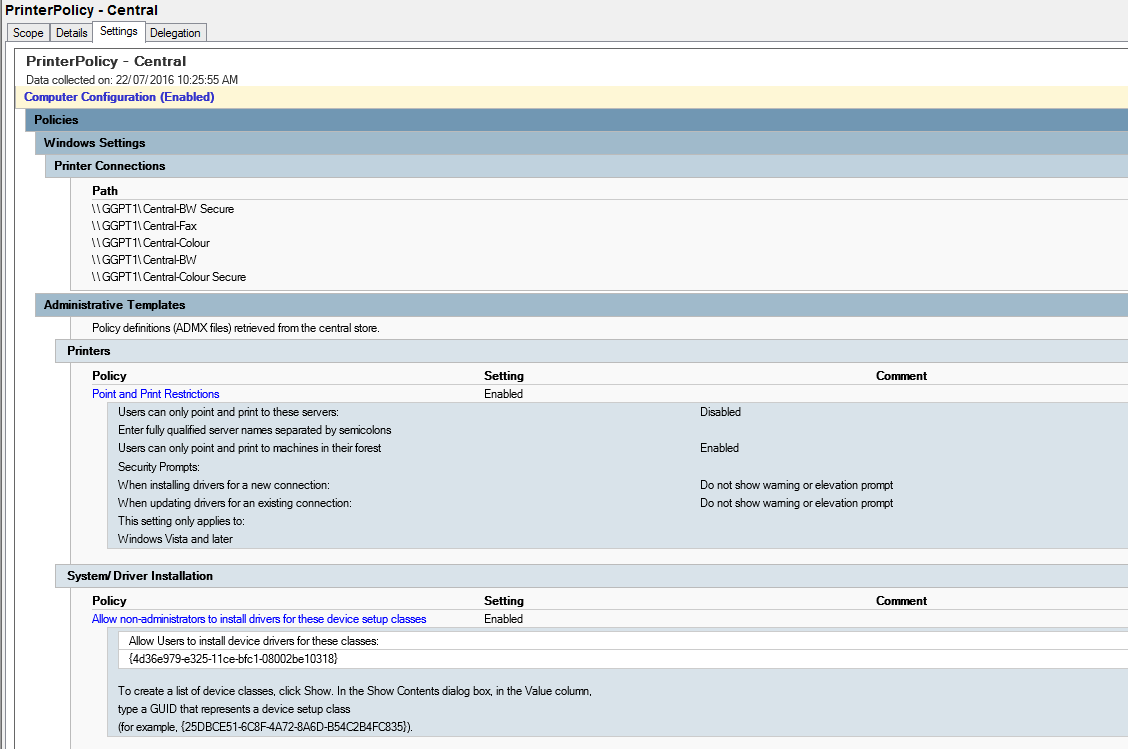
These printers are deployed through Print Management and are deployed via GPO.  There are Point and Print restriction policies in place as well to remove any warnings or UAC prompts for installing new drivers, or updating drivers:


In theory, this should mean that there's no warnings and the drivers should just update.  I've had a look on the workstations and they're applying the policy correctly and the changes are there, so it's not an issue with applying the actual GPO.  With this in mind though, the warnings are still showing up and the drivers can't be updated.

When running the troubleshooter, it asks whether you want to install the updates with elevated privileges.  When doing this, it works fine.  After a lot of troubleshooting, this ticket was actually escalated to Microsoft support to look into this.  

They confirmed the following:

There was a Windows Security Update recently released which targeted the security of printing.  This was KB3170455 and this was the culprit!  Essentially what this update does is require drivers to meet certain criteria before they can be used.  The criteria is the following:
  • Package aware
  • Digitally signed
  • Catalogue print drivers

Apparently the official drivers we had downloaded from the Canon website did not meet this criteria.  Uninstalling this update has resolved the issue for all users.  

At the time of writing this blog, there is no official word from Microsoft acknowledging the issue caused by their security update other than what the support technician has told me, but they have confirmed that since the update, there have been a large number of support calls raised to their help-desk.


There's currently only two options to get around this:

  1. Download another driver that meets the criteria
  2. Remove the Windows Security Update from all servers and workstations
Note: if you are a small enough company, you can work around this by installing the driver update with elevated privileges.

16 December 2017

Setup DC for time sync to external NTP server

The following steps can be taken to force your Domain Controller to sync with an external NTP server.

Run CMD as Administrator

net stop w32time

w32tm /config /syncfromflags:manual /manualpeerlist:"0.pool.ntp.org 1.pool.ntp.org 2.pool.ntp.org 3.pool.ntp.org" /reliable:yes /update
net start w32time

13 December 2017

Allow BitLocker without a TPM

If you're using a computer which hasn't got a TPM, you can still enable BitLocker on the OS drive.  You will simply need to update the Local Group Policy (or normal Group Policy if you're within a Domain) to reflect the following:


Once done, you will be able to set a password-defined BitLocker on your OS drive.

15 November 2017

Monitor SCCM Updates

With recent versions of SCCM, you can now perform in-place updates of SCCM.  This is a great way of updating the application without having to download external ISOs etc.

The only issue is that once you have kicked off the install, you have no way of monitoring the progress within the application itself.  We have to move to the LOG files in order to monitor this.

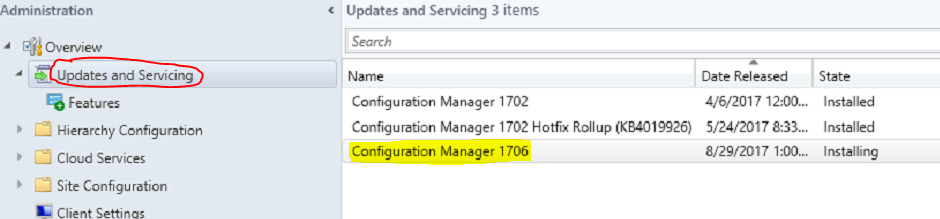
You can see the update highlighted here:


If you right-click the update, you can see "Install Update Pack".


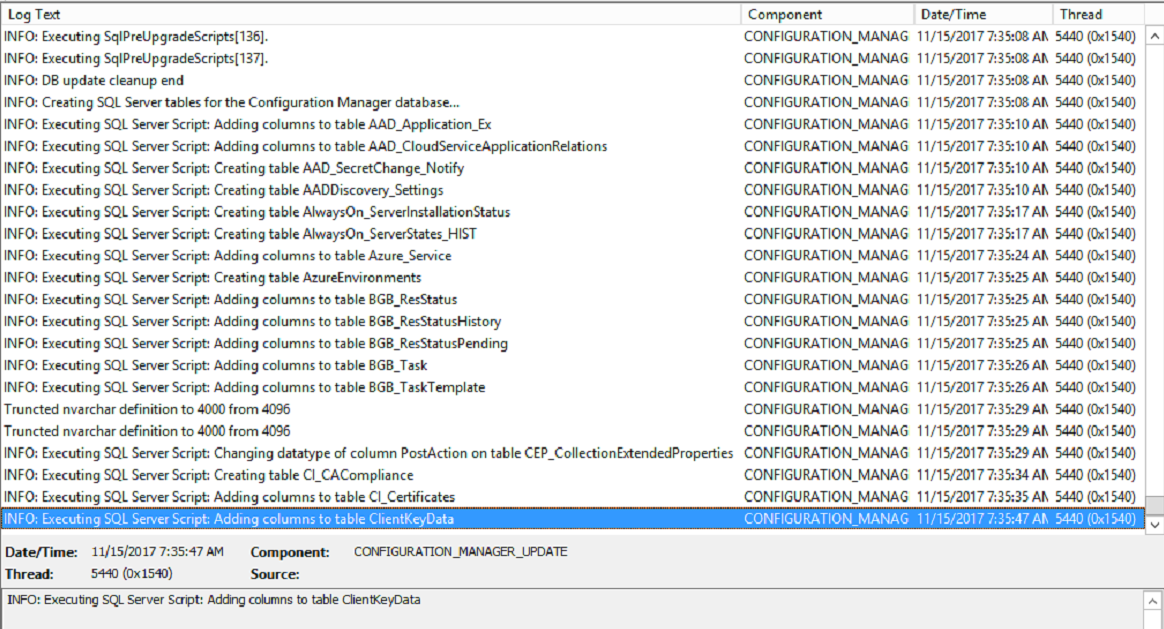
Once you have done this, the only way to monitor the progress is by opening up the following LOG file within CMTrace:

C:\Program Files\Microsoft Configuration Manager\Logs\CMUpdate.log


This will update automatically as there's new information, and it's an easy way to see where the installation is at and whether there's any problems.

01 November 2017

Windows Update Error: 80243004

Recently I was running Windows Update on a client's server, and I encountered the following error message:

Luckily this is a nice and easy fix.

1. Right-click task-bar and click on Properties

2. Click Customize

3. Tick Always show all icons and notifications on the taskbar
Once you've done that, simply click Try Again and it should work for you now.

05 October 2017

Error apply Hard Drive changes | Failed to add device 'Synthetic Disk Drive' | Hyper-V

So today I was adding a new disk to a clustered virtual machine running in a Hyper-V environment.
When I clicked 'apply' to save the changes I'd made, I received the following error message:

The device was being saved from one of the Virtual Machine Hosts, to a SAN where all the HDDs were located.

Luckily, this was a nice and easy fix.  When you're going into the drive settings, check on the top-left corner where it shows you the iSCSI Controller / IDE Controller.


Simply change this to one of the other settings, and click 'apply', to see whether it will let you save it.  In my case, it was set to IDE Controller 0, and I needed to change it to SCSI Controller.


Once you've changed this, you should be good to go!

07 September 2017

Veeam for Office 365 | Invalid Exchange Server version

Recently I noticed that clients of mine who were using Veeam for Office 365 started having issues with the product backing up their emails.

After looking into this, it looks as if Microsoft have updated their Exchange backend version without telling anyone, which has caused this issue.  Whilst there's no update available through Veeam at the moment, logging a support case with them provided me with a fix to get this up and running.

The error message in question here states "Invalid Exchange Server version".  This starts to fail for most mailboxes, and will eventually fail for all mailboxes.  Obviously this is a P1 issue, as you don't have backups up and running.

The fix is only available if you're running version 1.0.0.912, and is the following:


Download the hostfix file from https://storage.veeam.com/Fix_113114_fbcf2c440c.zip and follow the instruction to apply the hot fix. 

The workflow:
  1. Stop all the jobs
  2. Stop “Veeam Backup for Microsoft Office 365 Service”
  3. Rename and replace Veeam.Ews.dll with the DLL from the archive in C:\Program Files\Veeam\Backup365 (don't forget to back up the original DLL)
  4. Start “Veeam Backup for Microsoft Office 365 Service”
  5. Retry the job

After performing this fix, it has 100% resolved the issue for my clients.

30 May 2017

Hide User from GAL - Office 365 | AD Attribute

The following method will allow you to hide a user from the Global Address List if you're using Office 365 with Azure AD Connect.

From within AD, click on View, then Advanced Features


Find the user you'd like to amend and open up their AD object (note you will need to find the user account within AD, you can't search for it).

Find the following attribute and set it to True

msExchHideFromAddressLists


The next time Azure AD Connect syncs, it will update this attribute and the users will be hidden from the GAL.

Note: the GAL can take up to 24 hours to sync for each Outlook application.

16 May 2017

Update Hyper-V Integration Services

I was recently on a Hyper-V host where a few of the VMs were saying the integration services required an update.

To update this, open up the VM through Hyper V manager, then click Action > Insert Integration Services Setup Disk.


Run the setup from within the VM

A message will show up saying that it's detected a previous version of the services and asks whether you'd like to upgrade it


Once you've clicked OK, it will give you a progress bar for the installation


Once finished installing, you will need to restart the VM


The final step is to simply eject the Integration Services from the VM


This process will need to be carried out on each VM you're running in your environment, if you notice it requires an Integration Services update.  Just note that because of the reboot, it will cause down-time. 

07 May 2017

Office 365 Hybrid Deployment - Mail Loop

If you're ever in the middle of an Office 365 Hybrid deployment, you've configured everything correctly but you notice that when you're testing the mail flow from one premise to the other, it's causing a continuous mail flow (you will receive a NDR), the first thing I would suggest you look into is whether there's a gateway in the middle of your on-prem Exchange and your Office 365 environment.

Office 365 Hybrid is only supported if you have nothing between your on prem Exchange, and the O365 environment.  That means no IronPorts etc getting in the way.

I recently encountered an issue where there was a continuous mail flow symptom.  Office 365 was trying to deliver the email to on prem Exchange, it was caught up in the IronPort and then it tried to deliver it back to Office 365.  To get around this I opened Exchange up to the internet by NATting Port 25 on a different WAN IP which would bypass the IronPorts entirely.  I amended the Connectors in Office 365 so they'd connect through that address, rather than through the IronPorts.

Once this was done, the issue resolved itself immediately.

28 April 2017

Create new AD User with Remote Mailbox | Office 365 Hybrid

I recently had a client who had a Hybrid Office 365 who required a set of users to be created, and Office 365 mailboxes created at hte same time.  Whilst I could have had a script to create the users, then go through and add mailboxes to them, I decided that it would be better to smash it all in one hit.

Thanks to my colleague Gareth for writing this script

The following process is comprised of two steps.


  1. Run a script that references a CSV File
  2. A CSV file that has all the relevant information in it
In this case my CSV file had the following:


The BackupEmail was put there at the Client's request.  It was just an area to put the user's personal email address within the AD object.  

The script used is the following, which needs to be saved as CreateUsers.csv.  Note the bold areas which are the variables that have been included.


$Users = Import-Csv -Path "C:\Userlist.csv"
$OU = "OU=Sub-OU,OU=Parent-OU,DC=DOMAIN,DC=com,DC=au"     
foreach ($User in $Users)           
{           
    $Displayname = $User.Firstname + " " + $User.Lastname           
    $UserFirstname = $User.Firstname           
    $UserLastname = $User.Lastname           
    $SAM = $User.Username         
    $UPN = $User.Firstname + "." + $User.Lastname + "@domain"        
    $Password = "<insertpassword>" 
    $Mobile = $User.Mobile
     $remoterouting = "smtp:" + $UPN
     $Notes = $User.BackupEmail
    New-ADUser -Name "$Displayname" -DisplayName "$Displayname" -SamAccountName $SAM -UserPrincipalName $UPN -GivenName "$UserFirstname" -Surname "$UserLastname" -AccountPassword (ConvertTo-SecureString $Password -AsPlainText -Force) -Enabled $true -Path "$OU" -ChangePasswordAtLogon $false –PasswordNeverExpires $true -MobilePhone $Mobile -HomePhone $Notes
    Enable-RemoteMailbox $SAM -RemoteRoutingAddress $remoterouting
}

Save the script as well as the .csv file into the same location, then run the script through Exchange Management Shell.

This will create the user account and will also create the Office 365 Mailbox which can be viewed from either Exchange On Prem, or the O365 Tenant.  Remember that it takes a bit of time for Azure AD Connect to sync all the AD objects as well.  It might help to force an Azure AD Connect sync.

The last step you will need to do is to assign an Office 365 license to that particular user, or users.

03 April 2017

The Group Policy Client service failed the logon - Access is denied

I recently had a client who was receiving this error when he was trying to log into his domain account:


The fix for this is rather simple and straight-forward, however it's rather nasty if you don't know what to do.  The following steps can be followed to resolve this issue:


  • Login with another account, preferably a Domain Admin account
    • This should work as the issue is with the profile, not the computer
  • Create a local account on the machine and ensure it's also a local administrator
  • Remove the machine from the domain
  • Login as the local account you just created
  • Rename the profile name in C:\Users 
    • I would usually create a new folder called "Backup" and then move the profiles into there
  • Open Start Menu and search for Regedit
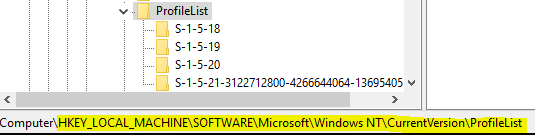
  • Open the following location
    HKEY_LOCAL_MACHINE\SOFTWARE\Microsoft\Windows NT\CurrentVersion\ProfileList

  • Click on the different SIDs until you find the one that has Profile Path which is related to the user that's having problems

  • Right-click the SID and export it just to make sure you have a copy

  • Delete the SID

  • Join the computer back to the domain
    • I had deleted the computer object from AD and I even renamed the computer
  • Login as the user who was having problems
  • Should be working perfectly now.

29 March 2017

Update App Deployment Client Connectivity Restriction | SCCM

I recently had a client who's using SCCM, and was needing to install a particular application on many computers.  These machines happened to be in a workshop and they were testing the deployment by doing the manual install (through Software Centre).  They noticed that whilst they elected to install this particular app on about 30 machines, most of the workstations would say "Waiting to install", whilst only about 5 or so machines would actually be installing the app at one time.

Ultimately every machine received the application, however they wanted to know why it was limited to this small number, and what we could do to increase that.

To update this number to allow more machines simultaneously installing applications, we need to do the following:

Administration > Site Configuration > Sites > Configure Site Components > Software Distribution

The highlighted section is what I had updated.

The next part I updated was the following:

Administration > Site Configuration > Sites > Right-click site name and click Properties > "Sender" tab

I updated the circled settings to be 15 each.


21 March 2017

Increase Public Folder Quotas | Office 365

Recently a client of mine received a warning message saying a certain Public Folder was running low on space and they needed to delete some items.


This is the standard message you get from Exchange/Office 365 if your mailbox is running out of space etc, however with this being Office 365, I would have thought this limit would be much larger (or at least the client wouldn't have encountered this message for a period of time).

I logged into Office 365 and checked the Public Folder settings to make sure nothing was explicitly set, and that they were just getting the default quotas.


Whilst you can simply change the storage quotas section to not use the organisation quota defaults, this wasn't really practical as this client had about 15 different Public Folders.  It was much easier to just change the entire organisation's quota defaults and have it affect all the Public Folders.

In order to change this, you will need to do the following:

1. Sign into Office 365 through PowerShell
Note: this links to a previous blog post of mine which goes through how to sign into O365 using PS
2. Type the following command to find out what the current warning and prohibit quotas are set to:

Get-OrganizationConfig -DefaultPublicFolderIssueWarningQuota,DefaultPublicFolderProhibitPostQuota


As you can see here, the warning message is set to 1.7GB, and the prohibit message is set to 2GB. Neither of which is really acceptable. 

I changed this to warn at mailbox size 45GB, and prohibit at mailbox size 49GB.  This will mean that they will not have to worry about this filling up for a long period of time.

In order to do this, I typed two commands:


  1. Set-OrganizationConfig -DefaultPublicFolderProhibitPostQuota 49GB
  2. Set-OrganizationConfig -DefaultPublicFolderIssueWarningQuota 45GB
You can see in the below screenshot that after doing this, I then ran the Get-OrganizationConfig again to confirm the limits.