This blog post has been created as I have recently needed to upload hundreds of Mail Contacts into Office 365.
1. Create a CSV file which has the following columns:
ExternalEmailAddress,Name,FirstName,LastName
2. Populate the CSV file with the required contents. Name will be their Display Name, so there cannot be any spaces etc. Usually with this I will populate the FirstName & LastName and then have the following for Name:
=C2&D2
This will combine the first name and the last name and remove any spaces etc. Then just drag this down for all the users and it will populate for everyone.
3. Save this file as ImportContacts.csv
4. Open PowerShell ISE and add the following contents
(change the bold section to reflect where you've saved your ImportContacts CSV file).
#Connect To Exchange Online
$UserCredential = Get-Credential
$Session = New-PSSession -ConfigurationName Microsoft.Exchange -ConnectionUri https://outlook.office365.com/powershell-liveid/ -Credential $UserCredential -Authentication Basic -AllowRedirection
Import-PSSession $Session
#Function to pick the CSV File
Function Get-FileName($initialDirectory)
{
[System.Reflection.Assembly]::LoadWithPartialName(“System.windows.forms”) |
Out-Null
$OpenFileDialog = New-Object System.Windows.Forms.OpenFileDialog
$OpenFileDialog.initialDirectory = $initialDirectory
$OpenFileDialog.filter = “All files (*.*)| *.*”
$OpenFileDialog.ShowDialog() | Out-Null
$OpenFileDialog.filename
} #end function Get-FileName
#Command To Launch Function and store it in the variable
$PathToCSV = Get-FileName -initialDirectory "C:\Users\adam.arkwright\Desktop\ImportContacts.csv"
#Commands to import CSV file to contacts then export the contact list for comparison
Import-Csv $PathToCSV | %{New-MailContact -Name $_.Name -DisplayName $_.Name -ExternalEmailAddress $_.ExternalEmailAddress -FirstName $_.FirstName -LastName $_.LastName}
Get-MailContact | Select DisplayName,ExternalEmailAddress,FirstName,LastName | Out-GridView
Get-MailContact | Select DisplayName,ExternalEmailAddress | Export-Csv "C:\Users\adam.arkwright\Desktop\ExportedContacts.csv"
5. Save this as ImportContacts.ps1 somewhere easily accessible.
6. Open PowerShell as administrator and run ImportContacts.ps1
This will then ask you for your Office 365 Username and Password. Make sure you use the administrator credentials. If there's any issues, you may find a File Explorer windows pop up. If this happens, simply navigate to where you've saved the .csv file and double click on it. Then it will go through and start importing all the contents into your Office 365 tenant.
21 February 2017
17 February 2017
Windows 10 | Connect to wireless automatically before logging in
A client of mine had a MS Surface running Windows 10. They were almost 100% wireless and kept running into issues where they'd login to their profile and then it would connect to the wireless. That's not usually a problem, however in this case it was a roaming profile and caused some issues with connectivity.
To get around this, I was able to save the credentials prior to logging in, which allowed the Surface to connect to the Wireless before they actually go through the login process, and ensure that it has access to a Domain Controller.
Click on the 'WiFi' option from Network Settings
Select User Credentials then click Save Credentials. It will then ask you to type in a username and password which it will then use to authenticate against the wireless prior to logging in.
To get around this, I was able to save the credentials prior to logging in, which allowed the Surface to connect to the Wireless before they actually go through the login process, and ensure that it has access to a Domain Controller.
Click on the 'WiFi' option from Network Settings
Click Wireless Properties
Click Advanced Settings
Note: this isn't a scalable solution, and merely designed to get one or two users up and running on wireless devices. This will cause problems if the user's password expires as well.
For a scalable solution, you will need to use Group Policy and define a Service Account username and password.
24 January 2017
Set passwords to never expire | Office 365
Whilst the majority of Office 365 users would have DirSync configured so users will be using their Active Directory user accounts & passwords, some businesses will be using the cloud user accounts, which have their passwords expire.
It's very simple to configure all cloud O365 accounts to have their passwords never expire, which will especially stop the inconvenience of having to update admin accounts etc.
To do this, you will need to log into Office 365 through PowerShell. You will also need to do the second part of the attached blog by connecting to the MSOL service.
Once you've done that, use the following command:
Get-MSOLUser | Set-MSOLUser -PasswordNeverExpires $true
22 January 2017
Office 365 Published Calendar | Publish Date Range | Extend Past 6 Months
I recently had a client who uses an Office 365 calendar to show up on a website of theirs. This was to make a certain calendar publicly available to everyone. They realised that the calendar on their WordPress website was only showing six months ahead of time, and didn't show anything further than that.
This can be changed to a maximum of 12 months ahead of time for viewing calendar items, which I think is sufficient for a publicly available calendar (published calendar). In order to find out the current setting, you will need to do this through PowerShell with the following command:
Get-MailboxCalendarFolder -Identity <EmailAddress>:\calendar
The field you're looking for is PublishDateRangeTo. In the screenshot above, it shows the already changed field. By default, this is set to SixMonths.
This explains why your published calendar suddenly goes blank after exactly six months. In order to change this, you will need to use the following command:
Set-MailboxCalendarFolder -Identity <EmailAddress>:\calendar -PublishDateRangeTo OneYear
Once you have done this, use the following command to double-check and make sure it's showing the correct setting now.
Get-MailboxCalendarFolder -Identity <EmailAddress>:\calendar
This can be changed to a maximum of 12 months ahead of time for viewing calendar items, which I think is sufficient for a publicly available calendar (published calendar). In order to find out the current setting, you will need to do this through PowerShell with the following command:
Get-MailboxCalendarFolder -Identity <EmailAddress>:\calendar
The field you're looking for is PublishDateRangeTo. In the screenshot above, it shows the already changed field. By default, this is set to SixMonths.
This explains why your published calendar suddenly goes blank after exactly six months. In order to change this, you will need to use the following command:
Set-MailboxCalendarFolder -Identity <EmailAddress>:\calendar -PublishDateRangeTo OneYear
Once you have done this, use the following command to double-check and make sure it's showing the correct setting now.
Get-MailboxCalendarFolder -Identity <EmailAddress>:\calendar
If you check your published calendar, you will see that it now shows 12 months worth of events.
18 January 2017
Configure SMTP Relay from On-Prem to Office 365
The following steps will guide you through creating a SMTP relay on a server which will allow you to use the Scan to Email functionality on printers/copiers etc, relaying through Office 365.
This is probably the easiest way to get devices emailing out once you've migrated to Office 365.
1. Find a server that you're going to use as the SMTP Relay, go to Server Manager and then Add Roles and Features
2. From Server Manager, click on Tools, then IIS 6.
If you haven't installed this yet, please do so
3. Expand the serer name, right click on SMTP Virtual Server #1 and click on Properties
4. Click Access tab, then Relay. Then select either specific IPs or select "All except the list below".
This is probably the easiest way to get devices emailing out once you've migrated to Office 365.
1. Find a server that you're going to use as the SMTP Relay, go to Server Manager and then Add Roles and Features
2. From Server Manager, click on Tools, then IIS 6.
If you haven't installed this yet, please do so
3. Expand the serer name, right click on SMTP Virtual Server #1 and click on Properties
4. Click Access tab, then Relay. Then select either specific IPs or select "All except the list below".
5. Click the Delivery tab, then click Outbound Security, tick Basic Authentication, then enter a username and password of an Office 365 mailbox. This is used for authentication with your Office 365 tenant.
6. Make sure TLS Encryption has been ticked
7. Click Delivery, then Advanced, then enter smtp.office365.com as the Smart Host address.
That is all you need to do to get the SMTP Relay up and running. To test this is rather easy as well, and it's highly recommended that you test it before configuring devices to send through this relay service.
Test Relay Service
1. Create a new Notepad document with the following contents
FROM:
scantoemail@domain.com (same as the mailbox you're authenticating with)
TO:
adam@mydomain.com (email you're sending the test to)
SUBJECT: Test email
Save this as Email.txt. Copy this .txt file to C:\inetpub\mailroot\Pickup. It should immediately disappear as it's picked up and sent through the relay.
If this arrives in your mailbox, then it's all up and running. Just make sure that when you're configuring printers etc, the send 'from' address needs to be the same address that you're authenticating with on the SMTP Relay server. If the emails don't match up, it will error out and won't send. You can setup the devices to send anonymously as well, and the authentication is done on the SMTP Relay server side.
13 January 2017
Assign License via PowerShell | Office 365 | Script
Thanks to my colleague Gareth Harris for this script.
I have recently been running a few large-scale (1000+ mailboxes) and I've had to rely on scripts for assigning licenses and converting mailboxes to shared mailboxes etc.
This blog will cover the script to assign a specific Office 365 license to multiple users, based on their UPN.
I have recently been running a few large-scale (1000+ mailboxes) and I've had to rely on scripts for assigning licenses and converting mailboxes to shared mailboxes etc.
This blog will cover the script to assign a specific Office 365 license to multiple users, based on their UPN.
- Create a folder on your machine called "Office 365"
- Create a CSV file with the header of "UserPrincipalName" and then fill the column up with the UPNs of the mailboxes/accounts that you wish to convert to Shared Mailboxes. Save this as license.csv
- Open Notepad and add the following contents:
$AccountSkuId = "<tenantname>:STANDARDWOFFPACK_IW_faculty"
$UsageLocation = "AU"
$Users = Import-Csv "C:\Folder\SubFolder\Office 365\License.csv"
$Users | ForEach-Object {
Set-MsolUser -UserPrincipalName $_.UserPrincipalName -UsageLocation $UsageLocation
Set-MsolUserLicense -UserPrincipalName $_.UserPrincipalName -AddLicenses $AccountSkuId
} - Save this file as "AssignOfficeLicense.ps1"
To find out the AccountSkuId, you can use the following Cmdlet:
Get-MsolAccountSku
Simply copy the entire line of the license you want, and paste that here:
Log into Office 365 through PowerShell. You can follow this blog post to be able to do that. You will also need to use the final cmdlet in that post to connect to MSOL.
Navigate to the Office 365 folder and then run the .ps1 file with the following command:
.\AssignOfficeLicense.ps1
That will then go ahead and start assigning all the Office licenses to the mailboxes that you have mentioned in the CSV file.
Thanks to my colleague Gareth Harris for this script.
Convert to Shared Mailbox | Office 365 | Script
Thanks to my colleague Gareth Harris for this script.
I have recently been running a few large-scale (1000+ mailboxes) and I've had to rely on scripts for assigning licenses and converting mailboxes to shared mailboxes etc.
This blog will cover the script to convert mailboxes to a Shared Mailbox, and then remove any associated Office 365 licenses with that user.
I have recently been running a few large-scale (1000+ mailboxes) and I've had to rely on scripts for assigning licenses and converting mailboxes to shared mailboxes etc.
This blog will cover the script to convert mailboxes to a Shared Mailbox, and then remove any associated Office 365 licenses with that user.
- Create a folder on your machine called "Office 365"
- Create a CSV file with the header of "UserPrincipalName" and then fill the column up with the UPNs of the mailboxes/accounts that you wish to convert to Shared Mailboxes. Save this as license.csv
- Open Notepad and add the following contents:
Import-csv "C:\Folder\SubFolder\Office 365\License.CSV" | foreach {
$UPN = $_.userPrincipalName
Set-Mailbox $UPN -Type “Shared”
$MSOLSKU = (Get-MSOLUser -UserPrincipalName $UPN).Licenses[0].AccountSkuId
} - Save this file as "ConvertToShared.ps1"
Once you have done this, you will need to sign into Office 365 through PowerShell. To do this, you can head over to this blog and follow the steps here.
Once you've done this, change your directory to the 'Office 365' folder that you had created. Then run the 'ConvertToShared.ps1' file.
.\ConvertToShared.ps1
This will then start the process of converting the mailboxes to 'Shared', and will also remove the licenses if there were any assigned.
Thanks to my colleague Gareth Harris for this script.
Sign into Office 365 | PowerShell
The following commands are used to sign into the PowerShell side of Office 365. This is mainly for my use as I have to keep Googling where to find it.
$UserCredential =
Get-Credential
$Session =
New-PSSession -ConfigurationName Microsoft.Exchange -ConnectionUri https://outlook.office365.com/powershell-liveid/
-Credential $UserCredential -Authentication Basic -AllowRedirection
Import-PSSession
$Session
If you need to use the MSOL commands, you will need to sign into that too, which you can use the following command:
Connect-MsolService
-Credential $UserCredential
04 January 2017
Stop Server Manager from showing at logon | RDS
I recently configured a new RDS solution for a client where Server Manager was always popping up when logging in. I didn't want this to happen for users, so I needed to make the required registry change for this to no longer happen:
Computer\HKEY_LOCAL_MACHINE\SOFTWARE\Microsoft\ServerManager
There should already be a DWORD called DoNotOpenServerManagerAtLogon which is set to Decimal: 0. Simply change this over to Decimal: 1 (as opposed to Hexadecimal: 1) to stop this from happening again.
You will still be able to open up Server Manager, however this won't appear automatically when logging in.
If you require IT Support in the Perth area, contact Winthrop Australia
Computer\HKEY_LOCAL_MACHINE\SOFTWARE\Microsoft\ServerManager
There should already be a DWORD called DoNotOpenServerManagerAtLogon which is set to Decimal: 0. Simply change this over to Decimal: 1 (as opposed to Hexadecimal: 1) to stop this from happening again.
You will still be able to open up Server Manager, however this won't appear automatically when logging in.
If you require IT Support in the Perth area, contact Winthrop Australia
An Access-Request message was received from RADIUS client x.x.x.x with a Message-Authenticator attribute that is not valid
A client of mine recently had Enterprise Wireless (PEAP) wireless configured which connects to a NPS server to authenticate users connecting up. People had issues connecting to the wireless after a new Domain Controller was brought online.
Checking the Event Logs, I found the following error:
This indicates that the Shared Secret between the Access Point and what's configured on the NPS (usually a DC) is not the same. In order to get around this, I checked the settings of each Access Point and updated the Shared Secret.
Once you've done this, log into each access point and update the Shared Secret on to ensure that it's the same. Once you've done this, the access points should communicate with the DC (or NPS) successfully.
Winthrop Australia provides IT Support in Perth.
Checking the Event Logs, I found the following error:
This indicates that the Shared Secret between the Access Point and what's configured on the NPS (usually a DC) is not the same. In order to get around this, I checked the settings of each Access Point and updated the Shared Secret.
Once you've done this, log into each access point and update the Shared Secret on to ensure that it's the same. Once you've done this, the access points should communicate with the DC (or NPS) successfully.
Winthrop Australia provides IT Support in Perth.
31 December 2016
Poor Network Performance | Network Shares (Server 2012 R2)
I was recently doing some work for a client where they had noticed that the network performance from their workstations to the File Server was rather poor. When transferring data to the File Servers (and any other shares on the Virtual Host), it was very slow.
All the VMs were either Server 2016 or 2012 R2, and it was running on a Virtual Host which was Server 2012 R2. The Server was a Lenovo x3650 m5. All the NICs were Broadcom and the drivers were fully up to date.
After looking into the issue, I found that some of the settings on the Network Adapters needed to be changed/updated (on the Virtual Host itself) to allow for faster transfer speeds. To do this, I needed to open up each Network Adapter, then click on Configure, then the Advanced tab. Once I did this, I had to set the following options to Disabled:
All the VMs were either Server 2016 or 2012 R2, and it was running on a Virtual Host which was Server 2012 R2. The Server was a Lenovo x3650 m5. All the NICs were Broadcom and the drivers were fully up to date.
After looking into the issue, I found that some of the settings on the Network Adapters needed to be changed/updated (on the Virtual Host itself) to allow for faster transfer speeds. To do this, I needed to open up each Network Adapter, then click on Configure, then the Advanced tab. Once I did this, I had to set the following options to Disabled:
- TCP/UDP Checksum Offload (IPv4)
- TCP/UDP Checksum Offload (IPv6)
- Large Send Offload V2 (IPv4)
- Large Send Offload V2 (IPv6)
- Virtual Machine Queues
Just remember that when performing these changes, it will drop the network connectivity to the adapter for about 5 seconds. If you're making this change on a live host, it will potentially disrupt network traffic to the VMs and the Host. If you have a NIC Team in place, do this to one Adapter, then wait for it to come back online before doing it to the next one to make sure that network connectivity to the host itself remains active.
After doing this to the NICs in my NIC Team, I tested the network connectivity and it was considerably faster.
28 December 2016
Directory service is missing mandatory configuration information | Server 2008R2
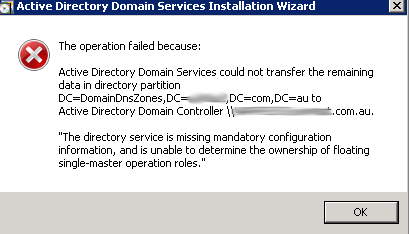
I was recently demoting a Domain Controller as I had upgraded to Server 2016, when I came across the following error message:
What this means is that the fSMORoleOwner is most likely pointing to the server that you're trying to decommission, and of course you can't do this. So what needs to be done is to update this to point to another DC that's active.
First, to confirm this, you will need to go into ADSI Edit. Connect to the following:
What this means is that the fSMORoleOwner is most likely pointing to the server that you're trying to decommission, and of course you can't do this. So what needs to be done is to update this to point to another DC that's active.
First, to confirm this, you will need to go into ADSI Edit. Connect to the following:
Once you've done this, open up DC=Infrastructure:
Look for fSMORoleOwner and check the server name that is referenced here:
In this case, it's showing my new DC, however originally it was showing the DC that I was wanting to decommission. In order to resolve this, I used the following script:
const ADS_NAME_INITTYPE_GC = 3
const ADS_NAME_TYPE_1779 = 1
const ADS_NAME_TYPE_CANONICAL = 2
set inArgs = WScript.Arguments
if (inArgs.Count = 1) then
' Assume the command line argument is the NDNC (in DN form) to use.
NdncDN = inArgs(0)
Else
Wscript.StdOut.Write "usage: cscript fixfsmo.vbs NdncDN"
End if
if (NdncDN <> "") then
' Convert the DN form of the NDNC into DNS dotted form.
Set objTranslator = CreateObject("NameTranslate")
objTranslator.Init ADS_NAME_INITTYPE_GC, ""
objTranslator.Set ADS_NAME_TYPE_1779, NdncDN
strDomainDNS = objTranslator.Get(ADS_NAME_TYPE_CANONICAL)
strDomainDNS = Left(strDomainDNS, len(strDomainDNS)-1)
Wscript.Echo "DNS name: " & strDomainDNS
' Find a domain controller that hosts this NDNC and that is online.
set objRootDSE = GetObject("LDAP://" & strDomainDNS & "/RootDSE")
strDnsHostName = objRootDSE.Get("dnsHostName")
strDsServiceName = objRootDSE.Get("dsServiceName")
Wscript.Echo "Using DC " & strDnsHostName
' Get the current infrastructure fsmo.
strInfraDN = "CN=Infrastructure," & NdncDN
set objInfra = GetObject("LDAP://" & strInfraDN)
Wscript.Echo "infra fsmo is " & objInfra.fsmoroleowner
' If the current fsmo holder is deleted, set the fsmo holder to this domain controller.
if (InStr(objInfra.fsmoroleowner, "\0ADEL:") > 0) then
' Set the fsmo holder to this domain controller.
objInfra.Put "fSMORoleOwner", strDsServiceName
objInfra.SetInfo
' Read the fsmo holder back.
set objInfra = GetObject("LDAP://" & strInfraDN)
Wscript.Echo "infra fsmo changed to:" & objInfra.fsmoroleowner
End if
End if
Create a new VBS file with the above script, and called it "FixFSMO.vbs". Copy this to the desktop of a DC that's active and then run the following command:
cscript fixfsmo.vbs DC=DomainDnsZones,DC=contoso,DC=com
You will also need to run the same command, but for ForestDNSZone.
cscript fixfsmo.vbs DC=ForestDNSZones,DC=contoso,DC=com
Once you've done this, check the ADSI object again and you will notice this has now updated to an active DC. Let this sit for 15 minutes or so to ensure that it syncs to all DCs, and then you should be able to re-run the DCPROMO to demote the Domain Controller.
Migrate DHCP Server to Server 2016
The following process can be followed when you're creating a new Domain Controller, and you'd like to migrate DHCP settings from an old DC to a new one.
I have done this from Server 2008R2 to Server 2016, however this can be used from 2008 to 2016.
- Log in to the old (existing) Domain Controller running DHCP
- Open up an Administrative Command Prompt
- Type the following:
netsh dhcp server export C:\Users\<username>\Desktop\dhcp.txt all - Copy the .txt file over to the desktop of the new DC
- Open up an Administrative Command Prompt
- Type the following:
netsh dhcp server import C:\Users\<username>\Desktop\dhcp.txt all - Open DHCP on the new 2016 server. You will notice all the settings have now been migrated (including reservations and leases)
Once you've done this, you will then need to authorise the new DC and unauthorise the old DC. This should happen automatically when you authorise the new DC, however make sure you double check this on the old one.
To be on the safe as once you've done this, make sure you disable the DHCP Server service on the old DC. This will ensure it does not start again if you were to reboot the server.
If you require IT Support in Perth, contact Winthrop Australia
Enable Split Tunnelling | Windows 10 VPN
In older versions of Windows (eg 7/8.1 etc) you were able to enable Split Tunnelling by removing the default gateway IP address from the IPv4 settings of a VPN's properties. This is now not available on Windows 10 and you can't actually click on the IPv4 properties.
In Windows 10, you now need to enable Split Tunnelling through PowerShell. It is done with a simple command:
Set-VPNConnection "VPN Name" -SplitTunneling $true
To verify that this was successful, you can type the following command to get the details of your VPN connection:
Get-VPNConnection
Winthrop Australia can supply all your IT Support needs in Perth, and most of Australia
In Windows 10, you now need to enable Split Tunnelling through PowerShell. It is done with a simple command:
Set-VPNConnection "VPN Name" -SplitTunneling $true
To verify that this was successful, you can type the following command to get the details of your VPN connection:
Get-VPNConnection
Winthrop Australia can supply all your IT Support needs in Perth, and most of Australia
21 December 2016
SMTP Relay Not Sending Mail
We have a SMTP Relay configured on a client's server to relay mail from on-prem to their Office 365 tenant. This allows Scan to Email functionality from printers etc.
Recently a client told me that they're trying to scan to email but it's failing for them. I created a test email.txt file which was to just send a simple email. I put this file in the 'Pickup' folder, and it just stayed there. Usually it's picked up immediately and relayed.
I checked the services and noticed that the Simple Mail Transfer Protocol (SMTP) service was stopped, and for some reason it was set to 'Manual'. A quick manual start and then changing this to 'Automatic' resolved the issue for me.
If you require IT Support or Consultancy, contact Winthrop Australia
15 December 2016
Missing Application in Task Sequence | SCCM 2012
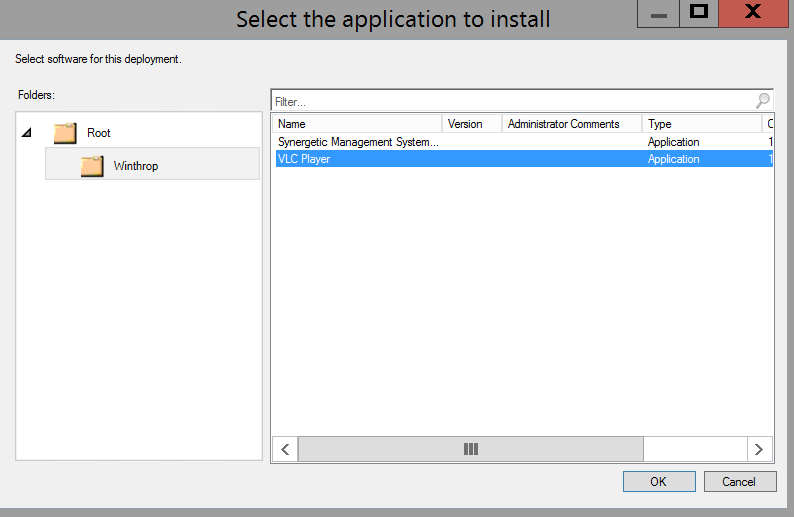
Recently a client of mine was trying to add an application to be installed as part of the 'Install Application' sequence within an Operating System Deployment Task Sequence. They were able to find many applications that were available, however they couldn't see this particular one (in this case it was VLC).
The application was showing up under Apps:
When adding it into the Task Sequence, there was no error messages, it was just not there:
To resolve this, go into the application itself, click on the Deployment Type tab, then click User Experience and make sure its set to Logon Requirement: Whether or not a user is logged in.
The application was showing up under Apps:
When adding it into the Task Sequence, there was no error messages, it was just not there:
To resolve this, go into the application itself, click on the Deployment Type tab, then click User Experience and make sure its set to Logon Requirement: Whether or not a user is logged in.
Once you've done this, it will allow you to see the app and choose to add it into the Task Sequence.
12 December 2016
Enable Multicast | SCCM 2012
This is a quick post to show you how to enable Multicast deployments through SCCM 2012.
Once you have done that, you will need to enable the multicast distribution for any packages/operating systems you may have. To do this, do the following:
It is not recommended that you enable Multicast when using SCCM. This has been known to cause issues with the WDS service constantly crashing.
Winthrop Australia provides some of the best IT Support in Perth. Contact us today to find out how we can help you.
- Click Administration
- Click Servers and Site System Roles
- Click on the SCCM server
- Double-click on Distribution Point
- Tick the Enable Multicast option
Once you have done that, you will need to enable the multicast distribution for any packages/operating systems you may have. To do this, do the following:
- Click on Software Library
- Click on the folder where you've saved your packages or operating systems
- Right-click on the Operating System or Package and click on Properties
- Click on Distribution Settings
- Tick Allow this package to be transferred via Multicast
It is not recommended that you enable Multicast when using SCCM. This has been known to cause issues with the WDS service constantly crashing.
Winthrop Australia provides some of the best IT Support in Perth. Contact us today to find out how we can help you.
Disable Yammer for all users | Office 365
I recently did an Office 365 migration where our client was using E3 licenses. This includes a Yammer subscription, which they were not interested in using at this stage. I was asked to disable this service for all users.
To do this, I did the following:
Get-MsolAccountSku | Format-List –property accountskuid,activeunits,consumedunits
This will show you which license pack you're currently using:
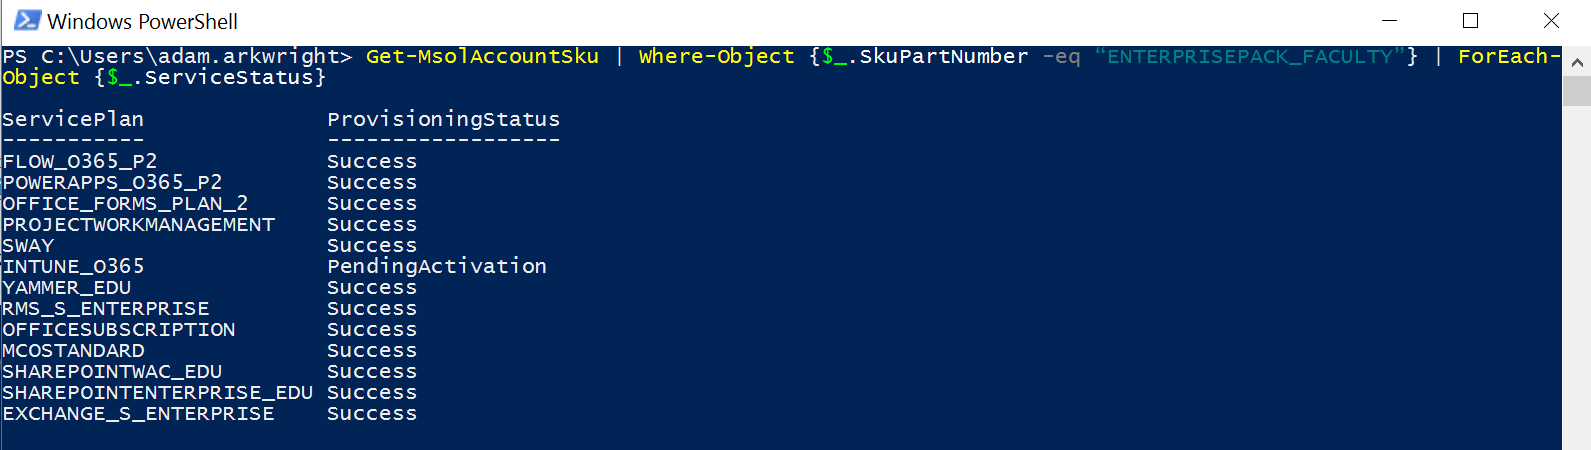
Get-MsolAccountSku | Where-Object {$_.SkuPartNumber -eq “ENTERPRISEPACK_FACULTY”} | ForEach-Object {$_.ServiceStatus}
This shows the license packs that are available for this particular O365 License:
In this case we're wanting to disable "Yammer_EDU".
Type the following:
$x
= New-MsolLicenseOptions -AccountSkuId “AccountSKUID:ENTERPRISEPACK_FACULTY”
-DisabledPlans “YAMMER_EDU”
Note: the bold section is the AccountSKUID which has been blurred out in this case, but can be found here:
To apply this to all users who have a current O365 license, type the following:
Get-MsolUser -all | Where-Object {$_.isLicensed -eq $True} | Set-MsolUserLicense -LicenseOptions $x
This will take ~5 minutes or so depending on the amount of users you have in your Tenant, however once this has completed, you will notice that the Yammer license is now set to 'off'.
09 December 2016
WSUS Not Downloding Updates
I recently had a client who had WSUS setup on Server 2016. It was trying to downloading some updates after a synchronisation, but it would freeze at 100% and not go any further.
Synchronisations were fine, and it would download the data that's required, however these 5 updates would just sit there. Checking Event Logs, I saw the following error:
After running the following command I found the following event
"C:\Program Files\Update Services\Tools\WsusUtil.exe CheckHealth"
It looks like the particular file it's trying to download is corrupt. Checking WSUS to find out what the update is, KB3172989 is actually a CU for Server 2016 Technical Preview. In this case, it's not needed so it was declined through WSUS. After doing this, I did a search for all the Technical Preview updates, and declined them as well. After running a Synchronisation again, it worked well.
07 December 2016
Exchange 2007 Uninstall Hanging on 'Remove Exchange Files'
I was recently decommissioning an Exchange 2007 server for a client. When I was going through the installation process, I noticed that it was hanging at the 'Remove Exchange Files' section.
After giving it sufficient time to complete on it's own, I had to go into the Task Manager to stop the PowerShell.exe task.
Simply end the process and PowerShell.exe will start back up immediately. Once that has done, take a look at the Exchange installation process, and you will notice that it will complete within about 15 seconds or so of stopping this process.
23 November 2016
ExportO365UserInfo.ps1 | You cannot call a method on a null-valued expression
Recently I was performing an Office 365 migration for a client who's on premise Exchange environment was 2007. Once I had migrated the mail boxes, I needed to convert the users to Mail Enabled Users (MEUs). This is explained on Microsoft's website here.
There are two scripts you're required to run. When you're running the first one, which is ExportO365UserInfo.ps1, the MS website states you need to do this from EMS. This is incorrect. If you run this script from EMS, you will get the following error message:
You cannot call a method on a null-valued expression.
At C:\migrace\ExportO365UserInfo.ps1:53 char:52
+ $CloudEmailAddress = $CloudEmailAddress.ToString <<<< ().ToLower(
).Replace('smtp:', '')
+ CategoryInfo : InvalidOperation: (ToString:String) [], RuntimeE
xception
+ FullyQualifiedErrorId : InvokeMethodOnNull
In order to get around this, and to make the scirpt work, simply run this in normal Powershell instead of EMS. It will work well and it will create the required cloud.csv file.
Once you've done that, you can run the second command within EMS for it to work well.
Winthrop Australia provides IT Support and Consultancy in the Perth area.
There are two scripts you're required to run. When you're running the first one, which is ExportO365UserInfo.ps1, the MS website states you need to do this from EMS. This is incorrect. If you run this script from EMS, you will get the following error message:
You cannot call a method on a null-valued expression.
At C:\migrace\ExportO365UserInfo.ps1:53 char:52
+ $CloudEmailAddress = $CloudEmailAddress.ToString <<<< ().ToLower(
).Replace('smtp:', '')
+ CategoryInfo : InvalidOperation: (ToString:String) [], RuntimeE
xception
+ FullyQualifiedErrorId : InvokeMethodOnNull
In order to get around this, and to make the scirpt work, simply run this in normal Powershell instead of EMS. It will work well and it will create the required cloud.csv file.
Once you've done that, you can run the second command within EMS for it to work well.
Winthrop Australia provides IT Support and Consultancy in the Perth area.
21 November 2016
Un-hide users from GAL
Exchange 2007
I am in the middle of running an Office 365 migration and during this migration, it's required that I un-hide the users from the GAL (disabled users) in order for O365 to recognise them and migrate them.
My client wants the disabled user's mailbox migrated and then converted to a Shared Mailbox in order to maintain an archive of the mail. In order to do this, we need a list of all the mailboxes that are hidden, then we can hide them. Once we're done we can use that same list to hide them again.
Generate CSV for all mailboxes hidden from the GAL
Get-Mailbox | Where {$_.HiddenFromAddressListsEnabled -eq $True} | Select Identity, HiddenFromAddressListsEnabled | export-csv c:\HiddenFromGAL.csv
Set $Users parameter
$users = import-csv C:\HiddenFromGAL.csv
Un-hide the hidden users
Foreach($_ in $users) {Set-mailbox $_.identity -HiddenFromAddressListsEnabled $false}
This will then allow you to perform the migration (in this case I am doing a Staged migration) without O365 failing to find the user accounts. Once you're done, simply repeat the last two stages. The final stage, change $False to $True.
Contact Winthrop Australia to find out how we can provide you with IT Support in Perth.
I am in the middle of running an Office 365 migration and during this migration, it's required that I un-hide the users from the GAL (disabled users) in order for O365 to recognise them and migrate them.
My client wants the disabled user's mailbox migrated and then converted to a Shared Mailbox in order to maintain an archive of the mail. In order to do this, we need a list of all the mailboxes that are hidden, then we can hide them. Once we're done we can use that same list to hide them again.
Generate CSV for all mailboxes hidden from the GAL
Get-Mailbox | Where {$_.HiddenFromAddressListsEnabled -eq $True} | Select Identity, HiddenFromAddressListsEnabled | export-csv c:\HiddenFromGAL.csv
Set $Users parameter
$users = import-csv C:\HiddenFromGAL.csv
Un-hide the hidden users
Foreach($_ in $users) {Set-mailbox $_.identity -HiddenFromAddressListsEnabled $false}
This will then allow you to perform the migration (in this case I am doing a Staged migration) without O365 failing to find the user accounts. Once you're done, simply repeat the last two stages. The final stage, change $False to $True.
Contact Winthrop Australia to find out how we can provide you with IT Support in Perth.
Office 365 Migration | Unable to create endpoint | Unable to connect to remote server
I recently was running through an Office 365 Migration (Staged) where I was trying to create the Migration Endpoint. As I was going through the configuration I was getting the following error message:
After manually typing in the details, I got the following message:
This one was a tricky one as I was running the test through the 'Test Exchange Connectivity' website, and it was all passing without issues. So it wasn't an autodiscover issue from what I could see.
After looking into this one for a few hours and not being able to find what the issue could be, I came across an issue with the Autodiscover and IPv6. When I was on the on-prem exchange server and I tried to ping the FQDN, it resolved an IPv6 address, even though this was disabled on the NIC.
To get around this, I had to edit the Hosts file on the server itself to resolve the IPv4 address when I pinged the server name, and hte FQDN. After doing this, when I went through the process to create the new migration point, I was able to get past this point and it discovered the server details automatically.
16 November 2016
WSUS downloads slow | BitsDownloadPriorityForeground
Recently I configured WSUS to download updates (about 150GB worth) and I noticed it was taking a very long time to download. This little tip will save a lot of time waiting for the download to finish.
Run the following command on the WSUS Server in PowerShell:
(get-wsusserver).GetConfiguration().BitsDownloadPriorityForeground
This will show you whether the setting has been enabled or not. We want it to say 'True'.
It will most likely say "False" if you're experiencing slow downloads. Once you've confirmed this, type the following to set this to 'True":
Contact Winthrop Australia to find out how we can help you with your IT Support needs.
Run the following command on the WSUS Server in PowerShell:
(get-wsusserver).GetConfiguration().BitsDownloadPriorityForeground
This will show you whether the setting has been enabled or not. We want it to say 'True'.
It will most likely say "False" if you're experiencing slow downloads. Once you've confirmed this, type the following to set this to 'True":
- $Config = (Get-WsusServer).GetConfiguration()
- $Config.BitsDownloadPriorityForeground = $True
- $Config.Save()
Once you've used these three commands, run the first command again to confirm that this has changed over to 'True'. There's no need to restart the services. You should see that the downloads will speed up now.
Contact Winthrop Australia to find out how we can help you with your IT Support needs.
19 October 2016
PXE Boot | Boot into WinPE then Immediate Restart
I recently came across a little issue where I was PXE Booting a machine into the WinPE environment to start a Task Sequence to image the machine. Once it had loaded and it had passed the "Loading Network Settings" window, it immediately restarted.
The most common cause for this is that you don't have the correct NIC drivers. I rebooted again, then pressed F8 which brought me to a command prompt. Once I was there, I waited until it went past the "Loading Network Settings" page, then ran an IPCONFIG to see whether I got an IP address. In this case I did. That means it wasn't a NIC driver issue.
The next thing to check is the BIOS time. Make sure this is accurate. In my case, this wasn't accurate at all. Once I reset this, I rebooted again into WinPE, and the Task Sequence started without any problem.
A quick 5 second fix could help you save an hour of troubleshooting!
The most common cause for this is that you don't have the correct NIC drivers. I rebooted again, then pressed F8 which brought me to a command prompt. Once I was there, I waited until it went past the "Loading Network Settings" page, then ran an IPCONFIG to see whether I got an IP address. In this case I did. That means it wasn't a NIC driver issue.
The next thing to check is the BIOS time. Make sure this is accurate. In my case, this wasn't accurate at all. Once I reset this, I rebooted again into WinPE, and the Task Sequence started without any problem.
A quick 5 second fix could help you save an hour of troubleshooting!
14 October 2016
OSD Task Sequence Failure | 0x80072EE2 | Network Connectivity Issues
Recently when I was out at a client, they were running OSD (Operating System Deployment) on a particular model of machine (Dell Optiplex 7040) and it started throwing up error messages during the "Download Operating System" step. The error message was 0x80072EE2.
When pressing F8 to check smsts.log, there was nothing there out of the ordinary. The only interesting thing I could see there, was that it hadn't added in the latest log data yet, so as far as it was concerned, there was nothing wrong with the OSD.
I checked my IP, which was fine. I tried pinging the SCCM server (and any other server on the network) and noticed that I was getting a lot of packet loss. This explains the issue that I was getting. Essentially, the network connectivity would be completely find up until a point where it would start getting massive packet loss, and then fail during the download.
I ruled out a physical issue with cabling, patching and the device by trying different network ports on the wall, and also trying different Dell machines (all 7040 however). I received the issue on all of the machines, virtually at the same point in the Task Sequence.
I attempted to inject different drivers into the Boot image, but that didn't help either. I was happy that this wasn't a driver issue, and it wasn't a physical networking issue. The look continues!
I added in three Task Sequence Variables into the beginning of my OSD Task Sequence. The idea behind these was to make the deployment less delicate, and to continuing working through the TS if there's some packet loss etc.
The variables I added are the following:
After adding these TS Variables in there, I restarted the machine and went through the OSD sequence. This time it completed without any issues.
Essentially the issue was that with the drivers and WinPE versions on this particular machine, the NIC was a bit flakey. Packets were dropped etc which originally caused it to fail. These variables just told the Task Sequence to be less particular when it comes to timing out. There will still be that intermittent packet loss when doing the TS, but this time it won't cause it to fail.
When pressing F8 to check smsts.log, there was nothing there out of the ordinary. The only interesting thing I could see there, was that it hadn't added in the latest log data yet, so as far as it was concerned, there was nothing wrong with the OSD.
I checked my IP, which was fine. I tried pinging the SCCM server (and any other server on the network) and noticed that I was getting a lot of packet loss. This explains the issue that I was getting. Essentially, the network connectivity would be completely find up until a point where it would start getting massive packet loss, and then fail during the download.
I ruled out a physical issue with cabling, patching and the device by trying different network ports on the wall, and also trying different Dell machines (all 7040 however). I received the issue on all of the machines, virtually at the same point in the Task Sequence.
I attempted to inject different drivers into the Boot image, but that didn't help either. I was happy that this wasn't a driver issue, and it wasn't a physical networking issue. The look continues!
I added in three Task Sequence Variables into the beginning of my OSD Task Sequence. The idea behind these was to make the deployment less delicate, and to continuing working through the TS if there's some packet loss etc.
The variables I added are the following:
After adding these TS Variables in there, I restarted the machine and went through the OSD sequence. This time it completed without any issues.
Essentially the issue was that with the drivers and WinPE versions on this particular machine, the NIC was a bit flakey. Packets were dropped etc which originally caused it to fail. These variables just told the Task Sequence to be less particular when it comes to timing out. There will still be that intermittent packet loss when doing the TS, but this time it won't cause it to fail.
06 October 2016
SCCM | Editing Object | Cannot edit the object, which is in use by ‘’ at Site ‘’
Recently I have been working on a client's SCCM server, and it has been crashing a lot. The problem with crashing, is that it doesn't update SQL to tell it that the item is no longer in use, therefore it remains 'locked'. This means that if you try to open the object (in this case it's a boot image), it will say "Cannot edit the object, which is in use by <username> at site <sitename>.
You can try to resolve the issue by clicking 'retry edit', but it usually fails.
In order to get around this, there are two SQL queries that you will need to do which will allow you to edit the object immediately. They are the following:
select * from SEDO_LockState where LockStateID <> 0
You can try to resolve the issue by clicking 'retry edit', but it usually fails.
In order to get around this, there are two SQL queries that you will need to do which will allow you to edit the object immediately. They are the following:
select * from SEDO_LockState where LockStateID <> 0
and
DELETE from SEDO_LockState where LockID = ‘<LockID of the record identified in the previous query>’
That's it! Once you've done that, you should be able to go into the ConfigMgr console and open up the object that was previously locked.
Subscribe to:
Posts (Atom)